Need a cozy crochet pumpkin for fall? This easy ribbed pattern creates a plump seasonal decoration with simple stitches, adjustable sizing, and a handmade stem.
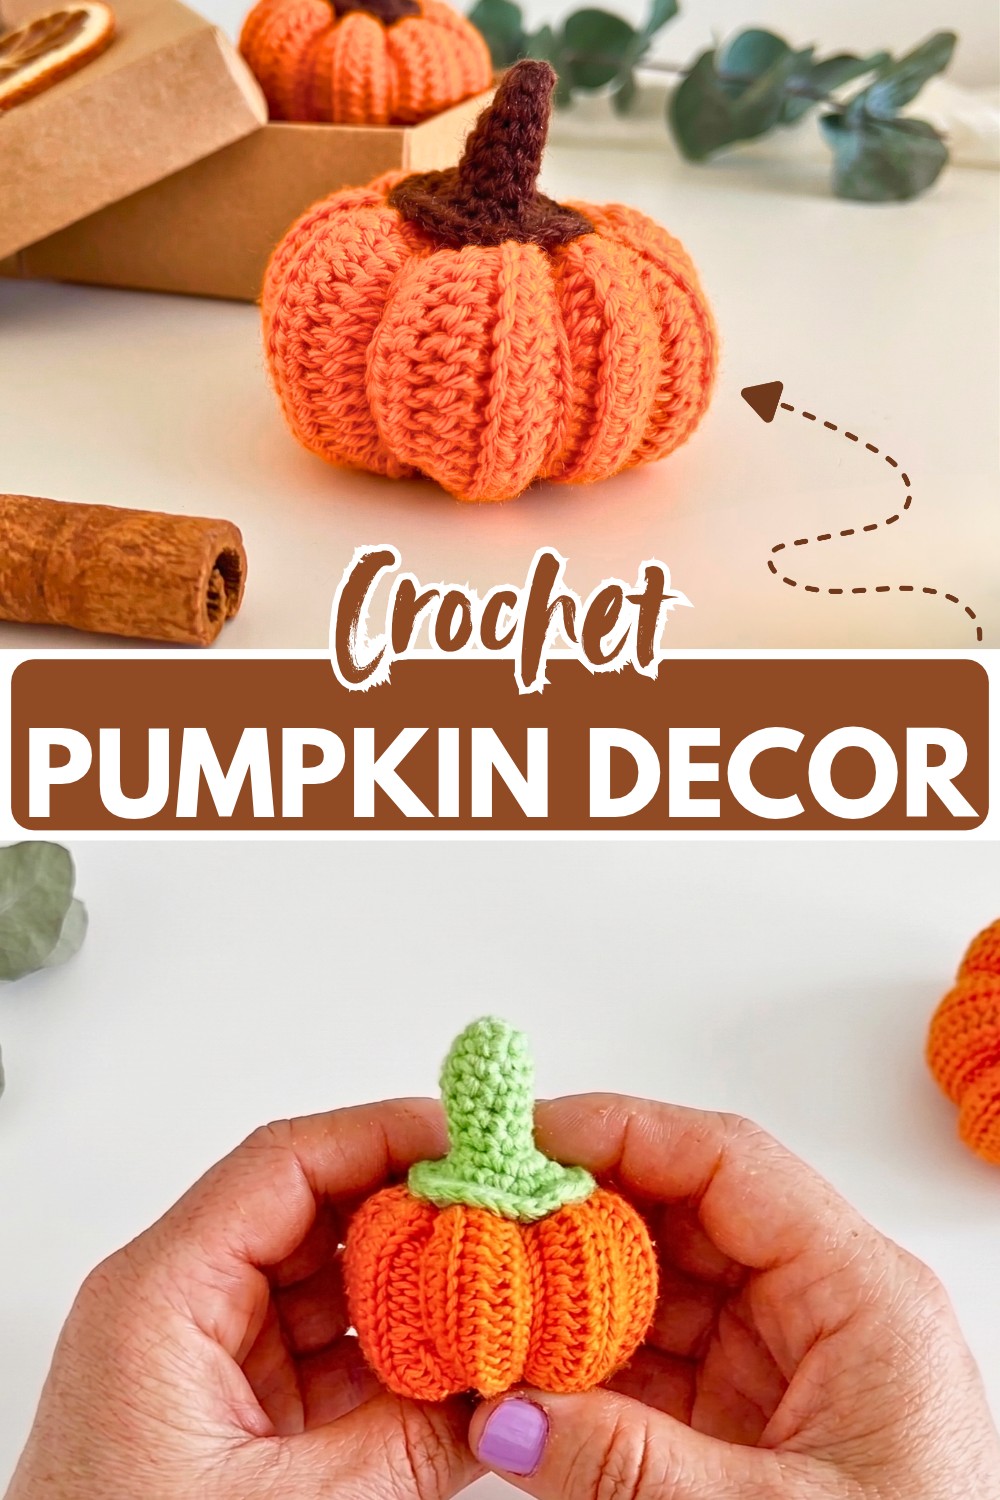
Free Crochet Pumpkin Pattern
Crochet pumpkins are a lovely way to bring the colors and warmth of autumn into your home. This design has a softly ribbed texture that gives the finished crochet pumpkin its rounded appearance, while the simple construction makes it approachable for beginners. Use classic orange yarn for a traditional fall look, or experiment with cream, beige, green, and other seasonal shades.
One of the nicest things about this pattern is that the size can be changed simply by adjusting the starting chain and the number of rows. Once the ribbed rectangle is finished, it is seamed into a tube, stuffed, gathered at both ends, and shaped into pumpkin segments. A crocheted stem completes the decoration and gives it a finished autumn look.
Credit Arakhne- Hand Knitting,Crochet&Housework Atelier
Materials and Tools
Yarn
- Cotton yarn in orange or your preferred pumpkin color
- Green or brown yarn for the stem
Other Supplies
- Fiberfill or polyfill stuffing
- 1.70 mm crochet hook
- Yarn or tapestry needle
- Scissors
Crochet Abbreviations
This pattern uses standard US crochet terminology.
- ch = Chain
- hdc = Half double crochet
- BLO = Back loop only
- sc = Single crochet
- inc = Increase; 2 single crochets in the same stitch
- sl st = Slip stitch
- MR = Magic ring

Step-by-Step Crochet Pumpkin Pattern
Crochet the Pumpkin Body
The pumpkin begins as a simple rectangular piece worked in rows. Working the half double crochet stitches through the back loops creates the raised ribbing that will become the pumpkin’s natural-looking texture.
Row 1: Start by making 25 chains.
Then chain 3 additional stitches to create the turning chain.
Work 1 hdc into the 4th chain from the hook.
Continue working 1 hdc into each remaining chain across. You should have:25 hdc

Row 2: Chain 2 and turn your work.
For this row, work through the back loop only (BLO) of each stitch.
Make 1 hdc in each stitch across. 25 hdc
The back-loop technique will create the ridged texture that gives the finished pumpkin its characteristic appearance.
Rows 3–25: Continue repeating Row 2:Ch 2, turn, 1 hdc in BLO of every stitch across.
Work until you have completed 25 rows in total.
When finished, you should have a ribbed rectangular panel.
Adjusting the Pumpkin Size
The basic medium pumpkin begins with 25 chains and 25 rows, but you can easily change the dimensions.
For a smaller pumpkin, you can use approximately 15 chains and 15 rows.
For a larger version, try 35 or 45 chains and the same number of rows.
Keeping the starting chain and row count matched helps maintain a balanced shape. Remember that changing the yarn or hook can also affect the final dimensions.

Seam the Pumpkin Body
Lay the ribbed rectangle flat and fold it in half so that the short edges meet.
Join the two short edges together using slip stitches, or sew them together with a yarn needle.
Work carefully from one end to the other, joining the corresponding stitches along the edge.
Once the seam is complete, fasten off but leave a long yarn tail. You will need this tail for gathering and shaping the pumpkin.
The rectangle should now form a hollow tube.
Close the Bottom
Thread the long yarn tail onto a tapestry needle.
At one end of the tube, weave the needle in and out around the opening, passing through the stitches near the edge.
Once you have worked around the entire opening, pull the yarn firmly.
The stitches will gather together and close the bottom of the pumpkin.
Knot the yarn securely so the opening stays closed.
Turn the piece right-side out so the ribbed texture is visible on the outside.

Add the Fiberfill
Fill the pumpkin with fiberfill or polyfill stuffing.
Add the stuffing gradually, distributing it throughout the body as you work.
For a fuller pumpkin, add enough stuffing to give it a plump, rounded appearance. Avoid compressing the fiberfill too tightly, because you will still need to gather and shape the top.
Leave enough flexibility in the center to make the pumpkin ridges later.
Gather the Top
Thread your yarn needle again and weave the yarn in and out around the upper opening of the pumpkin.
Pull the yarn gradually to gather the opening closed.
Before tightening it completely, check that the stuffing is evenly distributed and that the pumpkin has a rounded shape.
Pull the yarn firmly until the top closes.
Do not trim the yarn yet. The remaining tail will be used to create the pumpkin’s characteristic sections.

Shape the Pumpkin Ridges
This step transforms the simple stuffed shape into a recognizable pumpkin.
Pass the needle down through the center of the pumpkin, bringing it out through the bottom.
Pull the yarn firmly enough to slightly compress the pumpkin.
Then bring the needle back up toward the top.
Next, wrap the yarn around the outside of the pumpkin along one of the raised ribbed sections. Insert the needle back through the center and pull firmly.
This creates an indentation between two pumpkin sections.
Continue working around the pumpkin in the same way, creating approximately 6–7 sections.
Try to keep the spacing between the sections as even as possible. Pull the yarn with similar tension each time so the pumpkin develops a balanced shape.
When all the ridges have been formed, secure the yarn at the base and trim the excess.
Crochet the Pumpkin Stem
The stem is worked separately in rounds.
Use green or brown yarn, depending on the look you want.
Round 1: Create a magic ring. Work 4 sc into the ring. Join to the first sc with a sl st.[4 sts]
Round 2: Work an increase in each stitch around. This gives you:[8 sts]. Join with a slip stitch.
Rounds 3–7: Chain 1. Work 1 sc into each of the 8 stitches around. Join each round with a slip stitch.[8 sts per round]Repeat for a total of 5 rounds.
Round 8: Chain 1. Work an increase in each of the 8 stitches around.[16 sts] Join with a slip stitch.
Round 9: Chain 1 and work 1 sc into each stitch around.[16 sts] Join with a slip stitch.
Round 10: Chain 1. Work an increase in each of the 16 stitches around.[32 sts] Join with a slip stitch.
Fasten off and leave a long yarn tail for attaching the stem to the pumpkin.
Attach the Stem
Place the flared base of the stem over the gathered center at the top of the pumpkin.
Use the long yarn tail from the stem and a yarn needle to sew the flared edge securely around the center.
Work around the entire base of the stem so that it sits firmly against the pumpkin.
Once the stem is secure, weave in the remaining yarn end and trim away any excess.

Tips for a Well-Shaped Crochet Pumpkin
- Keep your hdc stitches consistent throughout the rectangular panel.
- Remember that Rows 2–25 are worked in BLO to create the ribbed texture.
- Add stuffing gradually so you can control the firmness of the pumpkin.
- Before creating the ridges, make sure the stuffing is evenly distributed.
- Use similar tension for each ridge so the pumpkin sections remain balanced.
- Leave long yarn tails where specified because they are needed for assembly and shaping.
- When attaching the stem, sew around its entire flared edge for a secure finish.
Fall Color Ideas
Orange is an obvious choice for a traditional pumpkin, but this pattern works beautifully with other autumn-inspired shades.
Try:
- Warm orange for a classic Halloween pumpkin
- Cream for a soft farmhouse look
- Beige for neutral fall décor
- Muted green for an unusual pumpkin
- Brown or green for a rustic-looking stem
You can also make several pumpkins in different colors and sizes to create a coordinated seasonal display.
Where to Display Your Crochet Pumpkin
Once finished, this handmade pumpkin can add a warm autumn touch to many areas around the home.
Place it on:
- A dining table
- A mantel
- A bookshelf
- A coffee table
- A seasonal centerpiece
- A Halloween display
- A fall-themed entryway
Smaller versions can also be grouped with other autumn decorations for a layered seasonal arrangement.
Final Finishing
Give the pumpkin a final check once the stem has been sewn into place. Make sure the gathered ends are secure, the ridges are evenly distributed, and all loose yarn ends have been woven in.
The combination of ribbed texture, rounded shaping, and a simple crocheted stem gives this pumpkin a cozy handmade appearance that works throughout the fall season. Make one in classic orange for Halloween, or create several sizes and colors for a softer autumn display.