Transform your crochet skills into something both unique and adorable! The Crochet Crybaby Alice Halloween pattern gives you the opportunity to create a cute character that’s perfect for the spooky season. With her oversized head and classic Alice-inspired style, this creation stands out as both charming and playful. It’s perfect for Halloween décor, a thoughtful gift, or even a cuddly collectible to cherish all year round.
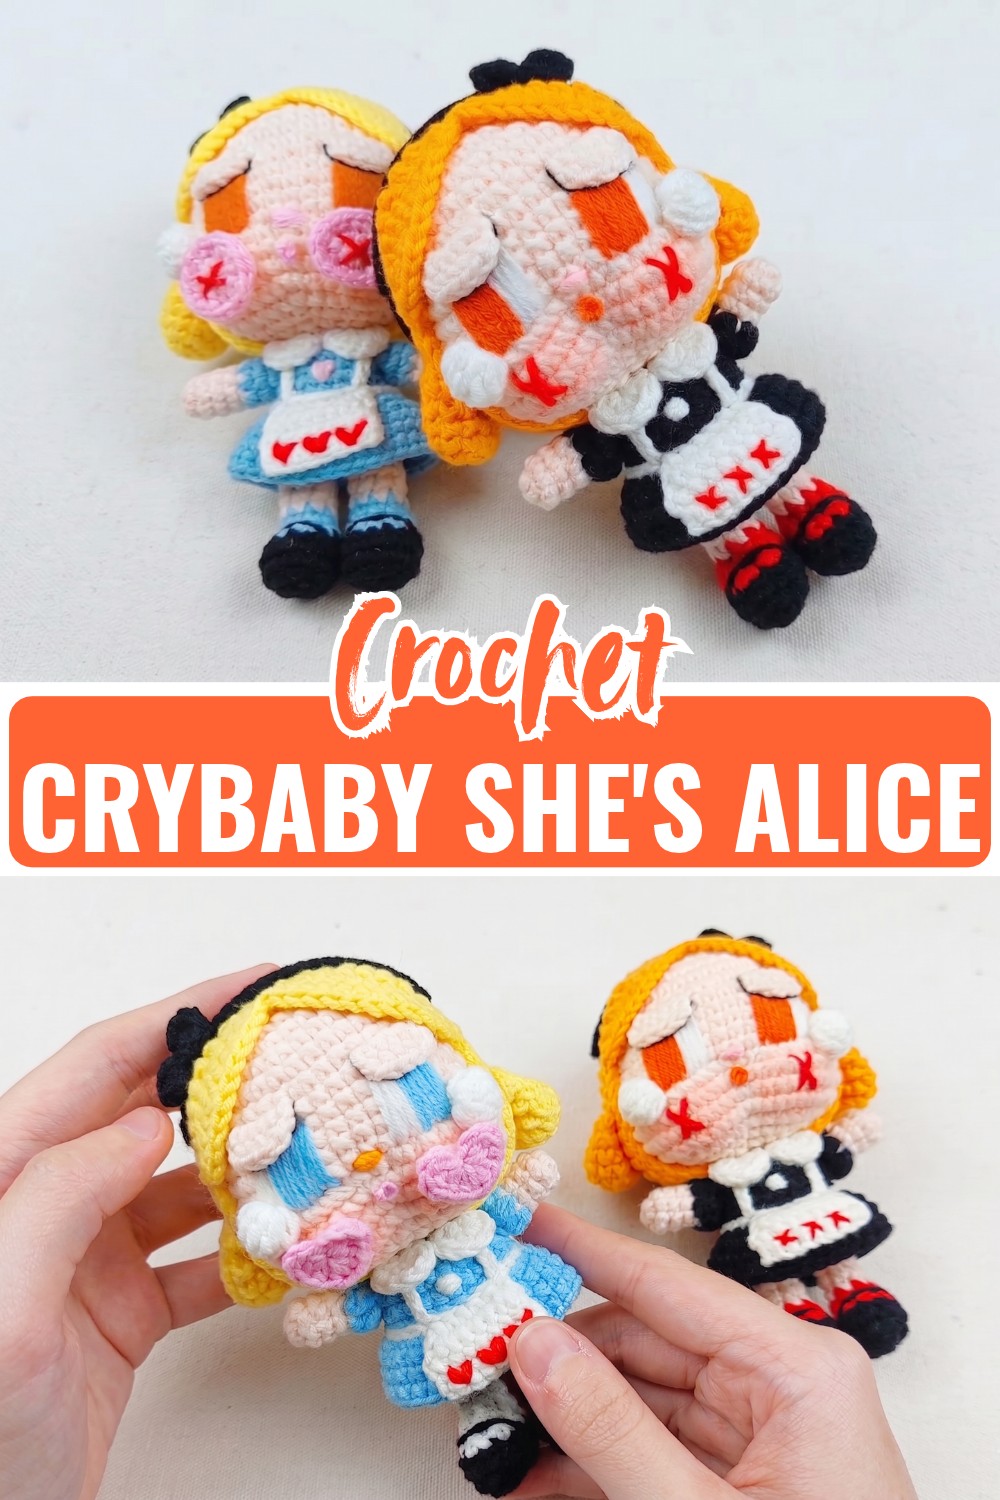
Crochet Crybaby Alice Halloween Pattern
This pattern is beginner-friendly and works great if you’d like to start making small amigurumi dolls. You’ll learn fun techniques using crochet hooks and yarn to bring Crybaby Alice to life, including her tiny yet detailed features. Whether you’re creating her for festive decoration or as a children’s gift, she’s bound to make people smile.
Credit Nhi Art Handmade – Lem’n Do
Materials & Tools
- Sport or 4-ply cotton yarn:
- Skin tone or beige for the head, arms, and legs
- Baby blue for the dress
- White for the apron, socks, and eye details
- Light yellow for the hair
- Black for the shoes and headband
- Light blue or translucent material for the teardrops
- Crochet hook: 2.0 mm or 2.5 mm
- Safety eyes: 10 mm, or black felt if preferred
- Fiberfill stuffing
- Tapestry needle
- Sewing pins
- Stitch markers
- Scissors
- Fabric glue or hot glue, if needed
- Pink blush or soft pastel for the cheeks
Finished Size
The finished Crybaby Alice doll is approximately 14–16 cm (5.5–6.5 inches) tall when made with the suggested yarn and hook size. Your final size may vary depending on yarn thickness and crochet tension.
For a Halloween variation, you can add a tiny crochet bat to the bow or place a miniature pumpkin accessory in her hand. Clear resin or small translucent beads can also be used for shiny teardrops.
Abbreviations
This pattern uses US crochet terminology.
- MR: Magic Ring
- sc: Single Crochet
- inc: Increase – 2 sc in the same stitch
- dec: Decrease – sc 2 stitches together
- hdc: Half Double Crochet
- dc: Double Crochet
- ch: Chain
- sl st: Slip Stitch
- FLO: Front Loops Only
- BLO: Back Loops Only
- st(s): Stitch(es)
- [ ]: Stitch count at the end of the round
- (…) x N: Repeat the instructions inside parentheses N times
Crochet Pattern
Head
Use skin-tone yarn and work in continuous spirals.
- Rnd 1: Work 6 sc into a MR. [6]
- Rnd 2: Work (inc) x 6. [12]
- Rnd 3: Work (1 sc, inc) x 6. [18]
- Rnd 4: Work (2 sc, inc) x 6. [24]
- Rnd 5: Work (3 sc, inc) x 6. [30]
- Rnd 6: Work (4 sc, inc) x 6. [36]
- Rnd 7: Work (5 sc, inc) x 6. [42]
- Rnds 8–16: Sc in all 42 sts for 9 rounds. [42]
- Eye placement: Insert the safety eyes between Rnds 11 and 12, leaving approximately 7 stitches between them. Check that they are level before securing the backs.
- Rnd 17: Work (5 sc, dec) x 6. [36]
- Rnd 18: Work (4 sc, dec) x 6. [30]
- Rnd 19: Work (3 sc, dec) x 6. [24]
- Stuff the head: Add fiberfill firmly enough to maintain the round shape, but avoid packing it so tightly that the stitches stretch.
- Rnd 20: Work (2 sc, dec) x 6. [18]
- Rnd 21: Work (1 sc, dec) x 6. [12]
- Rnd 22: Work (dec) x 6. [6]
Fasten off, leaving a tail. Weave the tail through the front loops of the remaining 6 stitches, pull the opening closed, and hide the end inside the head.

Legs and Body
Legs
Make 2 legs, beginning with black yarn for the shoes.
- Rnd 1: Work 6 sc into a MR. [6]
- Rnd 2: Work (inc) x 6. [12]
- Rnd 3: Work sc in all 12 sts through the BLO. [12]
- Change to white yarn.
- Rnd 4: Work BLO sc in all 12 sts. [12]
- Rnd 5: Work sc in all 12 sts. [12]
- Change to skin-tone yarn.
- Rnd 6: Work BLO (2 sc, dec) x 3. [9]
- Rnds 7–9: Sc in all 9 sts for 3 rounds. [9]
Fasten off the first leg. Do not fasten off the second leg, because the two legs will be joined directly to begin the body.

Joining the Legs
Work the joining round carefully so the legs remain evenly positioned.
- Rnd 10: On the second leg, ch 3 and join to the first leg with a sc. Sc in the remaining 8 sts of the first leg, work 3 sc along the chain, then work 9 sc around the second leg and 3 sc along the opposite side of the chain. [24]
The chain section creates the small bridge between the legs and establishes the body’s center.
- Change to baby blue yarn.
- Rnds 11–13: Sc in all 24 sts for 3 rounds. [24]
- Rnd 14: Work BLO sc in all 24 sts. [24]
This BLO round creates the edge where the dress skirt will later be attached.
- Rnd 15: Work (2 sc, dec) x 6. [18]
- Rnds 16–17: Sc in all 18 sts for 2 rounds. [18]
- Change to skin-tone yarn.
- Rnd 18: Work BLO (1 sc, dec) x 6. [12]
- Rnd 19: Sc in all 12 sts. [12]
Fasten off, leaving a long tail for attaching the head. Stuff the body firmly while keeping the neck area neat.
Dress Skirt
Use baby blue yarn and attach it to the FLO of Rnd 14 on the body.
- Rnd 1: Work (2 sc, inc) x 8. [32]
- Rnd 2: Work (3 sc, inc) x 8. [40]
- Rnds 3–6: Sc in all 40 sts for 4 rounds. [40]
- Change to white yarn.
- Rnd 7: Repeat (sl st, ch 2, 2 dc in the same stitch, skip 1 stitch) around to create the scalloped trim.
Fasten off and weave in the ends.
Tip: Make sure you attach the skirt evenly around the FLO edge. This helps the dress flare outward instead of twisting around the body.

White Apron
Bib
Use white yarn.
- Row 1: Ch 7. Starting in the 2nd ch from the hook, work 6 sc. Ch 1 and turn. [6]
- Rows 2–4: Work 6 sc, ch 1, and turn. [6]
Fasten off.
Skirt and Straps
Attach the yarn to the bottom corner of the bib and make the apron portion.
- Ch 12 to create the first strap, then sl st into the opposite top corner.
- Sc down the side of the bib to the bottom corner.
- Across the bottom, work (inc, 1 sc) x 3. [9]
- Row 1: Work 9 sc, ch 1, and turn. [9]
- Row 2: Work (2 sc, inc) x 3, ch 1, and turn. [12]
- Row 3: Work 12 sc. [12]
Fasten off, leaving a long tail for sewing.
Arms
Make 2 arms with skin-tone yarn.
- Rnd 1: Work 5 sc into a MR. [5]
- Rnds 2–6: Sc in all 5 sts for 5 rounds. [5]
- Change to baby blue yarn.
- Rnd 7: Work (inc) x 5. [10]
- Rnd 8: Sc in all 10 sts. [10]
- Rnd 9: Work (dec) x 5. [5]
Fasten off, leaving a sewing tail. Do not stuff the arms.
Hair
Use light yellow yarn for the hair cap.
Hair Cap
- Rnd 1: Work 6 sc in a MR. [6]
- Rnd 2: Work (inc) x 6. [12]
- Rnd 3: Work (1 sc, inc) x 6. [18]
- Rnd 4: Work (2 sc, inc) x 6. [24]
- Rnd 5: Work (3 sc, inc) x 6. [30]
- Rnd 6: Work (4 sc, inc) x 6. [36]
- Rnd 7: Work (5 sc, inc) x 6. [42]
- Rnds 8–13: Sc in all 42 sts for 6 rounds. [42]

Bangs and Side Locks
Continue from Rnd 13.
- Front bangs: Repeat (ch 6, turn, 5 hdc along the chain, sl st to the next cap stitch) 3 times.
- Side locks: Repeat (ch 12, turn, 11 hdc along the chain, sl st to the next cap stitch) 2 times.
Fasten off, leaving a long tail for sewing and positioning.
Headband and Bow
Use black yarn.
Headband
Ch 45. Starting in the 2nd chain from the hook, work 44 sl sts. Fasten off.
Bow
- Ch 11 and turn.
- Work 4 rows of 10 sc.
- Fasten off.
- Wrap black yarn tightly around the middle to create the bow shape.
- Sew or glue the bow onto the headband.
Final Assembly
Once all the individual pieces are finished, assemble the doll in the following order.
- Attach the head: Sew the neck of the body securely to the base of the head using the long tail from Rnd 19. Keep the head centered over the body.
- Attach the hair: Place the hair cap over the head and position the bangs centrally above the eyes. Sew or carefully glue the cap in place.
- Attach the arms: Sew the arms to both sides of the body around Rnd 17, just below the neck.
- Attach the apron: Position the white bib over the front of the blue dress. Bring the straps around the back and secure them neatly at the waist.
- Add the facial details: Embroider small white highlights beside the safety eyes and add a small frown with dark pink or red thread.
- Add the teardrops: Attach light-blue yarn droplets or translucent teardrop pieces beneath the eyes. Secure them carefully so they sit close to the cheeks.
- Add the blush: Apply a small amount of soft pink blush beneath the eyes and across the cheeks for the characteristic Crybaby expression.
- Finish the headband: Place the black headband over the hair cap and secure it behind the sides of the head with hidden stitches or small glue dots.

Detail Tips
The small facial and clothing details make the biggest difference in the finished doll. Before permanently sewing each piece, pin it in place and check the position from the front.
For the eyes, hair, apron, and headband, symmetry is especially important. If one side looks slightly higher than the other, adjust it before securing the piece.
When attaching the teardrops, keep both drops at a similar distance below the eyes. This helps maintain the recognizable Crybaby expression without making the face look uneven.
Customization
You can keep the classic baby-blue, white, yellow, and black color combination or create a different Halloween version.
- Add a tiny crochet bat to the bow.
- Place a miniature pumpkin in one hand.
- Use darker blue or purple for a more Halloween-inspired dress.
- Replace the translucent teardrops with shiny beads or small resin pieces.
- Use embroidered eyes instead of safety eyes if you prefer a softer handmade look.
Conclusion
Your Crochet Crybaby Alice is now ready for Halloween display, gifting, or adding to a handmade amigurumi collection. The combination of the blue dress, white apron, blonde hair, black bow, and tiny teardrops gives the finished doll plenty of character while leaving room for your own creative touches.