Need a tiny Halloween accent with a spooky twist? This crochet eyeball uses simple rounds, a bright iris, and a few embroidered veins to create a playful bloodshot finish.
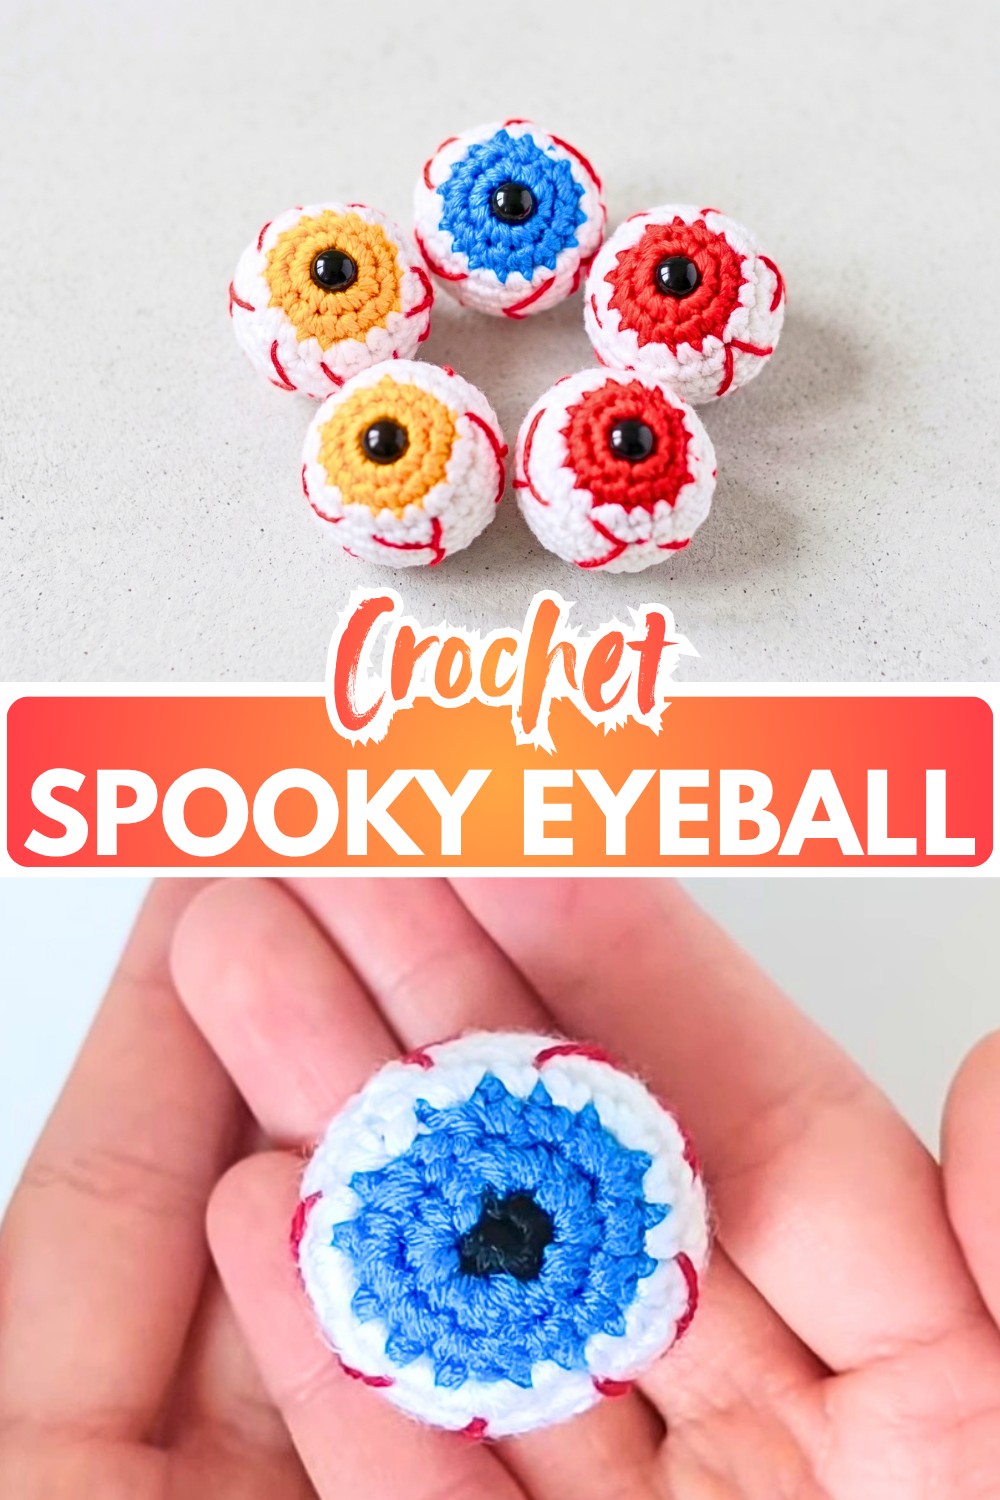
A single crochet eyeball is easy to tuck into a Halloween display, but making several in different iris colors gives you much more to play with. They can sit in a bowl, hang from a seasonal garland, or become small decorations and keychains. Because each one uses very little yarn, they are also handy when you want a quick make between larger crochet pieces.
The shape is simple, but the order of the color changes matters. The black center establishes the pupil, the iris grows around it, and the white rounds create the rounded outer portion. The decreases bring the opening inward while the stuffing gives the crochet eyeball its three-dimensional shape. The final red embroidery is what gives the otherwise simple form its bloodshot character.
Credit Suzi Handmade
Materials & Tools Needed
- Fine/Sport Weight Cotton Yarn:
- Black for the pupil
- Iris color of your choice, such as blue, green, yellow, or red
- White for the eyeball
- Red for the blood vessels
- Crochet Hook: 2.0 mm
- Polyester Fiberfill: For stuffing
- Tapestry/Yarn Needle: For closing and embroidery
- Stitch Marker: Helpful for continuous rounds
- Scissors
Finished Size & Customization Ideas
The finished eyeball measures approximately 1.5 inches (3.5 cm) in diameter when made with fine/sport-weight yarn and a 2.0 mm hook.
The easiest way to customize the design is through the iris. Blue and green give a more familiar eye appearance, while red, yellow, or purple can make the finished piece feel more fantastical.
You can also change the number and placement of the red veins. A few branches give a subtle bloodshot effect, while additional uneven branches create a much creepier look.
For seasonal decorating, make several eyeballs in different colors and place them together in a bowl or display. You can also attach a keychain ring or add a small hanging loop.
Pattern Abbreviations & Terminology
- MR: Magic Ring
- st/sts: Stitch/Stitches
- sc: Single Crochet
- inc: Increase – 2 sc in the same stitch
- dec: Invisible Decrease – crochet 2 stitches together
- [ ]: Final stitch count
US crochet terminology is used throughout. Work in continuous rounds unless otherwise stated.

Step-by-Step Crochet Instructions
Create the Pupil
The eyeball begins with only five stitches. Although that looks small, these stitches form the entire center of the eye, so keeping the magic ring tight is important.
Round 1 (Black): Make a MR, work 5 sc into the ring, and place a stitch marker in the first stitch (5).
Changing to the Iris Color
The black section is the pupil. The iris begins immediately after it, so the cleanest color transition happens while completing the final stitch of Round 1.
On the final stitch, pull through with the iris-color yarn rather than finishing the stitch with black.
This leaves the iris color ready for the next round without creating an extra stitch.

Build the Iris
Round 2 (Iris Color): Work 1 inc in each st around (10).
Round 3 (Iris Color): [1 sc, 1 inc] x 5 (15).
At the final stitch of Round 3, change to white yarn during the last pull-through.
Why the Iris Stops Here
The first three rounds are deliberately kept compact so the pupil remains clearly visible in the center. The 15 stitches at the end of Round 3 establish the outer edge of the iris before the white sclera begins.
Changing to white at this point also creates a distinct color boundary instead of allowing the iris to continue spreading outward.
Form the White Eyeball
The white section now expands slightly before holding its width. This gives the eyeball enough depth to become a sphere once it is stuffed and closed.
Round 4 (White): [2 sc, 1 inc] x 5 (20).
Round 5 (White): 1 sc in each st around (20).
Round 6 (White): 1 sc in each st around (20).
Round 7 (White): 1 sc in each st around (20).
Round 8 (White): 1 sc in each st around (20).
At the end of Round 8, you should have a small rounded tube-like form rather than a flat circle.

Reader Check
If your piece is still looking completely flat at this point, don’t worry. The sphere isn’t created by the white rounds alone. The combination of the held 20-stitch circumference, the following decreases, and the stuffing is what gives the finished eyeball its rounded shape.
Shape and Stuff the Eyeball
The next rounds reduce the stitch count in stages. These decreases bring the outer edge inward and create the opposite side of the sphere.
Round 9 (White): [2 sc, 1 dec] x 5 (15).
Round 10 (White): [1 sc, 1 dec] x 5 (10).
Stuffing Point
Pause after Round 10 and add the polyester fiberfill.
This is the right point to stuff because there is still a 10-stitch opening, giving you enough room to distribute the filling properly.
Start with small amounts rather than one large piece. Push the fiberfill toward the sides first, then fill the center. Turn the eyeball as you work so you can check that the sphere remains evenly rounded.
Avoid packing it excessively. Too much stuffing can stretch the stitches and make the white section look uneven.
Round 11 (White): 5 dec (5).
Fasten off, leaving a short tail for closing.

Close the Opening
Thread the remaining white yarn onto the tapestry needle.
Insert the needle through the front loops of the five remaining stitches, moving around the opening. Pull the yarn gradually until the hole closes.
Secure the yarn, then pass the needle into the body and bring it out through another area of the white section. Pull gently and trim the excess so the tail disappears inside.
Why Use the Front Loops?
Working through the front loops gathers all five remaining stitches toward the center. This produces a cleaner closure and avoids leaving a bulky knot visible on the outside of the eyeball.
Embroider the Blood Vessels
The red veins are added after the crochet sphere has been closed. This allows you to see the final shape while deciding where the embroidery should go.
Thread red yarn onto the tapestry needle and bring it out from the back or side of the eyeball, close to the white area surrounding the iris.
Create several branching lines traveling toward the iris.
A simple Y-shaped branch works well: make one main line, then split it into two smaller branches. Slightly irregular lines usually look more natural than perfectly straight ones.
Aim for approximately 4–5 main vein branches around the white area.
Keep the Embroidery Relaxed
Don’t pull the red yarn tightly. The veins should sit on the surface of the crochet. If you pull too firmly, the white stitches can become puckered and the eyeball may lose its smooth shape.
You also don’t need to make every vein identical. Varying their length and direction gives the finished eye a more organic, bloodshot appearance.
When finished, secure the red yarn at the back, pull the knot inside the eyeball, and trim the excess.

Optional Ways to Use the Finished Eyeball
The small size makes this design easy to adapt once the crochet itself is finished.
- Halloween Bowl: Make several with different iris colors and arrange them together.
- Hanging Ornament: Add a small loop of yarn to the top.
- Keychain: Attach a keychain ring securely through the upper stitches.
- Garland: Make several eyeballs and space them along a crocheted or yarn garland.
If you plan to make a group, changing only the iris and vein colors is enough to make the individual eyeballs look different without changing the pattern itself.
Final Finishing Check
Before putting your eyeball on display, check that:
- The pupil is centered.
- The iris color changes are clean.
- The white section is evenly stuffed.
- The final opening is completely closed.
- The red veins are secure but not pulled tightly.
- All yarn tails are hidden inside.
Your Crochet Spooky Eyeball Is Complete
What starts as just a few stitches becomes a tiny three-dimensional eyeball through a simple sequence of increases, steady rounds, decreases, and stuffing. The color changes establish the recognizable eye shape, while the embroidered veins provide the final Halloween detail.

Make one for a small seasonal accent or several for a more dramatic display. Changing the iris colors alone can give the same pattern a completely different look.