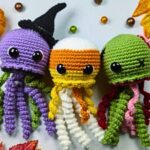
Unleash your creativity with this enchanting Witch Jellyfish crochet project. Its whimsical design blends spooky charm with underwater elegance, making it perfect for decorations, gifts, or simply to enjoy as a delightful handmade creation. Versatile and fun, it’s a craft like no other.

This charming Witch Jellyfish is not only decorative but also durable and eye-catching. Use it for Halloween setup, as a unique toy, or as a quirky home décor item.
The detailed features, stylish colors, and sturdy stitching make it a one-of-a-kind crochet piece that stands out.
Materials and Preparation
To create your Witch Jellyfish, you will need:
- Yarn: Worsted weight yarn in black, green, and purple
- Hook: 3.5 mm (E hook)
- Additional Tools:
- Yarn needle
- Stitch marker
- Scissors
- Fiberfill stuffing
- Two 20 mm safety eyes
- A small amount of white yarn (optional, for lining the eyes)
Abbreviations and Notes
Here are the abbreviations used throughout the pattern:
- SC: Single Crochet
- INC: Increase (2 SC in the same stitch)
- DEC: Decrease (SC two stitches together)
- Ch: Chain
- St/Sts: Stitch/Stitches
- FLO: Front Loop Only
- BLO: Back Loop Only
- Sl St: Slip Stitch

Pattern Notes and Tips:
- The Witch Jellyfish is crocheted in the round, so use a stitch marker to mark the beginning of each round.
- Work stitches tightly to prevent visible gaps.
Gauge, Approximate Size, and Pattern Notes
- Gauge: Gauge is not particularly important for this project since it is amigurumi, but aim for tight, uniform stitches.
- Finished Size: Approximately 5–6 inches tall, depending on your tension and materials used.
- Special Techniques:
- Magic ring: Used to start the circular pieces.
- Working in FLO/BLO: Creates texture and design in different parts of the project.
- Staggering increases ensures a smoother, more rounded shape.
Step-by-Step Pattern
1. Jellyfish Head
Rounds 1–8: Building the Shape
- Start with purple yarn. Create a magic ring and make:
- Round 1: 6 SC in the ring. (6)
- Round 2: INC in every stitch. (12)
- Round 3: [1 SC, INC] around. (18)
- Round 4: [1 SC, INC, 2 SC] around. (24)
- Round 5: [3 SC, INC] around. (30)
- Round 6: [2 SC, INC, 4 SC] around. (36)
- Round 7: [5 SC, INC] around. (42)
- Round 8: [3 SC, INC, 6 SC] around. (48)

Rounds 9–16: Adding Height
- SC evenly around for a total of 48 SC per round.
Rounds 17–19: Decreasing for Shape
- Round 17: [3 SC, DEC, 6 SC] around. (42)
- Round 18: [5 SC, DEC] around. (36)
- Round 19: [2 SC, DEC, 4 SC] around. (30)
Add Facial Features (Optional)
- Position the eyes between rows 4 and 5 with approximately 4 stitches between them. Attach the backs of the safety eyes.
- If desired, use white yarn to embroider a small “highlight” on the eyes for a cute look.

Final Assembly of Head
- Rounds 20–23: Start decreasing:
- Round 20: [1 SC, DEC] around until only 12 stitches remain. (12)
- Round 21: DEC in every stitch to close the opening. (6)
- Fasten off, weave in ends, and prepare to stuff the head firmly with fiberfill.

2. Tentacles
Curly Tentacles: Make 3 in purple.
- Start with a chain of 36.
- Beginning in the 2nd chain from the hook, work 3 SC in each chain across to the end.
- Leave a long tail for sewing.
Straight Tentacles: Make 4 in green.
- Start with a chain of 36.
- Beginning in the 2nd chain from the hook, work 1 SC in each chain across to the end.
- Leave a long tail for sewing.

Attach Tentacles:
- Sew the 3 curly tentacles in the center underside of the jellyfish.
- Sew the 4 straight tentacles evenly spaced along the outer edge.
3. Witch Hat
Rounds 1–7: Creating the Point
- Start with black yarn and create a magic ring. Work the following:
- Round 1: 4 SC into the ring. (4)
- Round 2: SC around. (4)
- Round 3: [1 SC, INC] around. (6)
- Rounds 4–5: SC evenly around. (6)
- Round 6: [2 SC, INC] twice. (8)
- Round 7: SC evenly around. (8)

Rounds 8–14: Growing the Hat
- Round 8: [3 SC, INC] around. (10)
- Continue increasing every few rounds:
- Round 9: SC (10).
- Round 10: [4 SC, INC] (12). (And continue until 24 stitches)
Rounds 15–18: Edging the Brim
- Switch to green yarn for a decorative band on Round 18 using BLO SC.
- Continue, switching back to black yarn for the brim:
- Create SL St and chain stitches decoratively.
Assembly of Hat:
- Lightly stuff the Witch Hat with fiberfill.
- Secure it to the top of the jellyfish (slightly off-center for a whimsical touch) using sewing stitches with the black yarn tail.

Key to Success:
- Select high-quality yarn for durability and texture.
- Follow the pattern precisely for the perfect design.
- Customize colors for a personal touch.
- Take your time on details like the hat for the best results.
- Ensure proper tension for even stitches.
Conclusion:
Crocheting this Witch Jellyfish is enjoyable, rewarding, and a creative way to make something unique. Whether for holiday décor, a handmade gift, or personal satisfaction, this project is both fun and practical. It’s the perfect craft for anyone looking for a playful challenge.