Want a tiny fall accessory you can crochet in a short sitting? This mini pumpkin keychain uses simple stitches, ribbed shaping, and a green cap for a cute finished look.
A little pumpkin can be surprisingly effective when you want a seasonal touch without making something large. This crochet pumpkin keychain starts as a simple ribbed rectangle, then a few sewing and stuffing steps transform it into a rounded pumpkin with defined segments.
The shaping is what gives this small crochet amigurumi its character. Once the orange body is joined and stuffed, the yarn is pulled through the center to create the crochet pumpkin’s plump ridges. A small green cap finishes the top, and a keychain ring turns it into a useful bag charm, gift, or quick fall accessory.
Materials & Tools Needed
- 4-ply yarn in orange and green
- 3.00 mm crochet hook (Size 5/0)
- Tapestry needle
- Scissors
- Fiberfill or stuffing
- Keychain ring
Abbreviations
US crochet terminology is used throughout the pattern.
- ch = chain
- sc = single crochet
- hdc = half double crochet
- blo = back loop only
- inc = increase (2 sc in one stitch)
- sl st = slip stitch
- st(s) = stitch(es)

Crochet Pumpkin Keychain Pattern
Pumpkin Body
The pumpkin begins as a flat ribbed piece. Working the rows through the back loops creates the raised texture that will later become the pumpkin’s natural-looking segments.
Foundation: Ch 15.
Row 1: Starting in the 2nd ch from the hook, work 14 hdc across. (14 sts)
Row 2: Ch 1, turn. Work 14 hdc in the back loops only (blo) across the row. (14 sts)
Rows 3–14: Ch 1, turn. Work 14 hdc in the back loops only (blo) across the row. (14 sts)
Texture Check: The finished rectangle should have visible horizontal ridges from the BLO stitches. These ridges are important because they will help define the pumpkin segments after the piece is sewn and shaped.

Seam the Pumpkin Body
Once all 14 rows are complete, the ribbed rectangle is folded and joined to create the pumpkin’s tube shape.
- Fold the ribbed piece in half so the short ends meet.
- Ch 1, turn, and slip stitch through both layers across the side to join the edges and form a tube.
- Fasten off, leaving a long tail for sewing.
Before Moving On: Make sure the side seam is secure before beginning the gathering. The long yarn tail will be used to close and shape the pumpkin, so avoid cutting it short.
Shape and Stuff the Pumpkin
The two open ends of the tube are gathered separately, with stuffing added before the bottom is closed.
- Thread the tapestry needle with the long yarn tail. Weave the needle in and out around the top edge of the tube using a running stitch.
- Pull the yarn tightly to gather the opening completely closed and secure it with a knot.
- Push the needle down through the center of the gathered opening and out through the bottom opening.
- Stuff the pumpkin firmly with fiberfill.
Stuffing Tip: Because the pumpkin is small, add the stuffing gradually and press it into the sides as you work. A firm fill helps the finished ridges stand out instead of leaving the pumpkin looking flat or collapsed.
- Sew a running stitch around the bottom opening.
- Pull the yarn tight to close the opening and secure it.
Create the Pumpkin Ridges
The final shaping step gives the pumpkin its segmented appearance.
- Take the needle from the bottom center and pull the yarn upward along the outside of the pumpkin, following one of the natural indents created by the ribbing.
- Insert the needle back down into the top center hole.
- Pull the yarn firmly to create a plump pumpkin segment.
- Repeat this process around the pumpkin until all the segments are defined.
- Secure the yarn and weave in the end.
Ridge-Shaping Check: Keep the yarn tension firm enough to create a visible indentation, but avoid pulling so tightly that the pumpkin becomes flattened. Work around the body evenly so the segments remain balanced.
Crochet Pumpkin Leaf/Stem Top
The green cap is worked separately and then sewn over the gathered center of the pumpkin.
Round 1: Start with a magic ring. Work 9 sc into the ring. Sl st into the first st to close the round. (9 sts)
Round 2: Ch 1. Work (inc, 1 sc) 4 times, then work 1 inc in the final stitch. Sl st to join. (14 sts)
Fasten off, leaving a long tail for sewing.

Final Assembly
- Position the green cap over the gathered center at the top of the pumpkin.
- Using the tapestry needle and green yarn tail, sew the cap securely onto the pumpkin.
- Sew the keychain ring to the top center of the green cap.
- Tie off, weave in any remaining loose ends, and trim the excess yarn.
Your mini pumpkin is now ready to attach to a bag, backpack, keys, or gift.

Finished Result
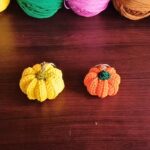
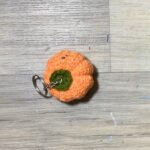
The ribbed orange body gives the pumpkin its textured shape, while the gathered center and pulled ridges create the rounded sections. The small green cap covers the top and provides a neat place to attach the keychain ring, completing the seasonal accessory.