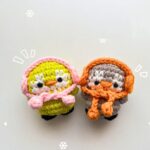
Looking for a tiny crochet companion? This mini penguin features a colorful body, white belly, embroidered face, and little flippers for a charming handmade finish.

Small enough to fit in your palm, this mini crochet penguin has a rounded body, contrasting white belly, tiny embroidered eyes, and a yellow beak. Its miniature size makes it suitable for a desk display, a handmade gift, or a cute bag charm when you add a keychain ring.
This crochet pattern guides you through shaping the body, changing yarn colors to create the belly, and closing the stuffed figure neatly. You’ll also learn how to embroider the face and form both flippers directly onto the body, with step-by-step instructions to help you finish your little crochet penguin.
Credit Daffy Bunny Crochet
Materials & Tools
- Main-color yarn: Choose black, light blue, purple, pink, gray, or another color for the penguin’s body.
- White yarn: For the contrasting belly.
- Black or dark brown yarn: For embroidering the eyes.
- Yellow yarn: For the beak.
- 1.5 mm crochet hook: As specified in the supplied instructions.
- Toy stuffing or polyfill: For filling the body.
- Yarn needle: For embroidery and weaving in ends.
- Scissors: For cutting yarn.
- Optional keychain ring: For turning the finished penguin into a bag charm or keychain.
Finished Size and Color Ideas
The finished penguin is miniature and approximately palm-sized, making it a sweet choice for small decorative displays or handmade presents. Exact dimensions will depend on yarn, tension, and hook size.
Try making a collection in different colors, such as pastel pink, soft purple, light blue, or classic black and white. For a portable accessory, attach a suitable keychain ring securely to the top of the finished figure.
Crochet Abbreviations
- MR: Magic ring
- ch: Chain
- sl st: Slip stitch
- sc: Single crochet
- dc: Double crochet
- inc: Increase; work 2 single crochets into the same stitch
- dec: Decrease; crochet 2 stitches together
- Rnd: Round
- [ ]: Total stitch count at the end of a round

Step-by-Step: How to Crochet the Mini Penguin
The body is worked from the top through the rounded middle and down toward the bottom. White yarn is introduced during the early rounds to create the belly, while the eyes and beak are embroidered before the opening becomes too small to access comfortably.
Step 1: Start the Body with a Magic Ring
Using your chosen main body color, make a magic ring.
Round 1: Work 6 sc into the ring. Join with a sl st into the first stitch, then ch 1.
Total: 6 stitches.
Pull the magic ring closed so there is no visible hole in the center. This forms the starting point for the penguin’s rounded body.
Step 2: Increase to Shape the Upper Body
The next two rounds widen the starting circle.
Round 2: Work an increase in every stitch around: (inc) × 6. Join with a sl st and ch 1.
Total: 12 stitches.
Round 3: Repeat (1 sc, 1 inc) × 6. Join with a sl st and ch 1.
Total: 18 stitches.
Round 4: Repeat (2 sc, 1 inc) × 6. Join with a sl st and ch 1.
Total: 24 stitches.
Keep the increases evenly distributed. The growing piece should form a smooth, rounded shape rather than a narrow tube.
Step 3: Introduce White Yarn for the Belly
Round 5 creates the first white sections of the penguin’s belly. Keep the main color and white yarn ready so you can change colors within the round.
Round 5:
- With the main color, work 8 sc.
- On the final pull-through of the eighth stitch, change to white yarn.
- Work 3 sc in white.
- Change back to the main color on the final pull-through of the third white stitch and work 2 sc.
- Change to white yarn and work 3 sc.
- Return to the main color and work the remaining 8 sc.
- Join with a sl st and ch 1.
Total: 24 stitches.
To change colors neatly, complete the final pull-through of the stitch before the new color with the new yarn. Keep the unused strand tidy on the inside of the work, without pulling it so tightly that the body puckers.
Step 4: Widen the White Belly
Continue the color pattern in Round 6 to expand the white area.
Round 6:
- Work 7 sc in the main color.
- Change to white and work 4 sc.
- Return to the main color and work 2 sc.
- Change to white and work 4 sc.
- Switch back to the main color and work the remaining 7 sc.
- Join with a sl st and ch 1.
Total: 24 stitches.
Check the white sections from the front as you work. They should sit on either side of the central main-color stitches, forming the beginnings of the contrasting belly.
Step 5: Complete the Main White Belly Section
Round 7 increases the width of the white area across the front.
Round 7:
- Work 6 sc in the main color.
- Change to white and work 12 sc.
- Return to the main color and work the remaining 6 sc.
- Join with a sl st and ch 1.
Total: 24 stitches.
The white section should now be wider and more recognizable as the penguin’s belly. Keep the color changes aligned with the previous rounds to maintain a balanced appearance.
Step 6: Work the Straight Body Rounds
The body now continues without increases or decreases for two rounds.
Rounds 8-9: Work 24 sc around in the main body color for each round. Join with a sl st and ch 1 at the end of each round.
Total: 24 stitches per round.
These rounds maintain the body’s width before the lower portion begins to narrow. Keep your tension consistent so the little penguin holds its shape.
Step 7: Embroider the Eyes and Beak
Complete the facial embroidery while the body opening is still accessible.
Eyes: Using black or dark brown yarn and a yarn needle, embroider two small oval eyes on the upper white belly area, following the placement shown in the supplied tutorial.
Beak: With yellow yarn, embroider a small triangular beak centered between and just below the eyes.
Check the face from the front before securing the yarn ends. Make sure the eyes are positioned evenly and the beak sits centrally.
Embroidered features are especially useful for miniature toys because they avoid adding small detachable parts.
Step 8: Begin Decreasing the Body
The next three rounds gradually close the lower portion of the penguin.
Round 10: Repeat (2 sc, 1 dec) × 6. Join with a sl st and ch 1.
Total: 18 stitches.
Round 11: Repeat (1 sc, 1 dec) × 6. Join with a sl st and ch 1.
Total: 12 stitches.
Round 12: Work 6 decreases around.
Total: 6 stitches.
As the opening gets smaller, pause to check the shape and prepare to add the stuffing before closing it completely.

Step 9: Stuff and Close the Body
Fill the penguin firmly with toy stuffing before closing the remaining opening. Add small amounts at a time and distribute them evenly so the body stays rounded.
After stuffing, cut the yarn and leave a long tail. Thread the tail through the front loops of the remaining 6 stitches using a yarn needle. Pull the yarn tight to close the opening, then secure the end and hide it inside the body.
Avoid overstuffing, which can stretch the stitches and make the colorwork look uneven. The finished body should feel firm while retaining its compact shape.
Step 10: Make the First Flipper
The flippers are formed directly on the sides of the body rather than crocheted as separate pieces.
Attach the main body yarn to the chosen side of the penguin.
- Ch 3.
- Work 1 dc into the same base stitch.
- Ch 3 again.
- Finish with a sl st into the same base stitch.
- Cut the yarn, secure it, and weave the remaining end inside the penguin.
This small chain-and-stitch combination creates the first flipper. Keep the yarn secure at its base so the flipper holds its shape.
Step 11: Make the Second Flipper
Repeat the same process on the opposite side of the body.
- Attach the main body yarn at the corresponding position.
- Ch 3.
- Work 1 dc into the same base stitch.
- Ch 3.
- Finish with a sl st into the same base stitch.
- Cut the yarn, secure it, and weave in the end.
Compare both flippers from the front. They should sit at similar heights and angles, giving the penguin a balanced silhouette.
Step 12: Finish and Customize Your Mini Penguin
Inspect the body, embroidered face, and flippers. Secure any loose yarn ends and check that the body remains neatly closed.
For a decorative version, place the penguin on a desk or shelf. To create a small handmade gift, make several penguins in different body colors. If you want to use it as a keychain or bag charm, attach a suitable ring securely to the top without pulling on the crochet stitches.
Your mini crochet penguin is complete, with a rounded body, contrasting belly, embroidered eyes and beak, and two tiny flippers. Its compact size and customizable colors make it a versatile little amigurumi for gifting or display.