Those tiny crochet acorns paired with colorful autumn leaves make charming fall keychains, bag charms, and seasonal decorations, with simple shapes and warm yarn colors.

Tiny woodland accessories are a lovely way to celebrate autumn without needing much yarn or time. This crochet acorn features rounded shaping, a contrasting cap, and a coordinating leaf, and its miniature size makes it easy to carry or gift.
This step-by-step crochet guide covers acorn shaping, cap construction, leaf details, and final assembly. You’ll learn how each crochet piece fits together, plus ways to customize colors and sizing for personal fall accessories. Let’s get started.
Credit SIMPLIFIED CRAFT
Materials and Tools
- Acorn base yarn: Light tan, cream, or another warm nut-brown shade
- Acorn cap yarn: Dark brown
- Leaf yarn: Orange, rust, yellow, or another autumn color
- Crochet hook: 1.5 mm
- Fiberfill stuffing
- Yarn needle
- Stitch marker
- Scissors
- Optional keychain ring: For making a bag charm or keychain
The 1.5 mm hook is suited to a small, tightly stitched project when paired with compatible yarn. If you choose thicker yarn, use a correspondingly larger hook and expect the finished piece to grow.
Finished Size and Customization
The finished project is intended to be a miniature amigurumi-style acorn with a separate autumn leaf. Exact measurements were not provided, so the final size will depend on yarn thickness, hook size, and individual tension.
Try these variations:
- Create a larger acorn: Use thicker yarn with an appropriately sized hook.
- Experiment with fall colors: Pair cream or tan with chocolate brown, then choose rust, golden yellow, or burnt orange for the leaf.
- Make a seasonal cluster: Attach several acorns and leaves to one keychain ring for a fuller autumn charm.
- Use it as decoration: Add a hanging loop for a seasonal garland, ornament, or small decorative display.
Pattern Abbreviations and Terminology
- MR: Magic Ring
- SC: Single Crochet
- HDC: Half Double Crochet
- DC: Double Crochet
- Sl St: Slip Stitch
- Ch: Chain
- Inv Dec: Invisible Decrease
- Rnd: Round
- Row: Row
- St(s): Stitch(es)
The pattern uses US crochet terminology. An invisible decrease combines two stitches into one and helps create a neater shape when working amigurumi.

Before You Begin: Important Pattern Notes
The supplied instructions contain a few details worth checking before you start:
- Acorn base, Round 2: The stated total of 9 stitches matches an increase followed by one single crochet, repeated three times. The wording about working into the “2nd stitch” is unclear, so the repeat below is written to match the supplied stitch count.
- Acorn cap, Round 2: The intended instruction is 2 single crochets in every stitch, giving 12 stitches from 6.
- Autumn leaf: The supplied directions do not specify every skipped space or the exact placement of single, half double, double, and slip stitches that create the lobed edge. The leaf section below preserves the provided foundation and shaping details, but the exact decorative edge needs a complete stitch-by-stitch sequence or a reference image to reproduce precisely.
The acorn base and cap counts are retained as supplied.
How to Crochet the Acorn Base
The base uses light tan or cream yarn. Work in rounds, placing your stitch marker in the first stitch of each round so you can track increases and decreases.
Round 1: Start the Base
Make a magic ring and work 6 single crochets into the ring. Pull the yarn tail to close the center, then mark the first stitch.

Stitch count: 6
Round 2: Increase to 9 Stitches
Repeat the following sequence three times:
- Work 2 single crochets into the next stitch.
- Work 1 single crochet into the following stitch.
You should have 9 stitches at the end of this round.
Stitch count: 9
Round 3: Increase to 12 Stitches
Repeat this sequence three times:
- Work 1 single crochet in each of the next 2 stitches.
- Work 2 single crochets into the next stitch.
This expands the base gradually while keeping the rounded shape.
Stitch count: 12
Round 4: Increase to 15 Stitches
Repeat the following sequence three times:
- Work 1 single crochet in each of the next 3 stitches.
- Work 2 single crochets into the next stitch.

Stitch count: 15
Round 5: Increase to 18 Stitches
Repeat the following sequence three times:
- Work 1 single crochet in each of the next 4 stitches.
- Work 2 single crochets into the next stitch.
The base should now have a wider, rounded section.
Stitch count: 18
Rounds 6–9: Build the Acorn Body
Work 1 single crochet in every stitch around for four consecutive rounds. Keep the stitch count steady and check that the sides remain even.
Stitch count: 18 stitches per round
Round 10: Begin Tapering
Repeat the following sequence three times:
- Work 1 single crochet in each of the next 4 stitches.
- Work 1 invisible decrease over the next 2 stitches.
This begins narrowing the upper part of the acorn.
Stitch count: 15
Round 11: Continue Shaping
Repeat the following sequence three times:
- Work 1 single crochet in each of the next 3 stitches.
- Work 1 invisible decrease over the next 2 stitches.
Stitch count: 12
Round 12: Close the Shape
Repeat the following sequence four times:
- Work 1 single crochet in the next stitch.
- Work 1 invisible decrease over the next 2 stitches.
Stitch count: 8
Keep the remaining opening available for stuffing and closing. Do not fasten off until you are ready to finish the base.

How to Crochet the Acorn Cap
Use dark brown yarn for the cap. It forms the textured-looking top that sits over the narrower end of the acorn base.
Round 1: Make the Center
Create a magic ring and work 6 single crochets into it. Pull the ring tight.
Stitch count: 6
Round 2: Expand the Cap
Work 2 single crochets into every stitch around.
Stitch count: 12
Round 3: Increase to 18 Stitches
Repeat the following sequence six times:
- Work 1 single crochet in the next stitch.
- Work 2 single crochets into the following stitch.

Stitch count: 18
Rounds 4–6: Form the Cap
Work 1 single crochet in each stitch around for three rounds, keeping the stitch count at 18. This creates the cap’s sides.
Stitch count: 18 stitches per round
Finish the Cap
Work a slip stitch into the next stitch, fasten off, and leave a long yarn tail for attaching the cap to the base.
Make the Cap Stem
Chain 7 to create the small stem or loop described in the supplied instructions. Secure the chain and anchor it neatly at the top center of the cap.
The exact method for shaping this chain into a stem was not specified. Arrange and secure it to match the look you want before attaching the cap to the acorn.

How to Crochet the Autumn Leaf
Choose orange, rust, yellow, or another seasonal yarn color. The leaf begins with a chain foundation, then uses stitches along both sides to form its outline.
Step 1: Make the Foundation Chain
Chain 9.
This chain provides the central starting line for the leaf. Keep the loops even so the leaf edges are easier to work.
Step 2: Work Along the First Side
Starting in the second chain from the hook, work 7 single crochets. Work 2 single crochets into the final chain on this side to form the end of the leaf.
Step 3: Shape the Tip
Chain 2, then work 2 single crochets into the same space as directed in the supplied instructions. This creates the pointed end.
Step 4: Work Along the Opposite Side
Continue along the opposite side of the foundation chain, working 1 single crochet into each stitch until 3 chains remain unworked.
The supplied instructions do not explain how these final three chains are used in the next part, so check the original tutorial if you need an exact match.
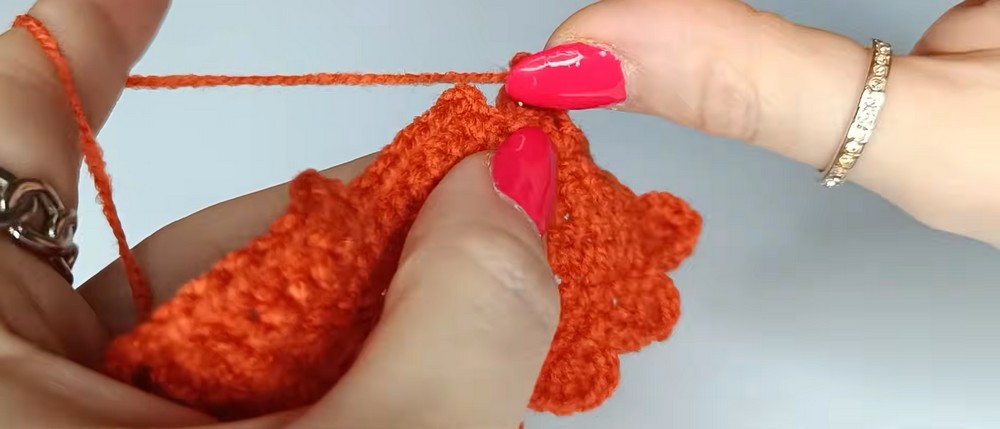
Step 5: Create the Lobed Edge
Chain 1 to turn, then work back across the leaf using a combination of single crochet, half double crochet, double crochet, and slip stitches in designated skipped spaces. Varying stitch heights helps create a wavy outline reminiscent of an autumn oak leaf.
Important: The exact stitch placement for this decorative edge was not included in the supplied pattern. Follow a reference photo or the original video for the precise locations of each stitch; otherwise, the leaf’s final shape may differ from the intended design.
Fasten off securely when the leaf is complete, leaving a tail if you need it for attaching the leaf to the acorn or keychain.
Assembly: Finish Your Acorn and Leaf Charm
Step 1: Stuff the Acorn Base
Add small amounts of fiberfill through the opening left after Round 12. Distribute the stuffing evenly so the base feels firm and holds its rounded shape without stretching the stitches too far apart.
Step 2: Close the Opening
Cut the yarn, leaving a long tail. Thread it through the yarn needle and weave it through the front loops of the remaining 8 stitches. Pull the tail gently to draw the opening closed, then secure it.
Step 3: Attach the Cap
Position the brown cap over the narrowed top of the acorn base. Check that it sits evenly and covers the closure before sewing it in place with the cap’s yarn tail.
Sewing gives a secure finish. Craft glue is an alternative if suitable for your materials, but allow it to set fully before handling the charm.
Step 4: Attach the Leaf
Place the leaf beside the acorn cap, adjusting its angle so the pointed end and lobed edges remain visible. Sew it to the acorn or cap with the yarn tail, taking care not to flatten the leaf’s shape.
Step 5: Add the Keychain Ring
Weave in loose ends and attach the finished acorn-and-leaf piece to a keychain ring or lanyard. Check that all attachments are secure before using it as a bag charm or accessory.

Helpful Tips for a Neat Finish
- Keep tension consistent: Tight stitches help fiberfill stay inside the amigurumi, especially when using a small hook.
- Use a stitch marker every round: This is particularly helpful while increasing and decreasing the acorn base.
- Check the cap placement before sewing: Centering the cap first helps avoid a tilted finish.
- Avoid overstuffing: Too much fiberfill can stretch the stitches and distort the shape.
- Secure the leaf carefully: Attach it at one or two discreet points so its outline remains visible.
For keychains, inspect the yarn joins and hardware regularly. Small handmade parts may loosen with frequent use, so this project is best treated as a decorative accessory rather than a toy for young children.
Ideas for Displaying Your Finished Crochet Acorn
Use the finished piece as an autumn bag charm, add it to a seasonal key ring, or make several in coordinating shades for a fall garland. A mix of tan acorns, dark caps, and orange or yellow leaves gives a warm seasonal palette without requiring much yarn.
Once you have confirmed the exact leaf-edge stitches from your reference tutorial, you can repeat the design in different colors and sizes to create a coordinated set of handmade autumn accessories.