Learn to crochet a cute fat chicken with this easy amigurumi tutorial. A fun pattern for gifts, toys, shelf decor, and beginners alike.

Crochet Fat Chicken Tutorial
This crochet fat chicken stands out with its round shape, tiny wings, and cheerful little face that instantly catches the eye. It looks wonderful on a shelf, adds a playful touch to a desk, delights children as a soft toy, or becomes a thoughtful handmade gift for someone special. As each part comes together, its charming personality begins to shine, making you excited to see how the finished crochet chicken will look.
The tutorial explains every step in a simple, beginner-friendly way, making it easy to shape the crochet chicken from start to finish. You can experiment with different colors, add your own small details, or make several in different sizes to create a fun collection with its own unique style. Once the final stitches are in place, you’ll discover the little finishing touches that give this crochet fat chicken its handmade charm and make it a delight to display or gift.
Credit ghazi craft
Quick Facts:
- Skill Level: Beginner-friendly
- Project Type: Crochet Amigurumi Chicken
- Finished Size: Approximately 12–15 cm (depending on yarn and tension)
- Estimated Time: 2–3 hours
- Yarn Type: Polyester, cotton, or medium-weight acrylic yarn
- Hook Size: 2.5 mm or a suitable hook size for your yarn
- Techniques Used: Magic Ring, Chain Stitch, Slip Stitch, Single Crochet, Double Crochet, Granny Square Construction
- Perfect For: Handmade gifts, shelf decoration, desk décor, seasonal displays, and cute room accents
Why You’ll Love This Pattern:
- It transforms simple flower granny squares into a unique 3D chicken design.
- The construction method is easy to follow and suitable for beginners.
- The finished chicken has a cute rounded shape with charming handmade details.
- You can customize it with different colors to create your own collection.
- It makes a lovely handmade gift or decorative piece
Materials & Tools Needed
- Yarn:
- Body Base Color: Cream or off-white polyester yarn (or medium/worsted weight cotton/acrylic yarn).
- Flower Accent Colors: Three contrasting shades (e.g., rustic tones like rust brown, mustard yellow, and dark brown; or soft shades like pink, purple, and green).
- Detail Colors: Small amounts of orange (for the beak) and red/pink (for the comb/crest).
- Crochet Hook: Size No. 3 (2.5 mm) or a matching hook size for your yarn.
- Stuffing: High-quality polyester fiberfill.
- Eyes: Two black beads or 5 mm safety eyes.
- Tools: Yarn needle, scissors, glue (hot glue gun or craft glue for attaching eyes), lighter (optional, for sealing polyester ends).


Gauge
Not crucial! Maintain firm and consistent tension to prevent visible stuffing between stitches.
Construction & Features
- Modular Shape: Made from two flat granny squares sewn together.
- 3D Tetrahedron Formation: The final open seam is folded perpendicularly for shaping.
- Integrated Details: Comb, beak, and wattle are crocheted onto the body directly—no separate pieces!

Making Process Overview
The crochet fat chicken begins with two flower granny squares that create the foundation of its unique body shape. Each square starts with a colorful floral center, gradually transforms into a structured square, and is finished with a neat border in the main body shade. Once both pieces are completed, they are carefully joined together to prepare the base for the chicken’s three-dimensional form while keeping the construction simple and beginner-friendly.
The most interesting part of the crochet process is turning these flat granny squares into a charming rounded chicken shape. After adding fiberfill, the remaining opening is folded and stitched in a clever way that creates its plump, pyramid-like body without complicated assembly. This special shaping technique gives the crochet chicken its adorable structure and makes the transformation from simple squares to a complete character truly enjoyable.
The final stage adds the small details that bring the crochet fat chicken to life. A tiny comb, beak, and wattle are carefully added to the body, while the eyes complete its cheerful expression. With these finishing touches in place, the simple granny squares become a delightful handmade chicken that is ready to brighten up shelves, decorate spaces, or become a thoughtful handmade gift.
Step-by-Step Pattern
Step 1: Crochet Two Flower Granny Squares
Follow this simple 4-round flower granny square pattern for the body:
- Round 1 (Center):
- Start with a magic ring.
- Ch 3 (counts as the first dc), then work 15 dc into the ring (total 16 stitches).
- Close with a sl st to the top of the starting ch-3.
- Round 2 (Flower Petals):
- Switch to your second yarn color.
- Work 3-dc clusters in each space between stitches, separated by ch-1.
- Round 3 (Squaring Off):
- Switch to your third color.
- Convert the circle into a square by creating corners with [3 dc, ch 2, 3 dc] and filling the sides with regular dc stitches.
- Round 4 (Border):
- Switch to the cream/off-white body color.
- Work 1 dc in each stitch around, adding corners as follows: [2 dc, ch 2, 2 dc] in each corner space.
- Fasten off.
Step 2: Assemble the Body Seams
- Place your granny squares back-to-back, with the right sides (decorative sides) facing outward.
- Using cream yarn and a yarn needle, sew along three of the four edges using a whipstitch through the back loops only.
- Secure and tie off your yarn.

Step 3: Stuff and Shape
- Generously fill the inside with fiberfill stuffing, teasing it apart to avoid lumps.
- Pinch the final open side perpendicular to the bottom seam. (This fold creates a 3D triangular pyramid shape).
- Sew the open top edge shut using your yarn needle.
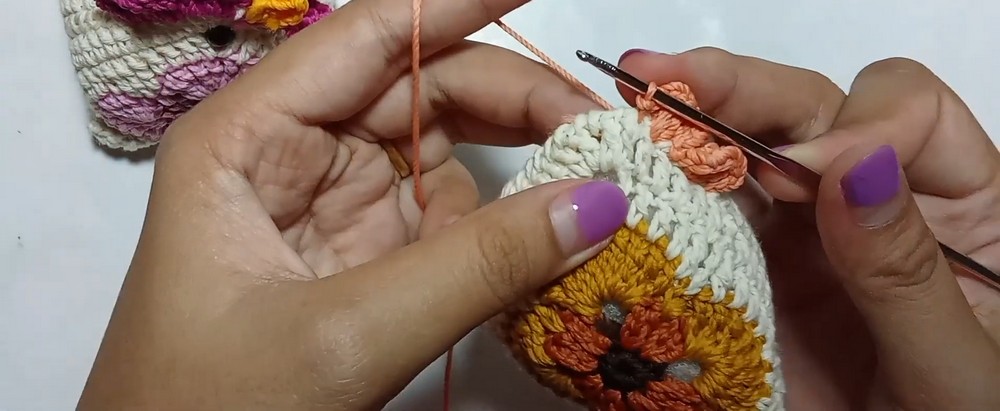
Step 4: Crochet the Comb (Top of the Head)
- Locate and join: Find the center 6 stitches along the top seam (pointed end). Join your comb color (red/pink yarn) here.
- Work the comb:
- Ch 3, 3 dc in the first stitch, then ch 3, sl st into the next stitch.
- Repeat this sequence 3 times for a wavy, 3-bump comb.
- Fasten off.
Step 5: Crochet the Beak & Wattle
- Beak:
- Join orange yarn at the front fold line, below the comb.
- Work:
- (Ch 1, sc) in the first stitch.
- (Dc, ch 3, dc) in the next stitch.
- (Sc) in the final stitch.
- Fasten off and weave in ends.
- Wattle:
- Join red yarn directly beneath the beak.
- Work:
- (Ch 3, 3 dc, ch 3, sl st) all in the same stitch.
- Fasten off.
Step 6: Finishing Touches
- Attach the bead or safety eyes slightly behind the beak. Secure with glue.

Troubleshooting & Suggestions
- Lumpy Stuffing: Break apart fiberfill into fluffy clouds to prevent lumps.
- Clean Seams: Sew back loops only to create invisible, decorative seams.
- Tight Stitches: Drop down hook size (e.g., 2 mm) if stuffing peeks through stitches.
Creative Modifications
- Seasonal Themes: Use festive shades for holidays (e.g., red/green/white for Christmas or pastels for Easter).
- Keychain/Ornament Option: Add a hanging loop by chaining 15 at the comb before fastening off.