Crochet Mushroom Pop Amigurumi Pattern – Fun and Easy
Crochet enthusiasts are always on the lookout for fresh ideas, and this mushroom pop amigurumi is bursting with charm. Perfect for beginners and seasoned crafters alike, this pattern combines playful textures with simple techniques, making it a delightful way to bring creative flair to your handmade designs. Its whimsical mushroom shape adds a touch of personality, whether used as decor or gifted to loved ones.
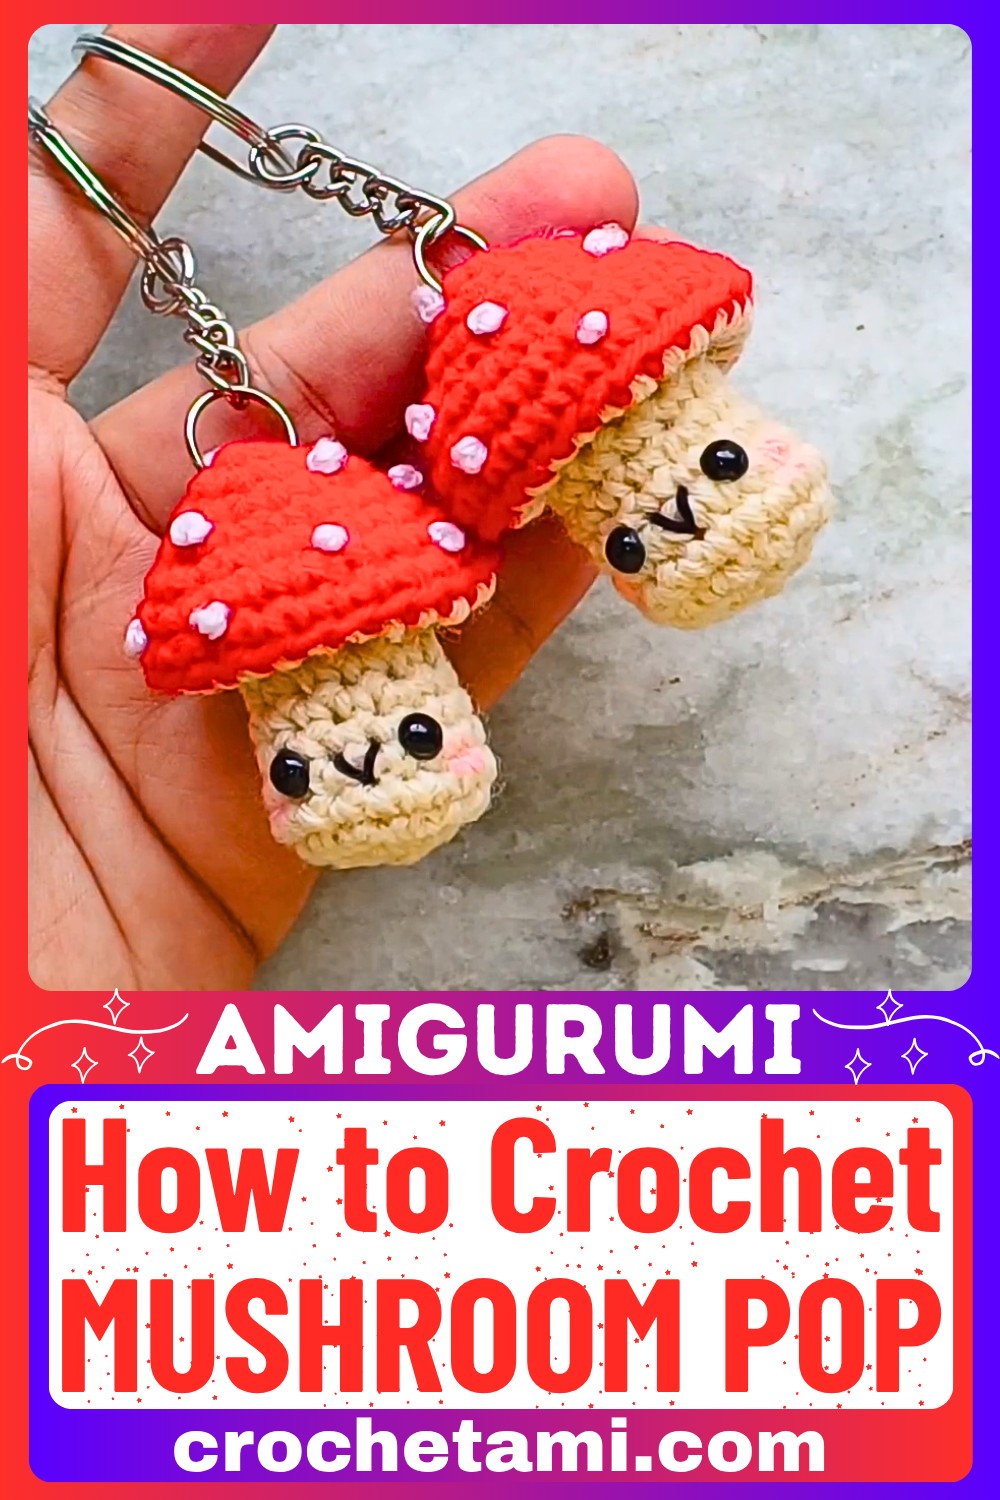
Crochet Mushroom Pop Amigurumi
Crafting has never felt more rewarding than with this cute amigurumi project. The video tutorial simplifies the process, helping you build a cheerful mushroom with just a few tools and yarn. It’s a fantastic way to unwind while adding a splash of creativity to your day. Whether you’re making one for fun or starting your collection of crochet creations, this pattern sparks joy and imagination.
Credit Cute Crochet
Materials and Preparation
Materials Needed
To create this adorable Mushroom Pop Amigurumi, you’ll need:
- Yarn:
- Red yarn (for the mushroom cap)
- White yarn (for the mushroom’s spots)
- Tan yarn (for the gills and stem)
- Black yarn (to embroider the facial features)
- Stuffing (to fill the mushroom stem)
- Safety eyes or black beads (for the eyes)
- Keychain hardware (optional if making a keychain version)
- Tools:
- A 3mm crochet hook (use a hook smaller than yarn recommendations for tight stitches)
- Yarn needle
- Stitch marker (a paperclip or scrap yarn will also work)
- Scissors

Important Notes
- Tight stitches: Use a smaller hook size than usual to ensure tight stitches so the stuffing doesn’t show through.
- Safety precautions: If the mushroom is meant for a child, opt for embroidered eyes or safety eyes instead of glued-on ones to avoid potential choking hazards.
- Customization: You can fidget with the mushroom by gently “popping” the cap up and down as a playful feature.

Step-by-Step Pattern
Part 1: The Mushroom Cap
- Magic Circle
- Start with red yarn. Form a magic circle by wrapping the yarn over your finger to create an “X.” Insert your hook under the “X,” pull the yarn through, yarn over, and pull through the loop.
- Chain 1 (this does not count as a stitch).
- Round 1
- Work 6 sc (single crochet) into the magic circle. Pull the yarn tail to close the circle tightly. (6 sts)
- Use a stitch marker to mark the last stitch of the round.
- Round 2
- Increase in every stitch around (2 sc in each st). (12 sts)
- Round 3
- Work 1 sc in each of the first 3 stitches, then increase in the next st (2 sc in the same st). Repeat this sequence 3 times. (15 sts)
- Round 4
- Work 1 sc in each of the first 4 stitches, then increase in the next st. Repeat this sequence 3 times. (18 sts)
- Round 5 (Final increase round)
- Work 1 sc in each of the first 2 stitches, then increase. Repeat this sequence 6 times. (24 sts)
- Rounds 6-7
- Work 1 sc into each stitch all the way around. The stitch count remains constant at 24.
- Finish the Cap
- Fasten off, leaving a long tail for weaving in.
- Adding Spots
- Use white yarn and the French knot embroidery technique to create spots on the cap. To make a French knot:
- Push your needle through the fabric from back to front. Wrap the yarn around the needle 2-3 times and insert back into the same hole, pulling gently to form a knot.
- Tie a knot at the back to secure, and hide yarn tails inside the cap.
- Use white yarn and the French knot embroidery technique to create spots on the cap. To make a French knot:

Part 2: The Gills
- Attaching Yarn
- Use tan yarn and work only into the back loops of the final round of the cap.
- Round 1: Gills
- Work 2 double crochets together (dc2tog) into each back loop around. (12 sts)
- Round 2: Decrease
- Decrease with single crochet into every stitch. Use the invisible decrease technique by working into the front loops only. (6 sts)
- Fasten off and leave a tail for sewing.
- Close the Gills
- Sew the hole by weaving the tail through the front loops of the stitches, pulling tight to close.

Part 3: The Stem
- Front Loops of Gills
- Attach tan yarn to the unused front loops from the cap’s final round.
- Round 1: Initial Stitches
- Work 1 sc into each front loop around. (12 sts)
- Round 2
- Work 1 sc into each stitch. (12 sts)
- Round 3: Increase
- Work 1 sc in each of the first 3 stitches, then increase in the next stitch. Repeat this sequence 3 times. (15 sts)
- Rounds 4-5
- Work 1 sc into each stitch around. (15 sts)
- Round 6
- Attach the eyes between Rounds 4-5. Use safety eyes, embroider with French knots, or glue-on beads. Ensure the spacing is even.
- Decrease Rounds (7-8)
- Round 7: Work 1 sc, then invisible decrease. Repeat 6 times. (12 sts)
- Round 8: Work invisible decreases in each stitch. (6 sts)
- Close the Stem
- Stuff the stem, ensuring it’s firm. Weave the tail through the front loops of the stitches to close the hole, and hide the yarn tail inside.

Part 4: Adding Details and Assembly
- Embroider the Face
- Use black yarn to embroider the mouth between Rounds 4-5 beneath the eyes, using a simple straight stitch to create a smile. Secure at the back and hide the yarn tail inside.
- Blush the Cheeks
- Use pink chalk or blush to lightly color the cheeks for added cuteness!
- Keychain Option
- Attach a keychain by looping a jump ring through the top of the cap. Use pliers to fasten the jump ring securely.


