A black-and-white spiral gives these crochet coasters a playful Halloween look, while the optional green scalloped edge adds the finishing touch to mugs, party tables, and autumn gatherings.
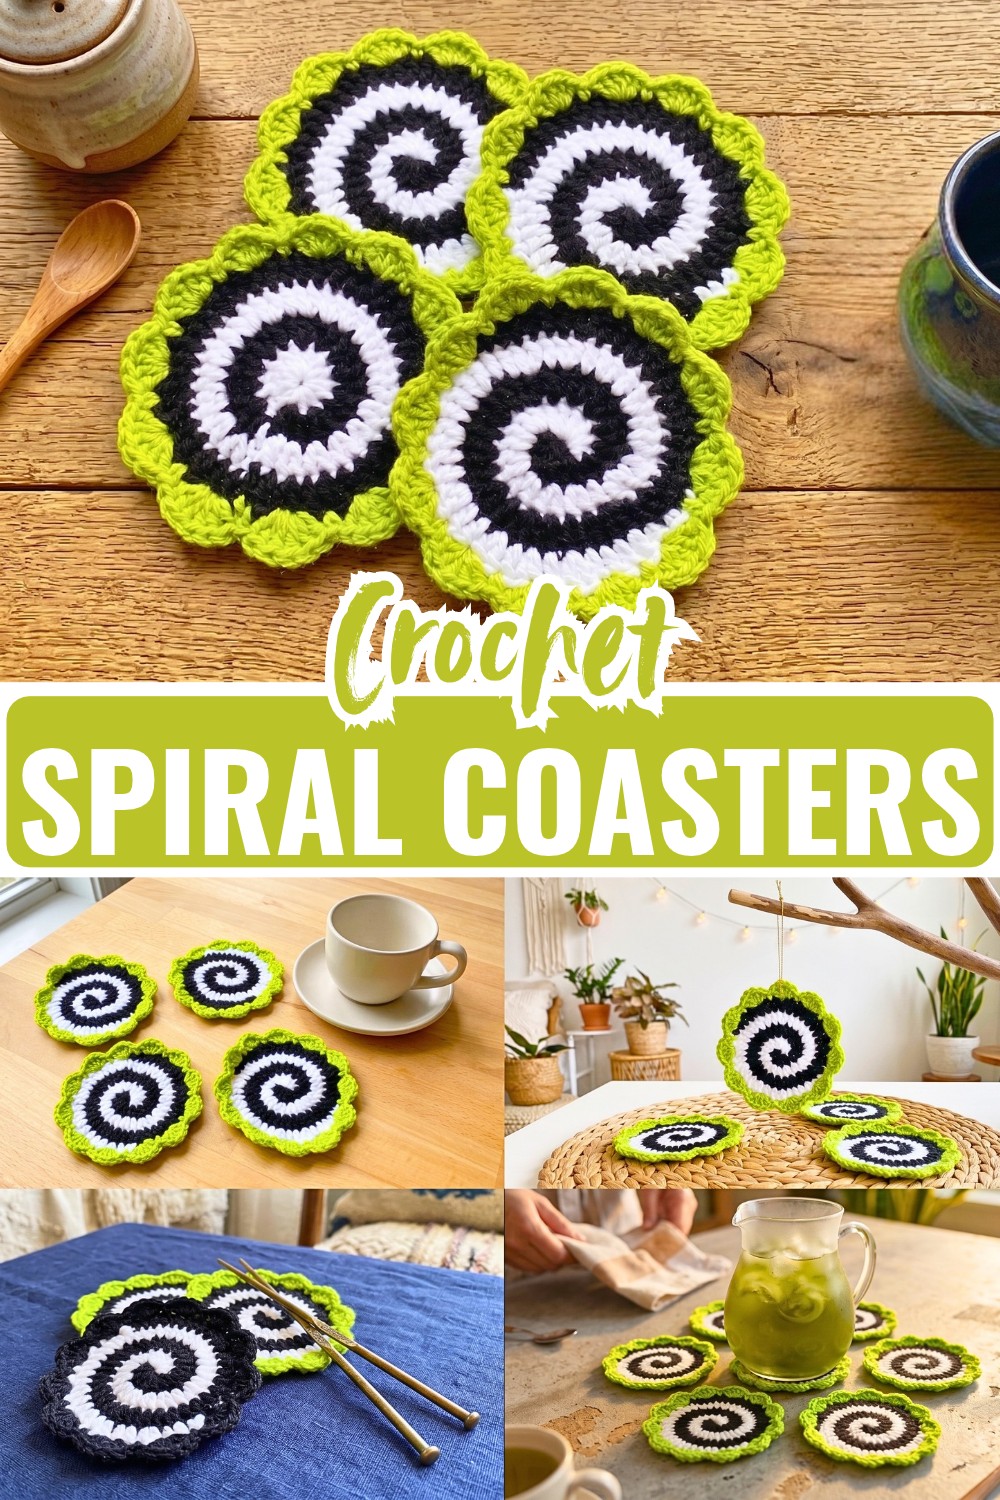
Halloween table decor can be fun without being complicated. These crochet coasters build their eye-catching look right from the center, where black and white sections grow outward into a bold swirl. The finished shape is useful under mugs and glasses, but it also has enough personality to become part of a crochet Halloween table setting.
The interesting part is how the two colors are worked separately within the same rounds. Each color follows its own section of stitches, so the crochet spiral develops as the coaster grows rather than being created afterward. Once the main circle is finished, a simple green scalloped border can add even more definition around the edge.
Credit Pops de Milk Crochet
Materials & Tools Needed
- Yarn: White and black yarn for the spiral; green yarn for the optional edging.
- Crochet hook: 4 mm.
- Stitch markers: Two help keep track of the white and black sections.
- Tapestry needle: For weaving in yarn ends.
- Scissors: For fastening off.
Finished Size & Customization
The finished diameter depends on your yarn, tension, and the number of rounds you work.
For the design shown here, the main coaster finishes after Round 5. If you want a larger coaster, additional increase rounds can be added before the final edging.
You can also change the color combination. The important part of the spiral effect is keeping two contrasting colors clearly separated as they travel around the center.
Pattern Abbreviations
US crochet terms are used.
- ch: Chain
- sc: Single crochet
- hdc: Half double crochet
- dc: Double crochet
- sl st: Slip stitch
- inc: Increase, 2 stitches worked in the same stitch
- MR: Magic ring

Crochet the Spiral Coaster Pattern
Start the Two-Color Center
The first round establishes two small sections inside the same magic ring. Each color gets its own set of stitches, which is what allows the spiral to develop as the rounds continue.
Keep both working loops accessible while you crochet. You will switch between the white and black sections rather than fastening off after every color change.
Round 1: With white yarn, ch 1 (does not count as a stitch), work 1 sc, 1 hdc, and 4 dc into the magic ring; pull up the white working loop, join black yarn into the ring, ch 1, work 1 sc, 1 hdc, and 4 dc into the same ring, then carefully tighten the magic ring using both tails. (6 white sts, 6 black sts; 12 sts total)
Why keep both loops? Each color needs to remain ready for the next round. Pulling up the working loop prevents one color from being accidentally unraveled while you work with the other.

Grow Each Color Section
Round 2 doubles the stitches in each color. This creates the first noticeable expansion and gives the spiral enough room to spread outward.
Work the complete white section first, then return to the black working loop.
Round 2: With white yarn, work 2 dc in each of the 6 white stitches from Round 1, place a marker in the final white stitch, then with black yarn work 2 dc in each of the 6 black stitches from Round 1 and place a marker in the final black stitch. (12 white sts, 12 black sts; 24 sts total)
The markers are especially useful here because there are two active color sections. They give you a clear stopping point for each color without having to count the entire circle every time.

Round 3: With white yarn, repeat [dc inc in the next st, 1 dc in the next st] around the white section to the marker; with black yarn, repeat [dc inc in the next st, 1 dc in the next st] around the black section to its marker. (18 white sts, 18 black sts; 36 sts total)
As the coaster grows, each increase is spaced farther apart. This keeps the circle expanding instead of allowing the center to curl into a bowl.

Round 4: With white yarn, repeat [dc inc in the next st, 1 dc in each of the next 2 sts] around the white section to the marker; with black yarn, repeat [dc inc in the next st, 1 dc in each of the next 2 sts] around the black section to its marker. (24 white sts, 24 black sts; 48 sts total)
At the end of this round, lay the coaster flat. It should be spreading outward rather than cupping upward. If it begins to ripple slightly, check your tension before continuing.
Create the Finished Inner Edge
Round 5 changes the stitch height gradually. The combination of dc, hdc, sc, and slip stitches brings the edge down and gives the coaster a more finished shape.
Round 5: With white yarn, repeat [2 dc, 1 hdc, 1 sc, 1 sl st] across the white section; with black yarn, repeat the same sequence across the black section, then fasten off both colors and weave in the ends. (48 sts total)
Why use shorter stitches here? The move from double crochet down to slip stitch helps the outer edge settle instead of continuing to flare outward like another increase round.

Add the Optional Green Scalloped Border
The green border is not necessary for the coaster to function, but it changes the finished look considerably. The small shells create a decorative edge around the black-and-white spiral.
Before starting, make sure the main coaster is lying reasonably flat. If the center is badly curled, fix the tension before adding the border.
Round 6: Join green yarn with a sl st and ch 1, then repeat [skip 1 st, 5 dc in the next st, skip 1 st, 1 sc in the next st] around; join with a sl st, fasten off, and weave in the ends. (Scalloped edging)
Each group of 5 dc creates one rounded scallop, while the single crochet anchors the next section. Keep the skips consistent so the border remains evenly spaced.

Finishing the Coaster
Weave the remaining yarn tails securely on the back and trim them once they are anchored.
Place the coaster on a flat surface and gently smooth it into a circle. If the edge needs a little help settling, lightly block the coaster rather than stretching it aggressively.
The finished black-and-white spiral already makes a strong Halloween accent, while the green border gives it a more playful, dramatic finish.

These coasters work especially well beneath mugs and glasses, where the spiral remains visible around the drink. Make several in matching colors for a Halloween table, or change the border color for a different seasonal combination.