Looking for a spooky crochet project? This Halloween skull coaster is quick to make, fun to display, and the perfect handmade touch for your festive table.

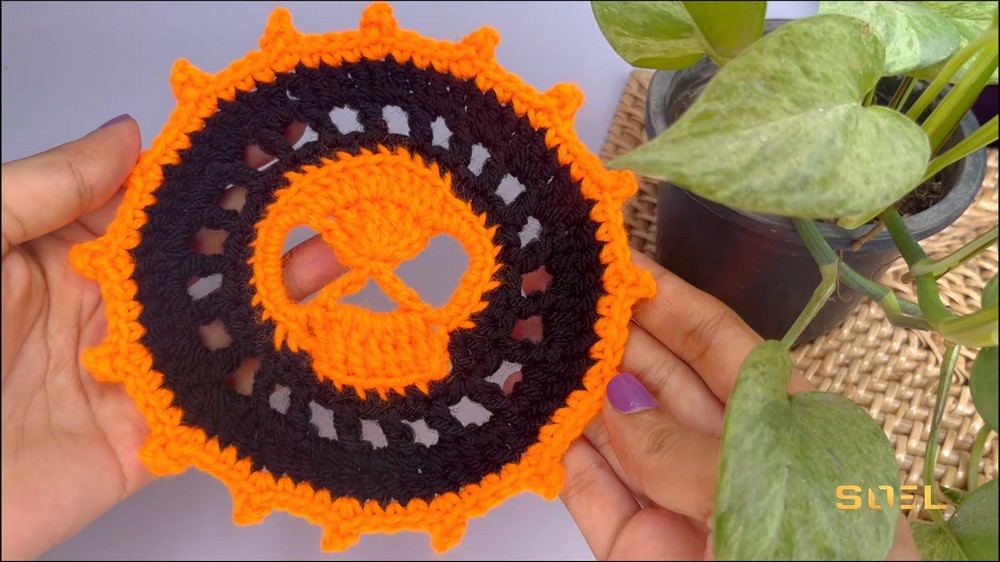
A Halloween table feels even more festive with a handmade crochet skull coaster that mixes playful charm with bold seasonal style. This crochet design starts with a detailed skull face before growing into a striking circular coaster, making every round more satisfying than the last.
Carefully placed stitches, smooth color changes, and a textured border bring the design to life without making the process feel overwhelming. The tutorial builds each section step by step, ending with a finished crochet coaster that’s both decorative and practical for the Halloween season.
Credit SOEL
Construction Overview & Key Features
- Start Point: Begin with a magic ring for a secure center.
- Skull Face Shape: Use a sequence of chains and treble crochets to define the skeleton’s face.
- Color Transitions: Seamlessly switch colors to distinguish the main circle from the outer accent rounds.
- Texture Creation: Utilize back loop only (BLO) stitches for clean texture and smooth transitions.
- Decorative Edges: Finish with picot-edged points for a festive and polished border.
Design Details
- Style: A circular coaster featuring a skeleton face at the center, framed by contrasting accent rings.
Techniques & Stitches Used
- Magic Ring (MR)
- Treble Crochet (tr)
- Double Crochet (dc)
- Half Double Crochet (hdc)
- Single Crochet (sc)
- Slip Stitch (sl st)
- Back Loop Only (BLO)
- Picot Stitch
Materials Needed and Tools
- Yarn: Black and Yellow or Orange (cotton works well for coasters!)
- Hook: 3.5 mm crochet hook
- Scissors
- Yarn needle
- Stitch marker
Abbreviations
- Ch: Chain
- Sc: Single Crochet
- Hdc: Half Double Crochet
- Dc: Double Crochet
- Tr: Treble Crochet
- Sl St: Slip Stitch
- BLO: Back Loop Only
Helpful Tips
- Tighten the magic ring completely for a well-defined skull center.
- Use a stitch marker to avoid miscounting and maintain even rounds.
- Experiment with yarn tension to keep stitches uniform.

Pattern Overview & Making Process
The pattern begins with a magic ring worked in orange or yellow to form the skull’s foundation. Treble crochets and chain spaces shape the facial features, while the second round fills these openings with a mix of single, half double, double, and treble crochet stitches to define the skull.
Once the center is complete, black yarn is joined through the back loops only. Chain spaces and double crochet stitches create a neat circular frame around the skull, followed by another round that fills those spaces to build the coaster’s body and give it a balanced shape.
The final round switches back to the original color for a decorative border. Repeating groups of single crochet stitches and picot details finish the edge, after which the yarn is fastened off and all ends are woven in to complete the Halloween skull coaster.
Step-by-Step Pattern Instructions
Round 1 (Yellow or Orange Yarn)
- Start: Make a magic ring, then chain 3.
- Treble Crochets:
- Make 5 treble crochets into the magic ring.
- Chains & Trebles Around Center:
- Chain 7, then make 1 treble crochet into the ring.
- Chain 4, then make 1 treble crochet into the ring.
- Chain 7, then make 5 treble crochets into the ring.
- Chain 7, then make 1 treble crochet into the ring.
- Chain 4, make 1 treble crochet into the ring.
- Closing the Round:
- Chain 7, then make a slip stitch into the first treble crochet to complete the round.
Round 2
- Start with Single Crochet:
- Chain 1, make 1 single crochet into the same stitch.
- Double Crochet Sequence:
- Chain 1, make 1 double crochet into the same stitch.
- Make 2 double crochets into the next stitch.
- Make 3 double crochets into the next stitch.
- Make 2 double crochets into the next stitch.
- Make 2 double crochets into the next stitch.
- In the Chain Spaces:
- In the first chain space, make 1 half double crochet and 8 single crochets.
- Chain 3, then make 1 treble crochet into the treble crochet stitch of the previous round.
- In the second chain space, make 5 treble crochets.
- Make 1 treble crochet into the next treble crochet stitch of the previous round.
- In the third chain space, make 9 single crochets, then 1 half double crochet in the same space.
- Finish the Round:
- Cut the yarn and create an invisible fasten-off.

Round 3 (Switch to Black Yarn)
- Attach Yarn (BLO):
- Join black yarn, working into the back loops only.
- Double Crochet Setup:
- Make 2 double crochets, then chain 2.
- Stitch Pattern:
- (Skip the next stitch, make 1 double crochet, chain 2) Repeat 18 times around.
- Use a stitch marker to mark the first chain for ease of closing the round.
- Close the Round:
- Make a slip stitch into the marked stitch (back loop only) to complete the round.
Round 4
- Start Round:
- Make a single crochet in the space from the previous round, then chain 1.
- Stitch Pattern:
- (Make 1 double crochet into the treble crochet stitch, then 2 double crochets into the next chain space) Repeat 20 times around.
- Finish the Round:
- Cut the yarn and create an invisible fasten-off.

Round 5 (Switch Back to Orange or Yellow Yarn)
- Join the Yarn:
- Attach the yarn to begin the decorative border.
- Decorative Edge Pattern:
- (Make 4 single crochets, chain 3, make a single crochet picot by slip stitching into the 1st chain of the 3-ch, then make 1 single crochet in the same stitch) Repeat 15 times around.
- Complete the Round:
- Cut the yarn and finish with an invisible fasten-off.
Notes
- Make sure all yarn ends are securely woven in with a yarn needle on the back of the work.
- This pattern works well with contrasting colors to bring out the skeleton face details and border texture.

Troubleshooting & Customization
Common Issues
- Loose Centers: Adjust magic ring tightness or redo Round 1 for a snug fit.
- Uneven Structure: Count stitches carefully; use stitch markers!
Customization Ideas
- Color Palettes: Mix black with neon green or purple for extra Halloween vibes!
- Border Variations: Swap picots for scallops or simpler edges for versatility.
Pattern Variations & Modification Ideas
Alternate the final round frame accents using either orange or yellow depending on your Halloween party themes
Assembly
- No assembly is required.
- Securely weave in all yarn tails using the yarn needle, ensuring durability.
Final Tips
- Make a matching set of coasters for seasonal décor!
- Share your creations on social media and tag your friends for inspiration.