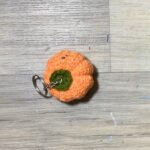
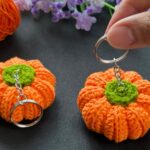
Looking for a tiny fall accessory? This easy crochet pumpkin keychain uses simple stitches, a ribbed texture, soft stuffing, and a green stem for a cheerful handmade finish.
This crochet pumpkin keychain turns a small amount of orange and green yarn into a cheerful fall accessory with a softly stuffed, ribbed pumpkin shape. The body begins as a flat piece worked in rows, so the texture is easy to see as you crochet.
Once the ribbed piece is folded and joined, the shaping gives the flat fabric its rounded pumpkin form. The final center stitches create the familiar pumpkin ribs, while the crocheted green stem and keychain ring make it ready to carry or gift.
Materials Needed
- Yarn: Orange (for the pumpkin) and Green (for the stem)
- Hook Size: 2.5 mm
- Other: Stuffing (fiberfill), tapestry needle, scissors, a lighter (to burn the ends if using a synthetic cord/yarn), and a keychain ring.
Pumpkin Body
The pumpkin body is worked flat in orange yarn. The back-loop-only stitches create the raised ribbed texture that will become visible once the piece is shaped.

Foundation
Make a slip knot and chain 15.
Row 1: Starting in the second chain from the hook, make 14 half double crochets (HDC).
Row 2: Chain 1, turn your work. Make 13 HDC in the back loop only (BLO), then make 1 HDC through both loops in the last stitch.
What to Watch For: The BLO stitches create the ridges that give the pumpkin its ribbed appearance. Keep the last HDC worked through both loops as instructed so the edge stays consistent.
Row 3: Chain 1, turn. Make 13 HDC (BLO), then 1 HDC in the last stitch.
Rows 4–16: Repeat the pattern from Row 3 (Chain 1, turn, 13 HDC in BLO, 1 HDC).
As these rows build up, the repeated BLO stitches form the ribbed fabric that will later wrap around the stuffed center.

Stitch Count Check
Before moving on to seaming, check that your finished flat piece has the same stitch width throughout the rows. Each row should contain the 13 HDC worked in BLO plus the final HDC, giving you 14 stitches across.
If the stitch count changes, check the first and last stitch of the row before continuing. The final HDC is worked through both loops, while the stitches before it are worked in BLO.
Seaming the Body
The flat ribbed piece now needs to be joined so it forms a tube. This tube will provide the base for the stuffed pumpkin shape.
- Fold the flat ribbed piece in half so the short ends meet.
- Chain 1, then slip stitch 13 times in the back loops only to join the two edges together into a tube.
- Finish with a final slip stitch and chain 1. Fasten off, leaving a very long tail for sewing and shaping.
Why This Step Matters: The short edges are being joined before the stuffing is added, changing the flat ribbed piece into the rounded form that can be filled.
Before Moving On: Leave the long yarn tail in place. It is needed for the gathering and shaping steps that follow.
Shaping and Stuffing
With the tube formed, the long orange yarn tail is used to close and shape the pumpkin.
- Thread the long tail onto a tapestry needle. Weave the needle in and out around the top edge of the pumpkin tube.
- Pull the yarn tight to cinch one end completely closed.
- Stuff the pumpkin firmly with fiberfill.
- Repeat the weaving process around the open bottom edge, pulling it tight to close the pumpkin completely.
- To create the classic pumpkin indentations, string the needle up through the center of the pumpkin, loop it over the outside, and pull down through the center again. Pull tight and repeat this around the outside a few times to create the “ribs” of the pumpkin. Secure the yarn and cut the excess.
Shape Check: The stuffing should fill the pumpkin firmly enough to give it a rounded shape while leaving the fabric able to gather at the ends. After both openings are closed, check that the center shaping is pulling inward evenly.
What to Watch For: When creating the ribs, keep the tension controlled rather than pulling extremely hard in one place. The goal is to create several visible indentations around the pumpkin rather than pulling the entire shape to one side.
Pumpkin Stem
The stem is worked separately in green yarn and is kept small so it sits neatly on top of the stuffed pumpkin.
Round 1: Make a magic ring. Chain 1, then make 6 single crochets (SC) into the ring. Slip stitch into the very first SC to join.
Round 2: Chain 1. Make 1 SC, then 1 SC increase (2 SC in the next stitch). Repeat this sequence 3 times for a total of 9 SC. Slip stitch into the first SC to join.
Finish: Chain 1 and fasten off, leaving a tail to sew the stem to the pumpkin.
What to Check: Round 2 should finish with 9 SC. Keeping this count accurate gives the stem its intended small, slightly widened shape for attaching to the pumpkin.

Final Assembly
The last steps attach the green stem and keychain ring to the finished pumpkin.
- Using your tapestry needle, sew the green stem directly onto the top center of your stuffed pumpkin.
- Weave the excess green yarn through the top of the stem to attach your keychain ring securely.

Final Check: Make sure the stem is centered on the top of the pumpkin and that the green yarn is woven securely through the stem before using the keychain.
Your crochet pumpkin keychain is now ready to carry as a small fall accessory or give as a handmade seasonal gift.