Handmade Crochet Rose for Spring or Holiday Gift
This crochet rose pattern is a beautiful way to craft delicate, handmade flowers that never wilt. What makes this particular tutorial special is its approach to creating realistic and layered petals, capturing the look of a freshly bloomed rose. With step-by-step guidance, even beginners can make it with ease.

This pattern fits perfectly with springtime, as it symbolizes new beginnings and fresh blooms. It also makes for a thoughtful Valentine’s Day gift or a Mother’s Day present. Handmade roses carry warmth and personal charm, making them ideal for heartfelt occasions.
Credit Xúy Crochet
Stitch Pattern & Structural Elements
The tutorial mainly utilizes simple stitches like single crochet and double crochet to shape the petals and layers effectively. Each layer is tightly stitched, giving the rose a full, realistic form, and the base structure keeps it stable whether used as décor or part of another project, like a bouquet.
Features & Benefits
- Customizable Size and Colors: Tailor the rose to match your desired aesthetic.
- Eco-Friendly Crafting: Replaces real flowers and reduces waste.
- All Skill Levels Welcome: Pattern is easy yet results in a polished, professional flower.
- Versatile Use: Attach to hats, bags, or turn them into brooches or keychains.
Required Materials:
To create this beautiful crochet rose gift, you’ll need the following materials:
- Yarn: You can select the yarn colors of your choice for the rose, leaves, base, and decorative elements.
- Crochet Hook: Ensure you use a hook size suitable for the yarn you’ve chosen.
- Scissors: For snipping excess yarn.
- Sewing Needle: For sewing parts together and hiding yarn tails.
- Cotton Filling: To stuff the base and ring holder.
- Quick-Drying Glue: For attaching the bow, flowers, and other decorative elements.
- Decorative Bow: (Optional) A pre-made bow or crochet your own.
Important Notes:
- Beginner-Friendly Tips: The tutorial guides you step-by-step, but if you’re new to crocheting, ensure familiarity with basic stitches like single crochet (sc), double crochet (dc), half double crochet (hdc), slip stitch (sl st), and creating a magic ring.
- Loop Awareness: Pay attention to instructions regarding front loop only (FLO) or back loop only (BLO) stitches.
- Joining Stitches: Always join rounds with a slip stitch to keep the pattern neat and establish a base for the next round.
- Cotton Stuffing: Don’t overstuff the base; it needs to maintain its shape while holding the ring securely.
- Glue Usage: Be sparing with glue to avoid unwanted messes. Use it to secure decorative elements like roses, bows, and leaves.
- Customization: Feel free to adjust the colors or placement of flowers to personalize your gift.

Step-by-Step Instructions:
Here is the detailed breakdown based on the tutorial:
1. Top Circle (Lid)
- Round 1: Create a magic ring and crochet 6 single crochet (sc) inside. Pull the loop tight and join with a slip stitch (sl st).
- Round 2: Crochet 6 single crochet increases (2 sc into each st). Sl st to join.
- Round 3: Alternate 1 single crochet, 1 increase (6 groups). Sl st to join.
- Round 4: Alternate 2 single crochet, 1 increase (6 groups). Sl st to join.
- Round 5: Alternate 3 single crochet, 1 increase (6 groups). Sl st to join.
- Round 6: Alternate 4 single crochet, 1 increase (6 groups). Sl st to join.
- Cut excess yarn, hide it on the back of the piece, and trim.

2. Main Body
- Rounds 1-3: Follow the same steps as the Top Circle to establish the base.
- Round 4: Chain 3, and double crochet (dc) into the back loop only (BLO). Continue BLO double crochet for the round. Sl st to join (18 stitches total).
- Round 5: Work with a double crochet decrease (dc dec) grouped into nine. Sl st to join.
- Round 6: Alternate 1 single crochet (sc) into the BLO, then 1 single crochet decrease. Complete in groups of 3.
- Rounds 7-11: Follow the pattern of increases per group:
- Round 7: 2 sc in each stitch.
- Round 8: 1 sc, 1 increase.
- Round 9: 2 sc, 1 increase.
- Round 10: 3 sc, 1 increase.
- Round 11: 4 sc, 1 increase.
- Round 12: Work 1 single crochet into each stitch (36 stitches).
- Round 13: Front loop only (FLO) single crochet into each stitch. Chain 1 to prepare for next rounds.
- Rounds 14-17: Single crochet without increases or decreases. After Round 17, slip stitch to join, trim the excess yarn, and hide it.

3. Assembling the Base
- Align the main body with the top circle (lid). Slip stitch around 9 stitches to secure the circle and main body together. Ensure a neat finish.
- Stuff a small amount of cotton inside before closing completely.
- Attach the decorative elements (roses, ribbons, etc.). Ensure secure placement with glue, hiding yarn tails for a clean look.
4. Ring Holder Base
- Chain Structure: Begin with a slip knot and chain 10. Work single crochet into the chain to create a small flat panel (9 sc).
- Repeat Rounds: Chain 1, turn, and single crochet into each stitch. Repeat this process for five rounds.
- Joining Sides: Fold the panel in half and slip stitch the edges together to form a cylindrical shape.
- Slip Stitch Rounds: Add slip stitches around the top and bottom edges for a cleaner finish.
- Stuff and Secure: Add cotton inside, crochet a slight raised edge for the ring placement, and attach it securely to the base using a sewing needle.

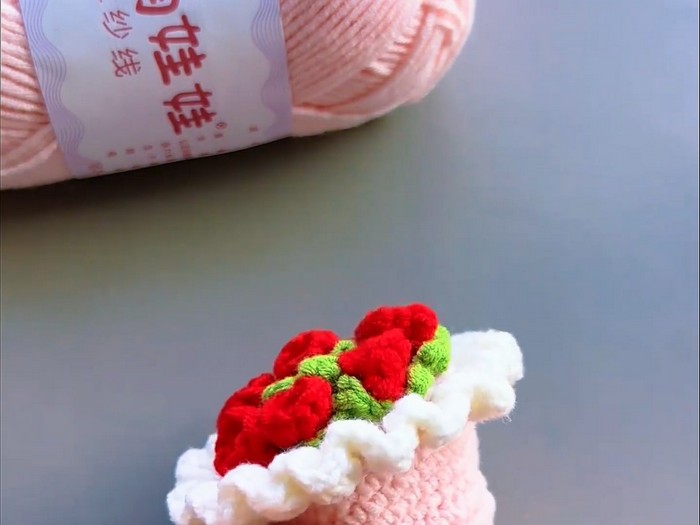
5. Flower and Leaf Decoration
- Small Roses:
- Chain 6, working from the second chain from the hook:
- Sc, sc increase, and sc across the chain to form a small petal.
- Repeat for all petals and roll the yarn to form a rose. Secure with glue.
- Create about 9 roses.
- Chain 6, working from the second chain from the hook:
- Leaf Creation:
- Start with a magic ring. Chain 3, then create single crochet (sc), half double crochet (hdc), and slip stitch (sl st) points for the leaf shape.
- Create 3 leaves per set.
- Attach roses and leaves with glue to the ring box cover in a visually pleasing arrangement.
6. Decorative Bow
- Fold a small piece of yarn into a bow shape. Secure the wrapping part with a tied knot for a bow-like appearance.
- Dab glue to attach it to the lid or the main body.
By following these steps, you can create a stunning crochet rose gift, perfect for Valentine’s Day, anniversaries, or any special occasion.


