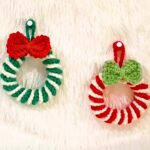
Want a unique yet simple crochet idea? These Christmas key medals are a beautiful way to spread holiday cheer and add charm to gifts!

Christmas crocheting feels even more special with small handmade crochet pieces that add festive charm wherever they go. This crochet design wraps a plain key ring with colorful stitches before finishing it with cheerful holiday details that instantly brighten the season.
The simple construction makes it easy to enjoy while still offering plenty of variety through different border options. Once the charms, snowflake accents, and hardware are added, the finished crochet piece becomes a lovely decoration for keys, gift wrapping, or the Christmas tree.
Credit Crochet Magic
Materials & Tools You’ll Need
Yarn & Crochet Materials:
- Yarn: 5-ply milk cotton yarn in festive colors (e.g., red, green, white, brown/tan) such as Xuefeier Mengwa or similar sport-weight cotton yarn.
- Crochet Hook: 2.0 mm hook for tight and uniform stitches.
- Base Ring: 3 cm (approx. 1.2 inches) flat metal key ring/hoop.

Embellishments:
- Resin Charms: Santa head, Christmas tree, bells, etc.
- Snowflake Accents: Resin/sequin snowflakes.
- Extras: Name tags, bell charms.
Keychain Hardware:
- Keychain rings, small open jump rings.
Additional Tools:
- Hot glue gun & glue sticks.
- Yarn needle.
- Small pliers.
- Scissors.
Pattern Note
This pattern is worked in the round, using basic shaping techniques. Adjust gauge by modifying hook size to achieve clean, crisp stitches.
Abbreviations
- ch: Chain
- sl st: Slip Stitch
- sc: Single Crochet
- inc: Increase (2 single crochets into the same stitch)
- dec: Decrease (single crochet two stitches together)
- st(s): Stitch(es)
- MR: Magic Ring
Key Features of the Pattern
- Festive Design: Shaped to resemble Christmas medals (e.g., snowflakes, bells, or ornaments).
- Texture: Creative use of stitches to add depth and charm.
- Functional: Includes attachments for keychains or clasps.
- Customizable: Adapt colors, embellishments, or thread types to suit your vision.

Pattern Overview & Making Process
The tutorial starts by covering a 3 cm metal key ring with 36 double crochet stitches worked evenly around the metal base using a 2.0 mm hook and 5-ply cotton yarn. On the final stitch of the round, the yarn is changed to a second color before joining with a slip stitch for a clean finish.
After the foundation is complete, the outer edge is finished by choosing one of four border styles: a festive shell border, continuous loops, picot arches, or an airy mesh edging. The round is joined, the yarn is fastened off, and all loose ends are woven in neatly.
To finish the piece, a contrasting strand is woven through selected stitches for extra detail. Resin Christmas charms are glued to the center, a snowflake accent is added, and bells or other decorations are attached with jump rings before securing the keychain hardware to complete the festive design.
Step-by-Step Instructions
Round 1: Foundation Ring Base
- Place your primary yarn color around the metal ring.
- Ch 2 (does not count as a stitch).
- Work 36 dc around the ring, keeping firm tension to ensure the metal is fully covered.
- On the 36th dc, switch to your secondary color cleanly by pulling through the final yarn-over with the new color.
- Join with a sl st to the first dc of the round.

Round 2: Outer Edging (Choose One Style)
Option 1: Festive Shell Border
- Ch 1, sc in the first st.
- Sk 1 st, work 5 dc in the next st (shell made), sk 1 st, sc in next st.
- Repeat around, join with a sl st to first sc. Fasten off and weave in ends.
Option 2: Continuous Loop Border
- Ch 1, sc in the first st.
- Ch 3, sc in next st.
- Repeat for every stitch around. Join with sl st, fasten off.

Option 3: Picot Arch Border
- Ch 1, sc in the first st.
- (Ch 2, sc) all in the same st. Sk 1 st, sc in next st.
- Repeat around. Join with sl st, fasten off.
Option 4: Airy Mesh Border
- Ch 1, sc in the first st.
- Ch 3, sk 1 st, sc in next st.
- Repeat around. Join with sl st, fasten off.

Finishing Touches
Decorative Weaving:
- Cut a short strand of contrasting yarn.
- Use a tapestry needle to weave through every 2nd dc stitch across 3 stitches. Tie neatly at the back.
Applying Resin Charms:
- Dab a small amount of hot glue onto the back of charms (Santa head, tree, etc.) and press onto the center.
Adding Snowflake & Hardware:
- Glue a snowflake charm or accent near the medal center for a frosty, layered effect.
- Use pliers to open a jump ring, attach charms and bells through the top-center stitch, and close tightly.
- Attach a keychain ring through the jump ring for functionality.
Tips for Success
Tension Tips on the Metal Ring:
- Hold the yarn tail tightly while crocheting the foundation. Keep dc stitches firm for an even finish.
Crochet Clean Color Changes:
- Perform the final pull-through of Round 1’s last stitch with the edging color to avoid color bleeding.
Hardware Security:
- Use pliers to seal jump rings tightly so charms stay securely fastened.
Creative Customizations
- Color Variations:
- Green base + red edging = Christmas tree look.
- White base + blue edging = snowflake theme.
- Gold base + white edging = classic holiday bell vibes.
- Alternative Uses:
- Skip the keychain hardware and attach a ribbon loop for tree ornaments, gift tags, or bag charms.
Conclusion & Action Step
These festive Christmas Key Medals are perfect for anyone looking to combine practicality with holiday cheer. Gather your materials, follow the steps, and have fun customizing for gifts or decor! Share your creations online or gift them as heartfelt keepsakes.