A palm-sized crochet Christmas bear with plush texture, tiny paws, rosy cheeks, and a jaunty Santa hat makes a heartwarming handmade holiday keepsake.
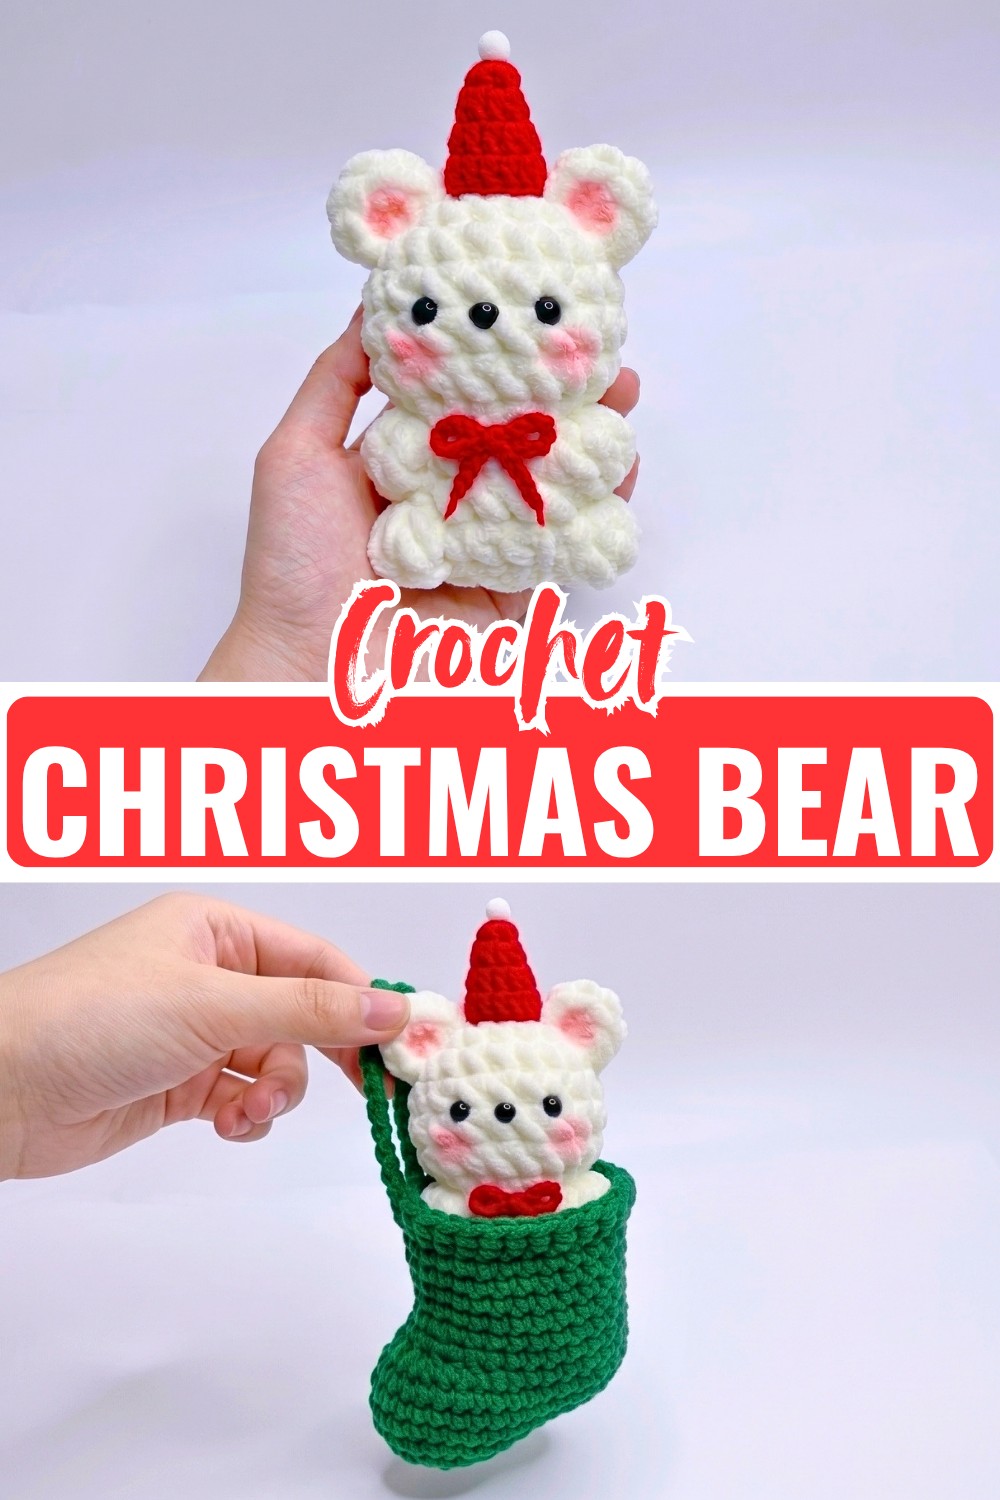
This little crochet Christmas bear has the kind of soft, rounded shape that makes you want to pick it up the moment you see it. The velvet yarn gives the body a plush finish, while the tiny popcorn paws and ears add just enough definition to make the crochet bear instantly recognizable.
The construction is especially satisfying because the body and head are crocheted as one piece, so there is no separate head to sew on later. Once the face is added, the Santa hat, red neck bow, and soft pink cheeks bring the whole bear to life.
Credit Xuxu Crochet
Materials & Tools Needed
- White chenille or velvet yarn for the body and ears
- Red yarn for the Santa hat and neck bow
- 7.0 mm crochet hook for the white velvet yarn
- 2.5 mm crochet hook for the red yarn
- 7 mm safety eyes
- 6 × 8 mm safety nose
- 10 mm white pom-pom for the Santa hat
- Polyester fiberfill for stuffing
- Stitch marker
- Yarn or tapestry needle
- Scissors
- Hot glue gun and glue sticks
- Pink blush and a small makeup brush
Safety note: The supplied construction uses hot glue for the eyes and nose. If the finished bear will be handled by a young child, use securely attached child-safe facial components instead and avoid loose embellishments.
Finished Size & Customization Ideas
The finished bear measures approximately 10–12 cm (4–4¾ inches) tall, depending on your yarn tension and the exact thickness of your chenille yarn.
You can easily give the same bear a different personality by changing the hat and bow color. Red gives it a classic Santa look, while forest green, gold, or soft mint creates a different holiday palette. You can also add a small hanging loop through the top of the hat if you want to use the bear as a tree ornament or bag charm.
Pattern Abbreviations
- MR: Magic Ring
- ch: Chain
- sl st: Slip Stitch
- sc: Single Crochet
- dc: Double Crochet
- inc: Increase – 2 sc in the same stitch
- dc-inc: Double Crochet Increase – 2 dc in the same stitch
- dec: Single Crochet Decrease
- FLO: Front Loops Only
- st(s): Stitch(es)

A Note About the Joined Rounds
Unlike many amigurumi patterns worked in a continuous spiral, the main bear is worked in joined rounds. At the end of each round, slip stitch into the first stitch before chaining up for the next round. This matters when placing the face and shaping the arms and legs, so keep the round joins consistent throughout the body.
Step-by-Step Crochet Instructions
Main Body & Head
Using white velvet yarn and a 7.0 mm hook, crochet the head and body as one continuous piece.
- Round 1: Make a MR, ch 1, work 10 sc into the ring, pull the tail tight to close, then sl st to the first sc to join. (10 sts)
- Round 2: Ch 1, work (1 sc, 1 inc) 5 times around, then sl st to join. (15 sts)
- Round 3: Ch 1, work (2 sc, 1 inc) 5 times around, then sl st to join. (20 sts)
- Round 4: Ch 1, work 1 sc in each stitch around, then sl st to join. (20 sts)
- Round 5: Ch 1, work 1 sc in each stitch around, then sl st to join. (20 sts)
- Round 6: Ch 1, work 1 sc in each stitch around, then sl st to join. (20 sts)
- Round 7: Ch 1, work 10 dec around, then sl st to join. (10 sts)
- Round 8: Working in FLO throughout, ch 1, work 1 sc, 1 inc, 1 popcorn stitch, 1 inc, 1 sc, 1 inc, 1 popcorn stitch, 1 inc, 1 sc, 1 inc, then sl st to join. (14 sts)
- Round 9: Ch 1, work 1 sc in each stitch around, including through the top loops of the popcorn stitches, then sl st to join. (14 sts)
- Round 10: Ch 1, work 4 sc, 1 popcorn stitch, 4 sc, 1 popcorn stitch, 5 sc, then sl st to join. (14 sts)
- Round 11: Ch 1, work (1 sc, 1 dec) 4 times, then 2 sc, and sl st to join. (10 sts)
- Round 12: Ch 1, work 5 dec around, then sl st to join. (5 sts)
How to Make the Popcorn Paws
For each popcorn stitch, work four incomplete double crochets into the same stitch: yarn over, insert the hook, pull up a loop, yarn over and pull through two loops, leaving the remaining loop on the hook. Repeat this four times, then yarn over and pull through all five loops.
The popcorns are what create the bear’s little raised arms and legs. When you reach the next round, make sure you work into the top loops of each popcorn rather than accidentally skipping them.
Stuff and Close the Bear
After Round 11, pull up a long loop to keep your work secure while you add the stuffing. Stuff the head and body firmly before completing the final closure. Chenille yarn can hide gaps easily, so check the shape from several angles as you fill it rather than adding all the stuffing at once.
- Finishing: After Round 12, cut the yarn leaving a short tail, thread the tail onto a yarn needle, pick up the front loops of the remaining 5 stitches, pull tight to close the opening, and weave the tail inside the body.
Bear Ears
Make 2 ears using white velvet yarn and the 7.0 mm hook.
- Round 1: Make a MR, ch 1, work 6 sc into the ring, then pull the center ring tight. (6 sts)
Fasten off, leaving a sewing tail.
Placing the Ears
Sew the ears onto the upper sides of the head between Rounds 2 and 3. Before securing them completely, place both ears temporarily and check them from the front. This makes it much easier to keep the bear’s face balanced rather than discovering that one ear sits higher after the sewing is finished.
Santa Hat
Using red yarn and a 2.5 mm hook, make the pointed Santa hat.
- Round 1: Make a MR, ch 2, work 6 dc into the ring, pull the ring tight, then sl st to the first dc to join. (6 sts)
- Round 2: Ch 2, work (1 dc, 1 dc-inc) 3 times around, then sl st to join. (9 sts)
- Round 3: Ch 2, work (2 dc, 1 dc-inc) 3 times around, then sl st to join. (12 sts)
- Round 4: Ch 2, work (3 dc, 1 dc-inc) 3 times around, then sl st to join. (15 sts)
Fasten off and weave in the ends inside the hat. Add a small amount of fiberfill inside the hat so it keeps its shape when placed on the bear.
Hat tip: Don’t overstuff the hat. A light amount of fiberfill is enough to keep the cone upright while still allowing you to tilt it naturally to one side.
Simple Red Neck Bow
Using red yarn and the 2.5 mm hook:
- Bow: Make a slip knot, chain 35, cut the yarn and pull the working loop through, then manually tie the chain into a small bow.
Adjust the bow before attaching it so both loops are approximately the same size.
Assembly & Finishing
Attach the Face
Place the 7 mm safety eyes between Rounds 4 and 5, keeping them evenly spaced on either side of the face.
Center the 6 × 8 mm safety nose between and slightly below the eyes. Check the placement from the front before securing the facial pieces.
Add the Santa Hat
Glue the 10 mm white pom-pom to the tip of the red hat.
Apply glue around the base of the lightly stuffed hat and attach it to the top of the bear’s head. Tilt it slightly to one side for the characteristic Santa look.
Attach the Neck Bow
Place the red bow at the neck, directly between the head and the popcorn arms. Secure it so the center of the bow sits in the middle of the bear rather than drifting toward one side.
Add Rosy Cheeks
Use a small makeup brush to lightly dab pink blush beneath each eye. You can also add a touch of blush to the center of each ear.
Keep the blush light at first. It is easier to build up the color than to remove excess from plush velvet yarn.

Final Details
Take a moment to check the bear from the front:
- Both ears should sit at similar heights.
- The eyes should be evenly spaced.
- The nose should sit centrally below the eyes.
- The popcorn arms and legs should remain visible.
- The Santa hat should sit securely without hiding the face.
- The bow should be centered at the neck.
These small adjustments make a noticeable difference on such a compact finished piece.

Conclusion
Your plush Crochet Christmas Bear is now ready to bring a little handmade warmth to the holiday season. The soft white body, tiny popcorn paws, rosy cheeks, red bow, and tilted Santa hat give it plenty of character without requiring complicated separate body pieces.
Display it on a shelf or mantel, tuck it beneath the Christmas tree, turn it into a festive ornament, or give it as a small handmade keepsake.