Here’s a tiny crochet Christmas bear with bobble-stitch details, rounded ears, and a green festive hat, ready to become a sweet handmade holiday keepsake.
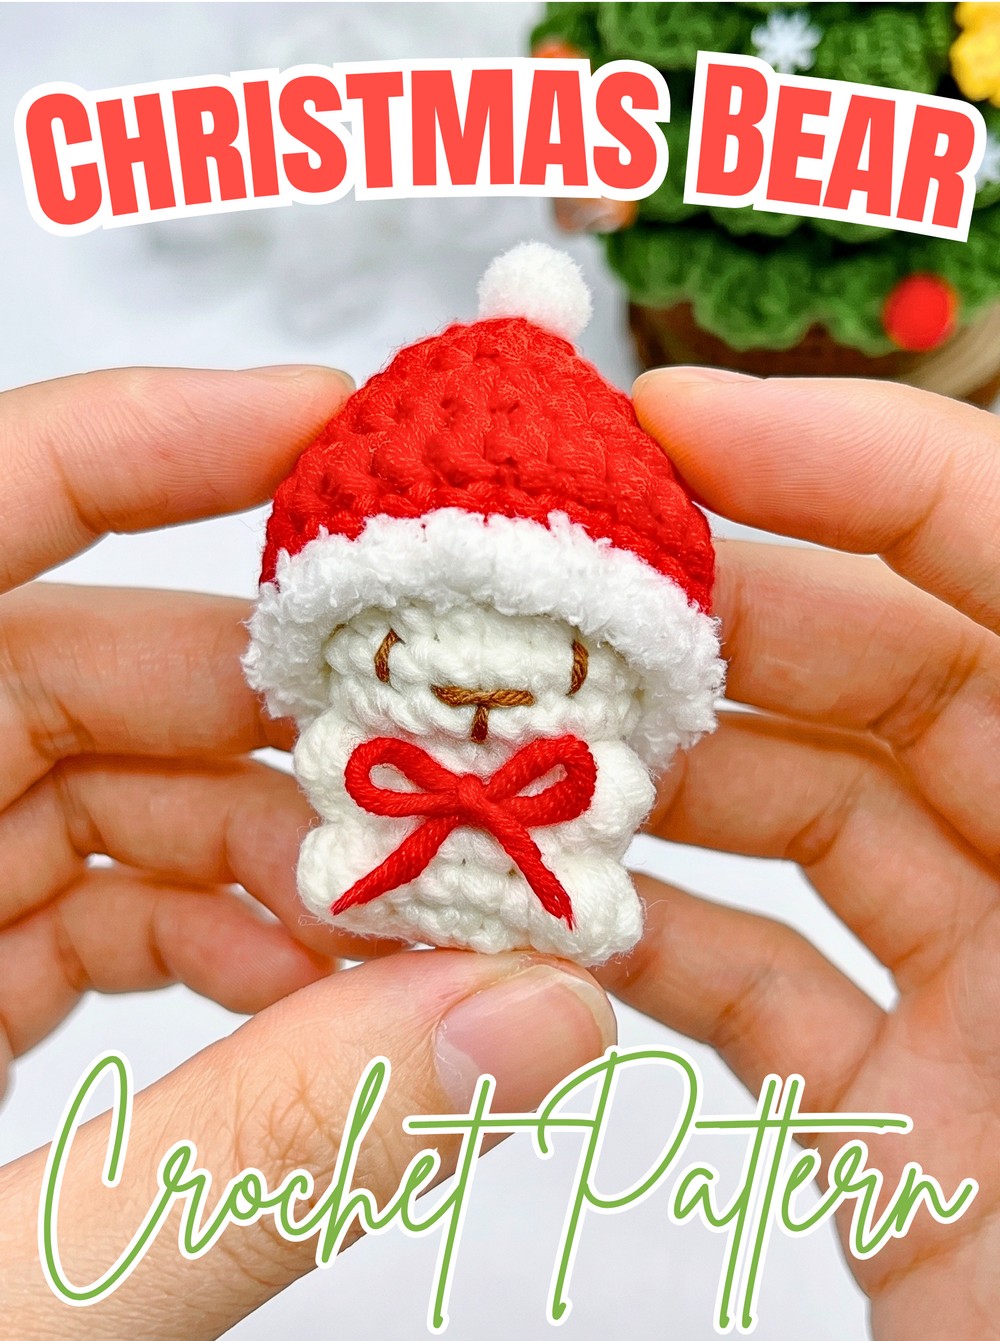 Crochet Christmas Bear Pattern – Mini Amigurumi Tutorial
Tiny crochet teddy bears have a special place in Christmas crafting, especially when soft beige yarn, little rounded ears, and a festive green hat give them a cozy holiday personality. This crochet Christmas bear combines miniature amigurumi charm with textured stitches that make its body distinctive and its seasonal character easy to recognize.
In this tutorial, you’ll learn how to shape the crochet bear’s head and body, create its ears and embroidered face, and crochet a green hat with fluffy white trim. The finishing steps bring everything together with stuffing, a white pom-pom, and a small yarn bow, creating a palm-sized crochet bear for Christmas gifts or decorations.
Credit Xuxu Crochet
Materials & Tools
- Beige milk cotton yarn: 5-ply, approximately 2 mm thick, for the bear.
- Green milk cotton yarn: 5-ply, approximately 2 mm thick, for the hat and decorative bow.
- Fluffy white yarn: Approximately 2 mm thick, for the hat trim.
- Dark brown yarn: For facial embroidery.
- Crochet hook: 2.5 mm.
- Fiberfill stuffing: For shaping the bear.
- Small white pom-pom: For the hat tip.
- Stitch markers: To track rounds.
- Yarn needle: For sewing and weaving in ends.
- Fabric glue: For attaching the pom-pom and bow.
- Scissors: For cutting yarn.
Finished Size & Customization
The finished bear is approximately palm-sized, making it suitable for small Christmas gifts, ornaments, and seasonal bag charms.
For a classic Santa-inspired color scheme, replace the green hat yarn with red. To hang the bear on a Christmas tree, add a loop of yarn or metallic cord at the top of the hat. A keyring can also turn it into a festive bag accessory.
Pattern Abbreviations
ch: Chain
sc: Single crochet
hdc: Half double crochet
dc: Double crochet
inc: Increase – work 2 single crochet stitches into the same stitch.
dec: Decrease – work 2 single crochet stitches together.
bobble: A raised stitch made from 4 incomplete double crochets worked into one stitch, then joined by pulling yarn through all 5 loops on the hook.
sl st: Slip stitch
FLO: Front loop only
st(s): Stitch(es)

Step-by-Step Crochet Christmas Bear Tutorial
Step 1: Shape the Bear’s Body and Head
Yarn: Beige
The body and head are crocheted as one continuous piece, giving this mini amigurumi its rounded silhouette. Begin at the base with a magic ring, then increase gradually before working even rounds to build height.
Round 1: Make a magic ring, chain 1, and work 5 single crochet stitches into the ring. Place a stitch marker in the first stitch and pull the ring closed. (5 stitches)
Round 2: Join with a slip stitch in the first stitch and chain 1. Work 2 single crochet stitches into the same stitch, then work 2 single crochet stitches into each remaining stitch around. (10 stitches)
Round 3: Starting in the first stitch, repeat 1 single crochet and 1 increase around. (15 stitches)
Round 4: Repeat 2 single crochet stitches and 1 increase around. (20 stitches)
Rounds 5–7: Work 1 single crochet in every stitch for three rounds. (20 stitches per round)
Round 8: Work 10 decreases around. (10 stitches)
Teaching tip: Keep the increases evenly distributed during the early rounds. Once you reach 20 stitches, the even rounds help the piece develop height instead of continuing to spread outward.
Step 2: Add Raised Bobble Details
Yarn: Beige
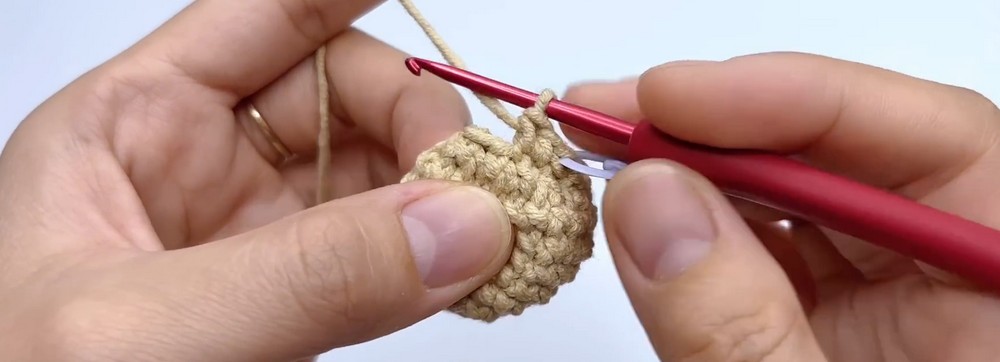
The bobble stitches create small raised accents on the bear’s body, adding texture to its otherwise smooth crochet surface. This detail gives the finished figure a more distinctive handmade look.
Work the next round through the front loops only.
Round 9: Work 1 single crochet in the first front loop, 1 increase in the next, 1 bobble in the third, and 1 increase in the fourth.
Continue with 1 single crochet, 1 increase, 1 bobble, 1 increase, 1 single crochet, and 1 increase across the remaining stitches as specified in the supplied pattern.
Push each bobble outward with your fingers so its raised texture appears on the outside of the work.
Round 10: Work 1 single crochet in each stitch around.
Round 11: Work 4 single crochet stitches, 1 bobble, 4 single crochet stitches, 1 bobble, and 5 single crochet stitches.
Round 12: Repeat 1 single crochet and 1 decrease around, following the shaping sequence.
The supplied instructions list 14 stitches for Rounds 9–11, but the individual stitch sequences do not consistently match that total. Check your stitch count against the original pattern before continuing.
Check your work: The bobbles should stand out clearly rather than sink inside the fabric. Adjust them gently from the outside before moving on.
Step 3: Close the Body
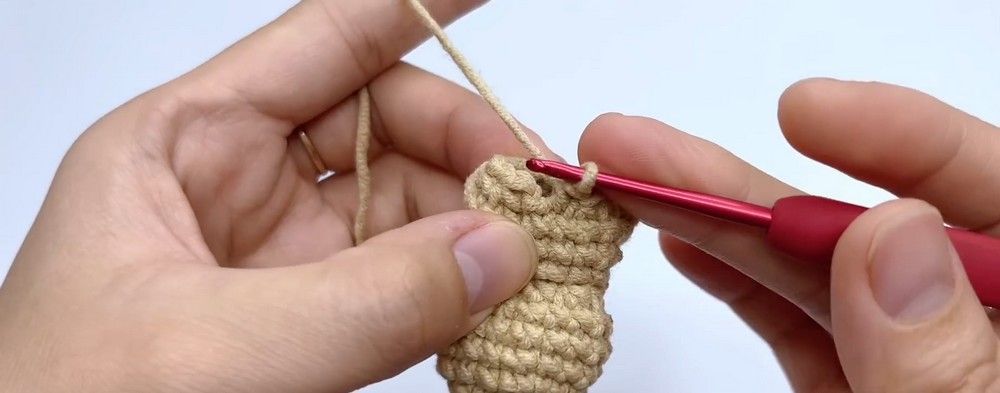
Once the final shaping round is complete, prepare the piece for stuffing and finishing.
Remove the stitch marker.
Work a slip stitch into the marked stitch to join.
Fasten off, leaving a long yarn tail for sewing.
Keep the opening accessible for stuffing. The remaining yarn tail will be used to close the base after the bear has been filled.
Step 4: Crochet Two Small Ears
Yarn: Beige
Small rounded ears help establish the bear’s teddy-bear appearance. Make two matching ears and attach them symmetrically to either side of the head.
Insert the hook into a stitch on Round 4 and pull beige yarn through.
Chain 2.
Skip the first chain from the hook and work 1 double crochet into the second chain.
Anchor the ear with 1 slip stitch into a stitch on Round 3 directly below.
Fasten off and weave in the loose ends.
Repeat on the opposite side to create the second ear.
Placement tip: Check both ears from the front before securing the yarn ends. Matching their height and spacing will help the face look balanced.
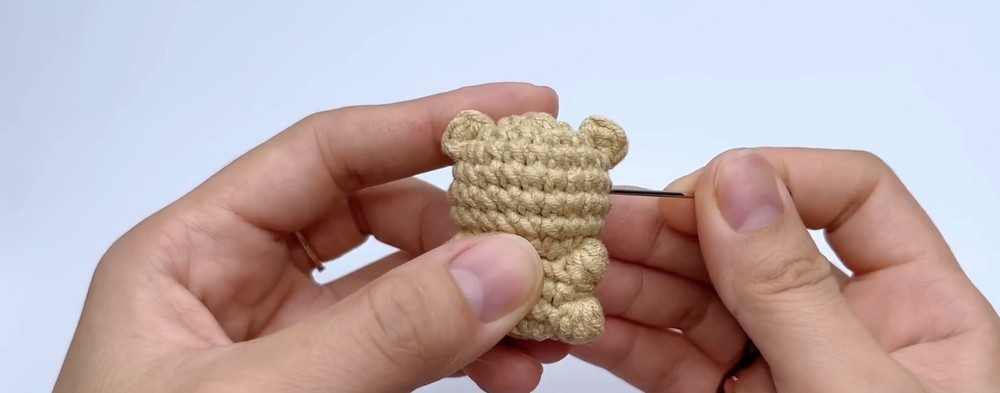
Step 5: Embroider the Bear’s Face
Yarn: Dark brown
Facial embroidery gives the miniature bear its expression without adding separate crocheted pieces. Use dark brown yarn for the eyes, nose, and snout.
Separate a strand of dark brown yarn into thinner strands if needed.
Count down from the top center of the head to locate approximately Round 6.
Embroider the eyes in balanced positions.
Stitch a small nose and snout in the center of the face.
Helpful tip: Keep the embroidered details small in proportion to the head. Before finishing the yarn ends, check that the eyes sit evenly and the nose is centered.
Step 6: Crochet the Green Christmas Hat
Yarn: Green
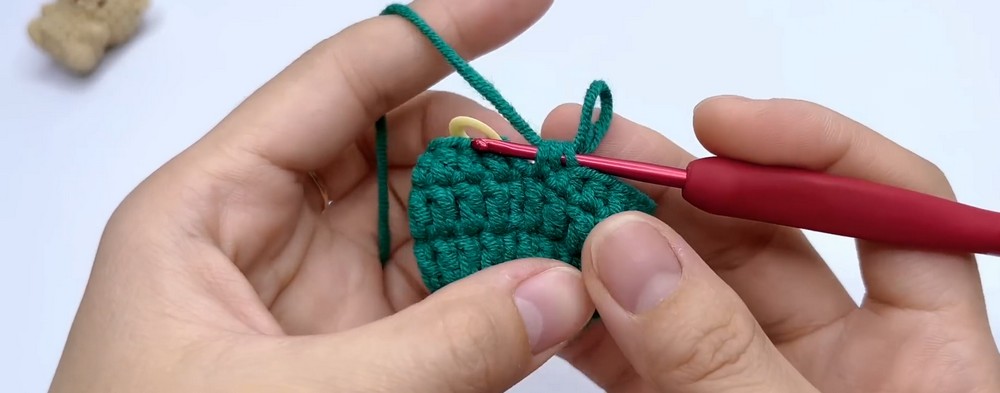
The green hat gives the bear its seasonal character. Its circular crown widens gradually, while the final rounds shape the brim so it can sit over the top of the head.
Round 1: Make a magic ring, chain 2, and work 7 double crochet stitches into the ring. Pull the ring closed and join with a slip stitch to the first double crochet. (7 stitches)
Round 2: Chain 2 and work 2 double crochet stitches into the same stitch as the join. Place a stitch marker in the first double crochet, then work 2 double crochet stitches in every stitch around. Join with a slip stitch. (14 stitches)
Round 3: Join with a slip stitch and chain 2. Repeat 1 double crochet and 2 double crochet stitches in the same stitch around. Join with a slip stitch. (21 stitches)
Round 4: Join with a slip stitch, chain 2, and work 1 double crochet in every stitch around. Join with a slip stitch. (21 stitches)
Round 5: Join with a slip stitch and chain 1. Work 6 half double crochet stitches, 9 single crochet stitches, and 6 half double crochet stitches around. Join with a slip stitch. (21 stitches)
Check your work: The hat should have a wider crown and a shaped lower edge. Try it gently over the bear’s head to check its placement before adding the trim.
Step 7: Add the Fluffy White Hat Trim
Yarn: Fluffy white
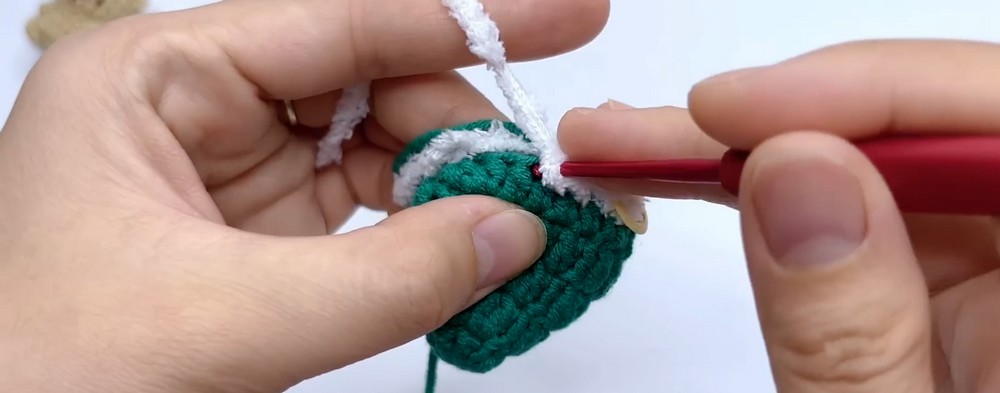
The white brim contrasts with the green hat and adds a soft, wintery finish.
Drop the green yarn and switch to fluffy white yarn at the joined stitch of Round 5.
Remove the stitch marker and work a slip stitch into the joined stitch.
Chain 1.
Carry the green working yarn downward and trap the yarn tails beneath the first few stitches where possible.
Work 1 single crochet in each stitch around.
Join with a slip stitch, fasten off, and weave in the ends.
The finished brim should create a clear white border around the green hat. Avoid pulling the fluffy yarn too tightly, as this can make the edging difficult to see.
Step 8: Stuff and Close the Bear
Materials: Fiberfill and yarn needle
Stuffing gives the bear its rounded shape and helps the bobble details remain visible.
Add fiberfill through the bottom opening.
Distribute the stuffing evenly into the head and body, adding small amounts at a time.
Thread the long beige yarn tail onto a yarn needle.
Sew the bottom opening completely shut.
Finishing tip: Use enough stuffing to support the shape without stretching the stitches. Check the silhouette before closing the opening fully.
Step 9: Finish the Hat and Add the Bow
Materials: White pom-pom, green yarn, fabric glue
The final embellishments bring the bear’s Christmas styling together.
Use fabric glue to attach the small white pom-pom securely to the tip of the green hat.
Cut a short strand of green yarn and tie it into a neat bow for the neck.
Position the hat on the bear’s head, with the textured white brim facing forward.
Use a small amount of fabric glue to attach the bow to the front of the neck.
Allow the glue to dry fully before handling the finished bear.
Final check: Make sure the hat sits securely, the bow is centered, and the embroidered face remains visible.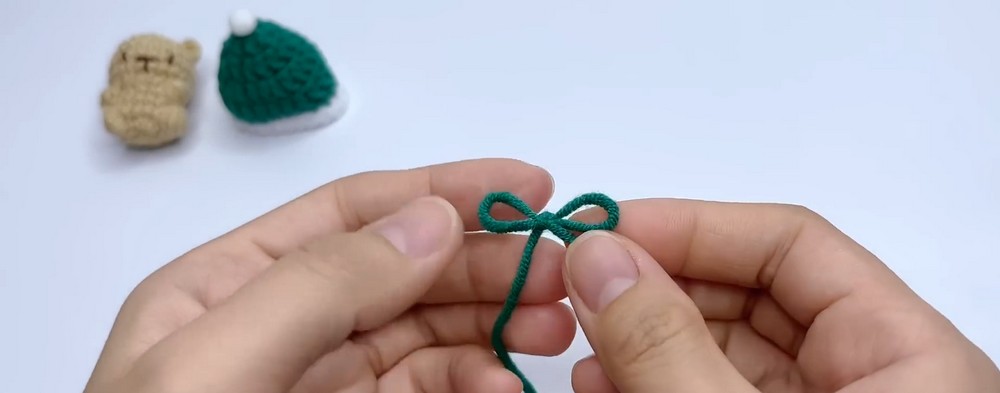
Ways to Use Your Crochet Christmas Bear
Your mini amigurumi bear can be displayed in several festive ways:
Christmas tree ornament: Add a hanging loop made from yarn or metallic cord at the top of the hat.
Seasonal bag charm: Attach a keyring to the finished bear.
Handmade holiday gift: Pair the bear with other small crocheted decorations.
Personalized variation: Replace the green hat with red yarn for a more traditional Santa-inspired color scheme.