Give your crochet frog a royal makeover with a sweet face, raised eye bumps, a tiny crown, and a softly stuffed body that stands about 4-5 inches tall.
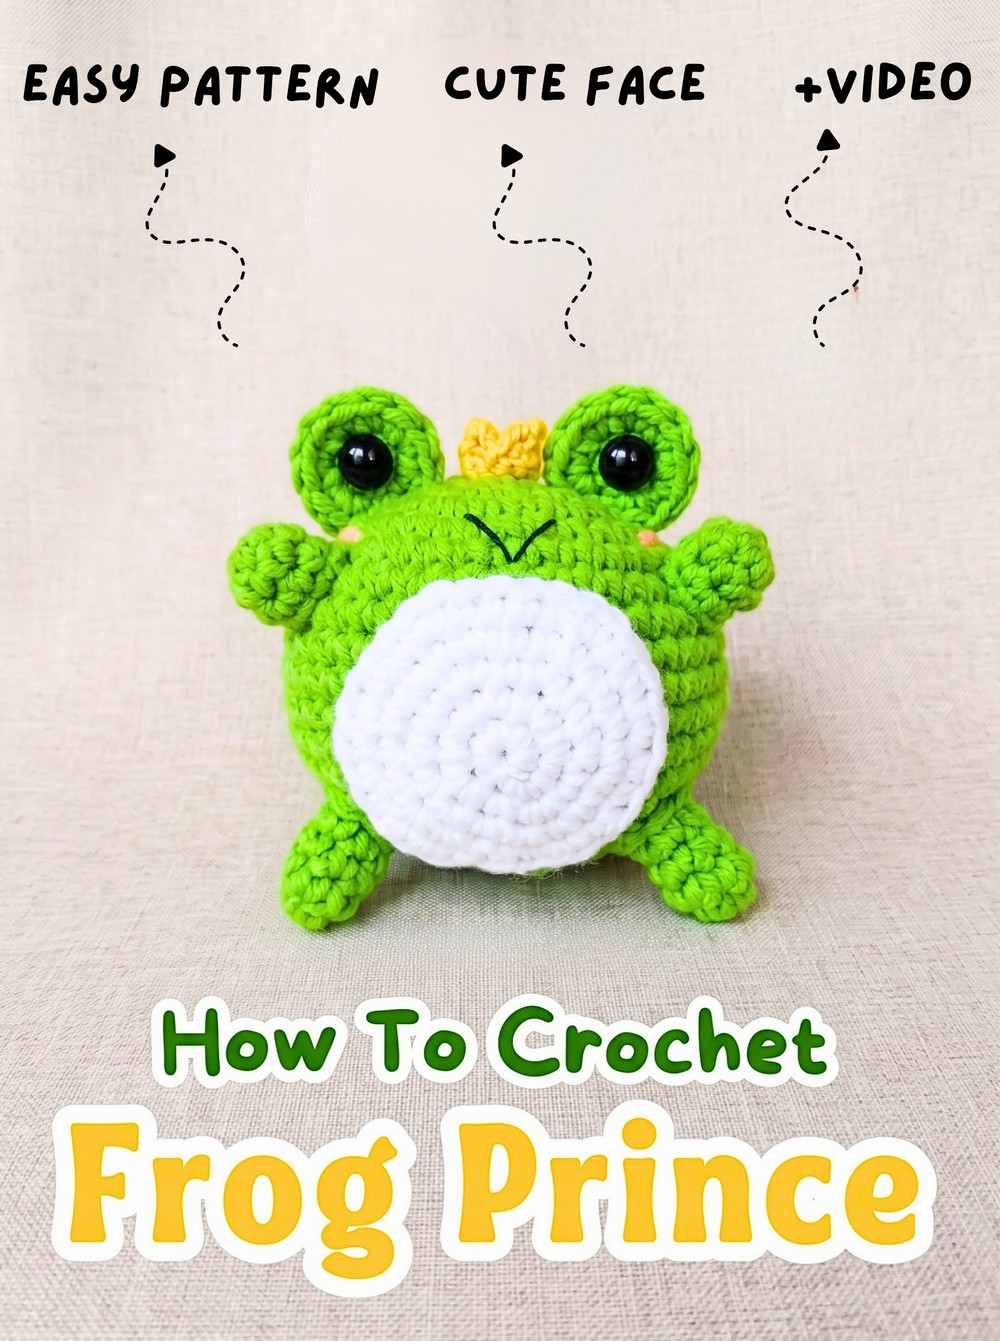
This little Frog Prince combines classic amigurumi shaping with a few charming details that make him instantly recognizable. The green head and body are crocheted as one continuous piece, while the raised eye bumps, simple facial embroidery, and golden crown give him his playful royal character.
The pattern uses single crochet, increases, invisible decreases, and basic sewing, so the shaping stays manageable while the finished frog develops a nicely rounded head and belly. You’ll also learn where to place the safety eyes, how much to stuff each body part, and how to position the arms and legs so the crochet frog can sit upright.
Credit Tedzukurida
Materials & Tools Needed
- Yarn: Light worsted or DK weight yarn in Green for the main body and head, Yellow for the crown, and a small amount of Pink for the blush.
- Crochet Hook: 2.5 mm or 3.0 mm. Choose a hook smaller than the yarn label recommends to keep the stitches tight.
- Eyes: 6mm or 8mm black safety eyes.
- Stuffing: Polyfill fiber stuffing.
- Tools: Tapestry or yarn needle, scissors, stitch markers, and black embroidery thread for the smile.
Finished Size & Customization
Using DK weight yarn, the Frog Prince will measure approximately 4 to 5 inches tall.
For a larger, softer version, substitute plush chenille yarn and a 5.0mm hook to create a jumbo Frog Prince. You can also add a tiny red cape made with half-double crochets for an extra royal touch.
Pattern Abbreviations
The pattern uses US crochet terminology.
- MR: Magic Ring
- ch: Chain
- sc: Single crochet
- inc: Increase – 2 sc in one stitch
- dec: Invisible decrease – sc 2 together through the front loops only
- sl st: Slip stitch
- BLO / FLO: Back loop only / Front loop only
- FO: Fasten off
- ( ): Total number of stitches at the end of the round
- [ ] x: Repeat the sequence inside the brackets the specified number of times

Crochet the Frog Prince
Head & Body – Worked as One Piece
Use Green yarn.
The head and body are worked continuously, so there is no separate neck seam to join later. Place a stitch marker at the beginning of each round to make the increases and decreases easier to track.
Round 1: 6 sc in a MR (6)
Round 2: inc in each st around (12)
Round 3: [1 sc, inc] x 6 (18)
Round 4: [2 sc, inc] x 6 (24)
Round 5: [3 sc, inc] x 6 (30)
Round 6: [4 sc, inc] x 6 (36)
Rounds 7–11 (5 rounds): sc in each st around (36)

Eye Placement: Insert the 6mm or 8mm safety eyes between Rounds 8 and 9, leaving approximately 6 stitches between them.
Round 12: [4 sc, dec] x 6 (30)
Round 13: [3 sc, dec] x 6 (24)
Stuffing: Begin adding polyfill firmly to the head. Add it gradually so you can shape the rounded head evenly rather than creating one hard lump of stuffing.
Round 14 (Neck): [2 sc, dec] x 6 (18)
Round 15 (Start of Body): [2 sc, inc] x 6 (24)
Round 16: [3 sc, inc] x 6 (30)
Rounds 17-21 (5 rounds): sc in each st around (30)
Round 22: [3 sc, dec] x 6 (24)
Stuffing: Fill the body firmly, paying particular attention to the belly so it develops a rounded shape while still leaving enough flexibility for the frog to sit.
Round 23: [2 sc, dec] x 6 (18)
Round 24: [1 sc, dec] x 6 (12)
Round 25: dec x 6 (6)
Finishing: FO, leaving a tail. Weave the tail through the FLO of the remaining 6 stitches, pull tightly to close the opening, and hide the yarn tail inside the body.

Eye Bumps – Make 2
Use Green yarn.
These small rounded pieces sit above the safety eyes and give the frog his characteristic wide-eyed expression.
Round 1: 6 sc in MR (6)
Round 2: inc in each st around (12)
Rounds 3–4 (2 rounds): sc in each st around (12)
Finishing: FO, leaving a long tail for sewing. Stuff each eye bump very lightly.

Arms – Make 2
Use Green yarn.
The arms are deliberately left unstuffed so they can rest naturally against the sides of the body.
Round 1: 5 sc in MR (5)
Round 2: inc in the first st, 4 sc (6)
Rounds 3–7 (5 rounds): sc in each st around (6)
Finishing: FO, leaving a long tail for sewing. Do not stuff the arms.
Legs – Make 2
Use Green yarn.
Partial stuffing gives the lower legs shape while keeping the upper portion flexible enough for a seated pose.
Round 1: 6 sc in MR (6)
Round 2: [1 sc, inc] x 3 (9)
Rounds 3-8 (6 rounds): sc in each st around (9)
Finishing: FO, leaving a long tail. Stuff the bottom half of each leg lightly, leaving the top half empty.
Make the Royal Crown
Use Yellow yarn.
The crown begins as a small ring that fits around the top of the frog’s head. Take care not to twist the foundation chain before joining it.
Round 1: Ch 12. Connect with a sl st to the first chain to form a circle. Make sure the chain is not twisted.
Round 2: Ch 1, sc in each st around, sl st to first sc to join (12)
Round 3 (Crown Points): [Ch 3, sl st in the 2nd ch from hook, sc in the next ch, skip 1 stitch on the base ring, sl st into the next stitch] x 6.
Finishing: FO, leaving a long tail for sewing.

Check the Sitting Position Before Sewing
Before attaching the legs permanently, place them against the lower front of the body and set the frog on a flat surface. This small check makes it much easier to adjust the placement before the sewing is finished.
The legs should sit at similar heights and angles, with enough contact underneath to help the Frog Prince balance upright. If one side tips forward or outward, reposition that leg slightly before securing it. Once the balance looks right, pinch the top of each leg flat and continue with the assembly.

Assemble the Frog Prince
Attach the Eye Bumps
Pin the two green eye bumps to the top of the head, centering them above the safety eyes. Use the long yarn tails to sew them securely in place.
Keep both bumps at a similar height so the face remains balanced. A small difference in placement can noticeably change the frog’s expression.
Add the Face
Thread the tapestry needle with black embroidery thread and sew a small, sweet V-shaped or curved smile directly between the safety eyes.
Using the pink yarn, stitch two small horizontal lines just below and slightly outside the eyes to create the blushing cheeks.
Sew on the Arms
Pinch the open top of each arm flat. Sew one arm to each side of the body, positioning them approximately one round below the neck crease, around Rounds 15–16.
Check the frog from the front before securing the second arm so both sides sit at a similar height.
Attach the Legs
Pinch the top of each leg flat and sew the legs to the lower front sides of the body around Rounds 21–23.
Use the sitting-position check above as your guide. Once the frog balances comfortably, secure both legs firmly.

Add the Crown
Place the yellow crown at the very top of the head, nestled between or slightly behind the two eye bumps. Use the long yellow tail to sew it securely in place.
A slightly tilted crown can give the Frog Prince a playful expression, while a centered crown creates a more classic royal look.
Once all the pieces are secure and the yarn ends are hidden, your little Frog Prince is ready to sit proudly on a shelf, desk, or other favorite spot. A red crocheted cape can turn him into an even more theatrical royal character, while plush yarn makes a larger version that is perfect for cuddling.