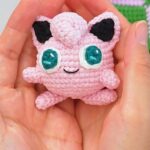
Looking for an adorable Pikachu plush? This easy crochet pattern brings the famous Pokémon to life with simple stitches and charming details.

Bring a little Pokémon magic into your home with this adorable crochet Pikachu pattern. Its bright yellow body, rosy cheeks, and signature ears make it instantly recognizable, while the simple shaping keeps every step enjoyable. The sweetest crochet details come together faster than you might expect.
This crochet tutorial builds Pikachu piece by piece, making it easy to follow from the first round to the final stitch. The head and body, tiny ears, and little arms are assembled into a cheerful plush that looks ready to brighten any shelf, desk, or gift basket. Every finished part brings the character to life in a satisfying way.
Credit Crochet Musings
Materials & Tools Needed
To create your Pikachu, gather these essential materials. We’ve added helpful tips to make your process as smooth as possible!
- Yellow Yarn
- Suggested: Worsted weight acrylic yarn.
- Tip: A soft yarn makes your Pikachu extra cuddly!
- Black Yarn
- Uses: Ears, stripes, and facial features.
- Red Yarn
- Uses: Pikachu’s rosy cheeks.
- Brown Yarn (Optional)
- Uses: Paw details or stripes for more accuracy.
- White Thread or Felt
- Uses: Tiny details like Pikachu’s eyes.
- Polyester Stuffing
- Tip: Use enough to make your Pikachu plush, but not overly firm.
- Felt (Optional)
- Uses: Great for adding eyes or cheeks if you’d rather not crochet them.
- Plastic Safety Eyes (8mm)
- Tip: These make the face pop and save time.
Tools
- Tapestry Needle
- Main Use: Sewing parts together and weaving in yarn ends.
- Tip: A blunt needle works best for this purpose.
- Stitch Marker
- Main Use: Tracking your rounds when crocheting in spirals.
- Tip: A locking stitch marker is less likely to slip out.
- Crochet Hook (3mm-4mm)
- Suggested Size: Choose based on your yarn weight.
- Tip: Go smaller for tighter stitches to prevent stuffing from escaping.
Gauge (Optional)
If you’re particular about sizing:
- Check that your stitches are tight enough so the stuffing doesn’t peek through. Adjust your hook size if necessary for a smoother finish.
Crochet Shortcuts at a Glance
- ch: Chain
- sc: Single crochet
- inc: Increase (2 sc in the same stitch)
- dec: Decrease (sc2tog)
- sl st: Slip stitch
- MR: Magic ring
- st(s): Stitch(es)
- FO: Fasten off
The Charm Behind This Pikachu
- Amigurumi basics: Work in continuous rounds using a magic ring.
- 3D design: Constructed in separate pieces (head, body, limbs, tail, and ears) that are later assembled.
- Iconic details: Pikachu’s signature lightning-shaped tail, rosy cheeks, and adorable ears!
- Customizable: Use different yarn types and experiment with facial features using embroidery or felt.
- Beginner-friendly: Perfect for both beginners and experienced crocheters.

Every Stitch Tells Pikachu’s Story
The pattern begins by making the main body and head as one continuous piece using a magic ring and continuous rounds. The shape is formed with gradual increases, followed by even rounds before decreasing to close the body. Safety eyes are added after the specified rounds, and the body is firmly stuffed before the final opening is sealed.
Next, the ears are crocheted separately, starting with black yarn before changing to yellow to create Pikachu’s signature ear tips. The small arms are also worked individually in simple rounds, leaving long yarn tails so they can be sewn onto the body later.
The final stage focuses on assembly and finishing details. The ears are sewn near the top of the head, the arms are attached below the eyes, and the face is completed with an embroidered mouth and rosy cheeks. A few finishing tips help keep the shaping neat, the color changes clean, and the finished Pikachu looking tidy and well balanced.
Step-by-Step Pattern: Crochet Pikachu
1. The Character Begins Here
(Main Body & Head)
Round 1: MR, 6 sc. (6 sts)
Round 2: 1 inc in each st around. (12 sts)
Round 3: [1 sc, 1 inc] × 6. (18 sts)
Round 4: [2 sc, 1 inc] × 6. (24 sts)
Round 5: [3 sc, 1 inc] × 6. (30 sts)
Rounds 6–13: 1 sc in each st around. (30 sts)

Placing the Safety Eyes
- Pause after Round 13.
- Place safety eyes between Rounds 6 and 7, spaced 4 stitches apart.
- Secure tightly with washers inside.
Closing the Body
Round 14: [3 sc, 1 dec] × 6. (24 sts)
Round 15: [2 sc, 1 dec] × 6. (18 sts)
Stuffing:
Firmly stuff the body with fiberfill.
Round 16: [1 sc, 1 dec] × 6. (12 sts)
Round 17: [1 sc, 1 dec] × 4. (8 sts)
Fasten off. Weave the yarn through the remaining front loops, cinch the hole closed, and hide the yarn end inside.

2. Ears (Make 2)
Use black yarn to start.
Round 1 (Black): MR, 4 sc. (4 sts)
Round 2: [1 sc, 1 inc] × 2. (6 sts)
Round 3: 1 sc in each st around. (6 sts)
On the last stitch of Round 3, switch to yellow yarn.
Round 4 (Yellow): 1 sc in each st around. (6 sts)
Snip and tie off the black yarn inside.
Round 5: 1 sc in each st around. (6 sts)
Round 6: [1 sc, 1 dec] × 2. (4 sts)
Fasten off, leaving a long tail for sewing.

3. Arms (Make 2)
Use yellow yarn.
Round 1: MR, 7 sc. (7 sts)
Rounds 2–4: 1 sc in each st around. (7 sts)
Fasten off, leaving a long tail for sewing.

The Big Character Reveal
Attaching the Ears
- Position ears about 3 rounds down from the top center of the head.
- Sew securely using the tail ends.
- Hide remaining yarn ends inside.
Attaching the Arms
- Place each arm on the sides of the body, about 1 round below the eyes.
- Sew them on flat, stitching through both layers of the arm edge and into the body.

Embroidering the Mouth
- Split black yarn to make a thinner strand.
- Insert the needle from behind an ear and bring it out between the eyes.
- Embroider a small “W” shape centered between the eyes.
- Bring the needle back out near the starting point behind the ear, knot the ends, and weave them into the body.
Embroidering the Cheeks
- Thread dark pink or red yarn.
- Insert the needle from behind the ear and bring it out just below and slightly to the outside of each eye.
- Sew 2 small horizontal lines on each side for cheeks.
- Secure and hide yarn ends inside the body.
Troubleshooting and Suggestions
Common Issues:
- Color changes look messy? When switching yarn colors (e.g., black to yellow on the ears), use the “invisible color change” technique.
- Loose stitches? Keep your tension tight to ensure no stuffing shows.
- Uneven shaping? Use stitch markers to track rounds, and count stitches after every row.
Creative Modifications:
- Change Pikachu’s expression by adjusting the mouth embroidery.
- Add a keychain loop to the top of the head for a portable buddy!
- Experiment with other Pokémon color combinations for fun, like blue and white for a shiny Pikachu!
The Final Touches That Matter
Bringing Pikachu to life through crochet is a magical experience for any Pokémon fan. With practice, your crafting gets even better, and the results become more rewarding! Ready to get started? Grab those hooks, yarn, and a lot of Pokémon love—your perfect Pikachu awaits. Share your creation online and spread that adorable Pokémon joy!