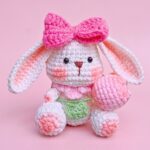
This adorable crochet polar bear features a rounded white body, tiny ears, and gray paw pads, with step-by-step instructions for shaping and assembling each piece.

Rounded features, tiny ears, and soft white yarn give this crochet polar bear its sweet, recognizable appearance. Light gray paw pads and an embroidered black nose add contrast, while careful stitching and secure assembly help create a durable little crochet companion with a neat, polished finish.
This crochet polar bear pattern guides you through making the main body, separate limbs, ears, snout, and paw pads before joining them together. You’ll also learn how to stuff and close the body, position the facial features, and finish the bear with securely attached details. Follow each stage to bring the little crochet bear together.
Credit Yui Crochet
Materials & Tools
- White yarn: For the head and body, hands, legs, ears, and snout.
- Light gray yarn: For the two paw pads.
- Black yarn or embroidery floss: For embroidering the nose and smiling mouth.
- 5 mm safety eyes or black beads: For the eyes.
- Crochet hook: Choose a size suitable for your yarn; 2–3.5 mm is a suggested range for standard amigurumi yarn.
- Fiberfill stuffing: To fill the body and shape the bear.
- Yarn needle: For sewing pieces together and weaving in ends.
- Scissors: For trimming yarn.
- Stitch markers: Optional, for tracking rounds.
- Craft glue: Mentioned in the source for attaching the paw pads and eyes.
Safety note: For toys intended for babies or young children, embroidered eyes are safer than small detachable parts. Do not rely on glue alone to secure pieces that could become choking hazards.
Finished Size
The finished bear is approximately 3–4 inches tall when made with standard amigurumi yarn and a suitable hook. Actual size will vary with yarn weight, hook size, and stitch tension.
For a personal touch, you can add a small crochet scarf or bow. Keep decorative accessories securely attached and appropriate for the intended age group.
Crochet Abbreviations
- ch: Chain
- sc: Single crochet
- inc: Increase; work 2 sc in the same stitch
- dec: Decrease; work 2 sc together
- slst: Slip stitch
- MR: Magic ring
- R: Round or row
- ( … ) × N: Repeat the instructions inside the parentheses the stated number of times

Step-by-Step: Crochet the Polar Bear
The bear is made from a rounded main body, two hands, two legs, two ears, a snout, and two paw pads. Complete each piece before assembly, keeping the specified yarn colors and stitch counts consistent.
Step 1: Start the Head and Body
Use white yarn to form the main rounded piece. Work in joined rounds, following the supplied instructions.
Round 1: Make a magic ring and work 6 sc into it. Join with a slst.
Total: 6 stitches.
Pull the ring closed firmly to avoid leaving a hole at the center.
Step 2: Increase the Body
The next rounds gradually widen the piece to create its rounded shape.
Round 2: Ch 1, work 6 increases around, and join with a slst.
Total: 12 stitches.
Round 3: Ch 1, repeat (1 sc, 1 inc) × 6, then join.
Total: 18 stitches.
Round 4: Ch 1, work 1 sc, 1 inc, then repeat (2 sc, 1 inc) × 5. Finish with 1 sc and join.
Total: 24 stitches.
Round 5: Ch 1, repeat (3 sc, 1 inc) × 6, then join.
Total: 30 stitches.
Round 6: Ch 1, work 2 sc, 1 inc, then repeat (4 sc, 1 inc) × 5. Finish with 2 sc and join.
Total: 36 stitches.
Round 7: Ch 1, repeat (5 sc, 1 inc) × 6, then join.
Total: 42 stitches.
Check that the piece lies evenly without curling excessively. Consistent increases help the rounded body develop smoothly.
Step 3: Work the Straight Body Rounds
Once the widest part is reached, maintain the stitch count to build the main body.
Rounds 8-23: Ch 1, work 42 sc around, and join with a slst in each round.
Total: 42 stitches per round.
Keep your tension even throughout these rounds. The straight section creates the central body area before the piece begins to narrow.
Step 4: Begin Decreasing the Body
The following rounds reduce the opening gradually, shaping the opposite end of the body.
Round 24: Ch 1, repeat (5 sc, 1 dec) × 6, then join.
Total: 36 stitches.
Round 25: Ch 1, work 2 sc, 1 dec, then repeat (4 sc, 1 dec) × 5. Finish with 2 sc and join.
Total: 30 stitches.
Round 26: Ch 1, repeat (3 sc, 1 dec) × 6, then join.
Total: 24 stitches.
Round 27: Ch 1, work 1 sc, 1 dec, then repeat (2 sc, 1 dec) × 5. Finish with 1 sc and join.
Total: 18 stitches.
As the opening narrows, check the shape and distribute the stuffing evenly rather than allowing it to bunch at one end.
Step 5: Stuff and Close the Body
Before closing the body completely, fill it with fiberfill.
Gently add small amounts of stuffing through the remaining opening. Distribute it evenly so the bear feels firm but not overly stretched.
Round 28: Ch 1, repeat (1 sc, 1 dec) × 6, then join.
Total: 12 stitches.
Round 29: Ch 1, work 6 decreases around.
Cut the yarn, leaving a tail. Thread the tail through the remaining stitches and pull to close the opening tightly. Secure the yarn and weave in the end.
Finishing tip: Add any final small amount of stuffing before the opening becomes too narrow to work comfortably.
Step 6: Crochet Two Hands
Use white yarn and make two matching pieces.
Round 1: Make a magic ring and work 6 sc into it. Join.
Total: 6 stitches.
Round 2: Ch 1, repeat (1 sc, 1 inc) × 3, then join.
Total: 9 stitches.
Rounds 3-5: Ch 1, work 9 sc around, and join each round.
Leave a long yarn tail on each hand for sewing it to the body.
Keep both pieces approximately the same size. Matching dimensions help the finished bear look balanced.
Step 7: Crochet Two Legs
Use white yarn to make two legs.
Round 1: Make a magic ring and work 6 sc into it. Join.
Total: 6 stitches.
Round 2: Ch 1, work 6 increases around, then join.
Total: 12 stitches.
Rounds 3-4: Ch 1, work 12 sc around, and join each round.
Leave a long yarn tail on each leg for attachment.
Check that the legs are alike before sewing them on. Consistent shaping helps the bear sit or stand more evenly.
Step 8: Make Two Small Ears
The ears are worked in white yarn and form small rounded details for the top of the head.
Round 1: Make a magic ring and work 4 sc into it.
Total: 4 stitches.
Round 2: Ch 1, turn, work 4 increases around, then join with a slst.
Total: 8 stitches.
Leave a long yarn tail for sewing. Make the second ear in the same way.
Set the two ears side by side before attaching them so you can check that their sizes and shapes match.
Step 9: Crochet the Snout
Use white yarn to make the separate snout piece.
Round 1: Ch 5. Starting in the second chain from the hook, work 3 sc, then 1 inc in the last chain. Continue along the opposite side of the foundation chain with 3 sc.
Total: 8 stitches.
Round 2: Work 3 sc, 1 inc, 3 sc, and 1 inc.
Total: 10 stitches.
Round 3: Work 10 sc around.
Total: 10 stitches.
Leave a long yarn tail for sewing the snout to the lower-middle part of the face.
Before attaching it, position the piece against the body to check that it sits centrally and leaves enough room for the eyes above it.
Step 10: Make Two Gray Paw Pads
Use light gray yarn for the small circular pads on the bottoms of the feet.
For each pad, make a magic ring and work 6 sc into it. Join with a slst.
Total: 6 stitches per pad.
Cut the yarn and weave in the ends. Make two matching pads.
The contrasting gray yarn helps distinguish the feet from the white body and gives the finished bear a small but noticeable detail.
Step 11: Position and Sew on the Legs
Arrange the two legs near the lower part of the body.
Use pins to hold them in position temporarily. Check that they sit at a similar height and angle before sewing.
Thread the long yarn tail from each leg onto your yarn needle. Sew each piece securely to the body, working through the corresponding stitches along the attachment edge.
Remove the pins and gently check both attachments. The legs should remain in place without large gaps between the pieces.
Step 12: Attach the Hands
Position the hands on the sides of the body, as shown in the source tutorial.
Pin each hand temporarily and compare their placement before sewing. Use the remaining yarn tails to stitch them securely to the body.
Keep the stitches close together around each attachment edge. A secure join helps prevent gaps and improves the toy’s durability.
Step 13: Attach the Snout and Embroider the Face
Place the snout on the lower-middle portion of the face. Adjust it until it looks centered, then sew it in place using its long yarn tail.
Use black yarn or embroidery floss to embroider the nose and a small smiling mouth line.
Keep the facial details neat and firmly secured. If the bear is intended for a young child, embroidered eyes and nose details are preferable to detachable plastic pieces.
Step 14: Sew on the Ears
Place one ear on each upper side of the head.
Compare their positions before sewing to make sure they sit at similar heights and angles. Use the long yarn tails to sew each ear securely to the head.
Check the bear from the front after attaching both ears. Small placement adjustments can make the expression look more balanced.
Step 15: Add the Eyes
The supplied tutorial uses 5 mm safety eyes or black beads positioned just above the snout.
If using safety eyes, follow the manufacturer’s attachment method and secure them before closing any inaccessible openings. For a toy intended for a baby or young child, use embroidered eyes instead of detachable components.
Position the eyes evenly on either side of the snout. Check the expression from the front before completing the attachment.
Step 16: Attach the Paw Pads
Place one light gray circular pad on the bottom of each foot.
The source suggests using craft glue to attach the pads. For a more durable finish, consider sewing them in place where the yarn and pad construction allow it. If glue is used, follow its safety instructions and ensure it is fully cured before handling the toy.
Check that the pads are aligned similarly on both feet.

Step 17: Complete the Final Checks
Inspect the finished polar bear before use.
- Make sure the body is evenly stuffed and the opening is securely closed.
- Check that the hands, legs, ears, and snout are firmly attached.
- Inspect the embroidered facial details and weave in any loose yarn ends.
- Confirm that the paw pads are secure and the overall shape looks balanced.
Your crochet polar bear is complete, with a rounded white body, small ears, contrasting paw pads, and a friendly embroidered expression. A tiny scarf or bow can be added for a seasonal variation, provided it is securely attached and suitable for the intended recipient.