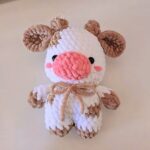
Want to make an adorable crochet bear? This simple pattern will leave you with an adorable handmade mini bear to treasure or share!

This mini crochet bear comes together with a clean round-by-round design that is easy to follow from the very first stitch. Its tiny size, soft shape, and simple details make it a lovely handmade piece that feels special without taking much time to complete. The cutest features appear little by little as the crochet pattern grows.
The body and head are worked as one piece, while the bobble stitches create small limbs with almost no extra sewing. Tiny ears are added directly onto the head, giving the bear its finished look in just a few simple steps. A small bow or keychain ring is all it takes to turn this crochet bear into a charming everyday companion.
Credit Gail Cabreira
Design Details
- Techniques & Key Stitches Used:
- Working in the round
- Magic ring (MR)
- Single crochet (sc)
- Increase (inc)
- Decrease (dec)
- Back loop only (BLO)
- Bobble stitch (BO) for limbs
- Slip stitch (slst)
- Chain (ch)
- Half double crochet (hdc)
Materials Needed
- Milk cotton yarn 4-ply (color of your choice)
- Fiber fill
- Keychain ring
Tools Required
- 3mm crochet hook
- Darning needle
- Scissors
- Stitch marker (optional)
Gauge:
Not specified
Finished Size / Measurements
- Mini keychain size (approximately handheld amigurumi size)
Abbreviations & Terminologies
- R: Magic Ring
- sc: Single Crochet
- inc: Increase (2 sc in the same stitch)
- dec: Decrease (single crochet 2 stitches together)
- BLO: Back Loop Only
- BO: Bobble Stitch (5 dc in the same stitch, partially completed and closed together)
- slst: Slip Stitch
- ch: Chain
- hdc: Half Double Crochet
Helpful Tips Before You Start
- Keep your stitches tight to prevent fiber fill from peeking through the amigurumi fabric.
- Leave a long tail after finishing the main body parts for cleaner assembly and detail stitching later.

Pattern Overview & Making Process
The pattern begins by working the head and body in one continuous piece using a magic ring and single crochet rounds. Increases shape the head, followed by plain rounds, then decreases after stuffing to create a neat, rounded form.
The next rounds are worked through the back loops, where increases and bobble stitches build the tiny arms and legs directly into the body. More single crochet stitches keep everything even before the final decrease round closes the shape.
Once the body is finished and filled, the opening is sewn closed with the yarn tail. The ears are crocheted directly onto the head using simple stitches, and the ends are woven in neatly. A ribbon or small bow can then be added around the neck, and a keychain ring attached if desired.
Step-by-Step Pattern Instructions
Head & Body Construction (Worked in the Round)
- Round 1: 5 sc into MR. (5 sts)
- Round 2: 5 inc. (10 sts)
- Round 3: (1 sc, inc) repeat from * 5 times. (15 sts)
- Round 4: (2 sc, inc) repeat from * 5 times. (20 sts)
- Rounds 5 & 6: 20 sc. (20 sts)
- Round 7: 10 dec. (10 sts)
- Stuff the head firmly with fiber fill.
- Round 8 (BLO): sc, inc, (BO, inc, sc, inc) repeat from * 2 times. (15 sts)
- Round 9: 15 sc. (15 sts)
- Round 10: 4 sc, BO, 3 sc, BO, 6 sc. (15 sts)
- Round 11: (1 sc, dec) repeat from * 5 times. (10 sts)
- Fasten off, leave a long tail for sewing, and fill the body.
Assembly Instructions
- Use a darning needle and the leftover yarn tail to sew the bottom opening of the body closed.
- Weave back and forth cleanly to secure.
- Ears:
- Insert your hook directly into the head between Round 3 and Round 4.
- Chain 1, 1 sc, 1 hdc into the same stitch, then slst into the next stitch to secure.
- Fasten off and weave in ends.
- Repeat for the second ear on the opposite side.
Customization Options
- Tie a contrasting piece of yarn or a small decorative ribbon into a bow around the bear’s neck.

Troubleshooting & Common Issues
- Limb Consistency: Ensure your bobble stitches (BO) are pulled tight and consistent, so the arms and legs are symmetrical.
Pattern Variations & Modification Ideas
- Use a thin decorative ribbon instead of yarn around the neck for a unique style!
Conclusion & Final Notes
Enjoy stitching your adorable, quick-to-make mini bears! They are perfect as thoughtful gifts, stocking stuffers, or sweet little keychain companions.