How To Crochet Penguin In Just Under An Hour With Simple Steps And Tips
Create your own adorable crochet penguin that’s perfect for adding charm to your home, gifting, or selling at markets.
This quick and versatile project is both beginner-friendly and customizable, making it ideal for spreading kindness or creating delightful decorations in no time.

This crochet penguin shines as a decorative piece, a handmade gift, or a cute market item. Its compact design and sturdy craftsmanship ensure durability, while its fluffy texture and intricate details make it irresistible. Plus, it’s completed in under an hour, keeping it efficient and practical.
Credit The Kindness Company
In this post, you will find a step-by-step Crochet Penguin pattern along with detailed instructions. However, if you encounter any difficulties or mistakes while creating your desired design, feel free to watch the video tutorial provided at the end of the blog post.
Materials and Preparation
To crochet this adorable pocket penguin, gather the following materials:
Materials:
- Yarn:
- Black fluffy yarn (for the body and wings)
- White fluffy yarn (for the belly)
- Orange fluffy yarn (for the beak)
- Hook: Crochet hook size appropriate for the yarn (recommended: 4mm or as suggested on your yarn label)
- Stuffing: Polyester fiberfill
- Safety Eyes: Two 6-8mm safety eyes
- Notions:
- Tapestry needle (for sewing and weaving in ends)
- Scissors
- Stitch markers
Yarn Weight Requirements:
Medium-weight or worsted-weight yarn will give a small-sized penguin. Adjust yarn and hook size for variations in size.
Abbreviations and Notes
Abbreviations Used:
- SC: Single Crochet
- INC: Increase (two SC in one stitch)
- DEC: Decrease (single crochet two stitches together)
- MR: Magic Ring
- SL ST: Slip Stitch

Pattern Notes and Tips:
- This tutorial is perfect for beginners and takes about an hour to complete.
- A magic ring is used to start the wings and body. If you’re unfamiliar with this technique, practice it before beginning the project.
- Fluffy yarn may add complexity, so work patiently and loosely.
- Keep tension even throughout, as this will affect the penguin’s finished shape.
Gauge, Approximate Size, and Pattern Notes
Gauge:
Gauge is not critical for this project, but the stitches should be tight enough so the stuffing doesn’t peek through.
Approximate Size:
Approximately 4 inches tall, depending on yarn and hook size.
Special Notes:
- No gauge swatch is required.
- The pattern uses color changes, so carry over the unused yarn color while crocheting to keep neat edges.
- Always use stitch markers to track your rounds, especially for amigurumi-style patterns.
Step-by-Step Pattern
Penguin Wings
Step 1: Start the Magic Ring
- Using black yarn, create a magic ring.
- Insert 8 SC into the MR. Tighten the ring and SL ST into the first SC. (8 stitches)
Step 2: Create Body of the Wing
- For Rounds 2 and 3, place 1 SC in each stitch around. Mark the first SC of each round to keep track. (8 stitches per round)

Step 3: Fasten Off and Shape the Wing
- Fold the wing in half and SL ST through both layers of the open edge, closing the wing.
- Fasten off. Weave in ends, hiding the tail inside the wing.
Step 4: Repeat
Make a second wing using the same steps.
Penguin Body
Step 5: Start the Magic Ring
- With black yarn, create another magic ring and place 6 SC into the ring. Tighten the loop and begin working in spirals.

Step 6: Add the Increases
- Round 2: 2 SC in each stitch (increase in every stitch around). (12 stitches)
- Round 3: (1 SC, INC) repeat around. (18 stitches)
- Round 4: (2 SC, INC) repeat around. (24 stitches)
- Round 5: (3 SC, INC) repeat around. (30 stitches)
Step 7: Color Changes and Wings
- For Rounds 6–12, use black and white yarn for the belly design.
- Work 12 SC in black, 6 SC in white, and continue with another 12 SC in black.
- Extend the white portion in the center during these rounds to create an oval pattern for the penguin’s belly.
- For Round 13, attach the wings mid-round by crocheting through both the wing and the body stitches.
Penguin Face
Step 8: Add the Eyes
- Attach safety eyes between Rounds 13–14, spacing them evenly on the white belly area.
- Snap the eye backs securely into place.

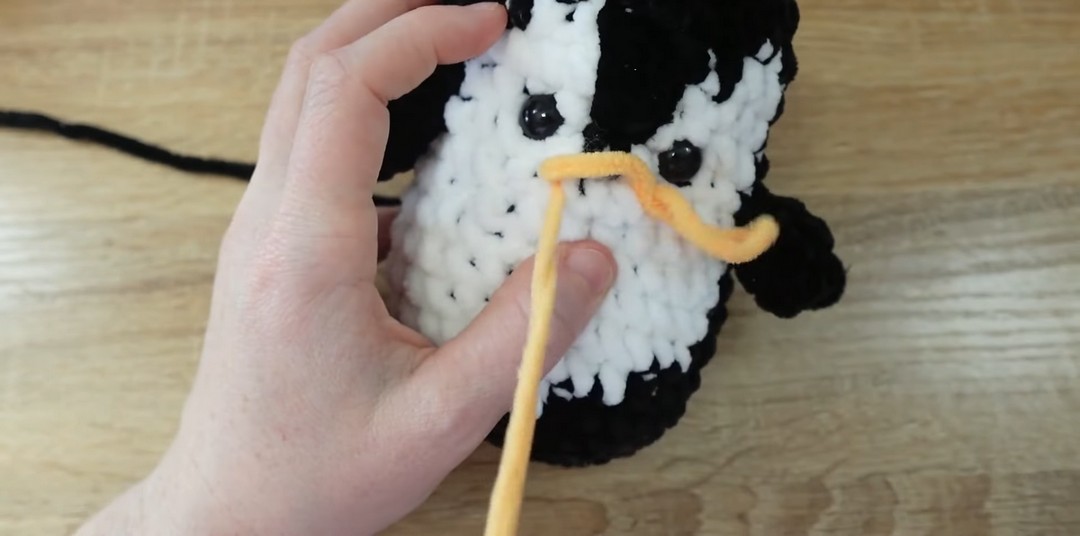
Step 9: Add the Beak
- Use a tapestry needle and orange yarn. Sew small straight stitches at the base of the white belly to create a triangular beak.
Closing the Body
Step 10: Stuff the Penguin
- Use polyester stuffing to fill the penguin’s body firmly but without over-stretching the stitches.
Step 11: Create Decreases and Finish
- Round 18: (3 SC, DEC) repeat around. (24 stitches)
- Round 19: (2 SC, DEC) repeat around. (18 stitches)
- Round 20: (1 SC, DEC) repeat around. (12 stitches)
- Round 21: DEC in every stitch. (6 stitches)
- Fasten off, leaving a long tail.
- With a tapestry needle, weave the long tail through the front loops of the final 6 stitches, pull tight to close. Weave the end into the body.
Final Touches
Step 12: Add Blush (Optional)
- Use fabric paint or pastel chalk to give the penguin rosy cheeks near its eyes.
Key to Success:
- Use soft, fluffy yarn to enhance the penguin’s texture.
- Maintain steady tension while crocheting for clean and uniform stitches.
- Follow the magic ring technique for a neat beginning.
- Pay attention to color changes, especially transitioning from black to white.
- Remember to stuff and shape the body evenly before closing.
Conclusion
Crocheting this penguin is a fun and satisfying project that combines creativity, functionality, and charm. Whether you’re honing your skills, making a heartfelt gift, or selling at craft fairs, this project is quick to complete and guaranteed to bring a smile. Give it a go—you’ll love the results!


