Want a cute way to add handmade Halloween charm to your fall décor? This crochet Halloween pumpkin uses simple amigurumi stitches and fun details for a festive little decoration.
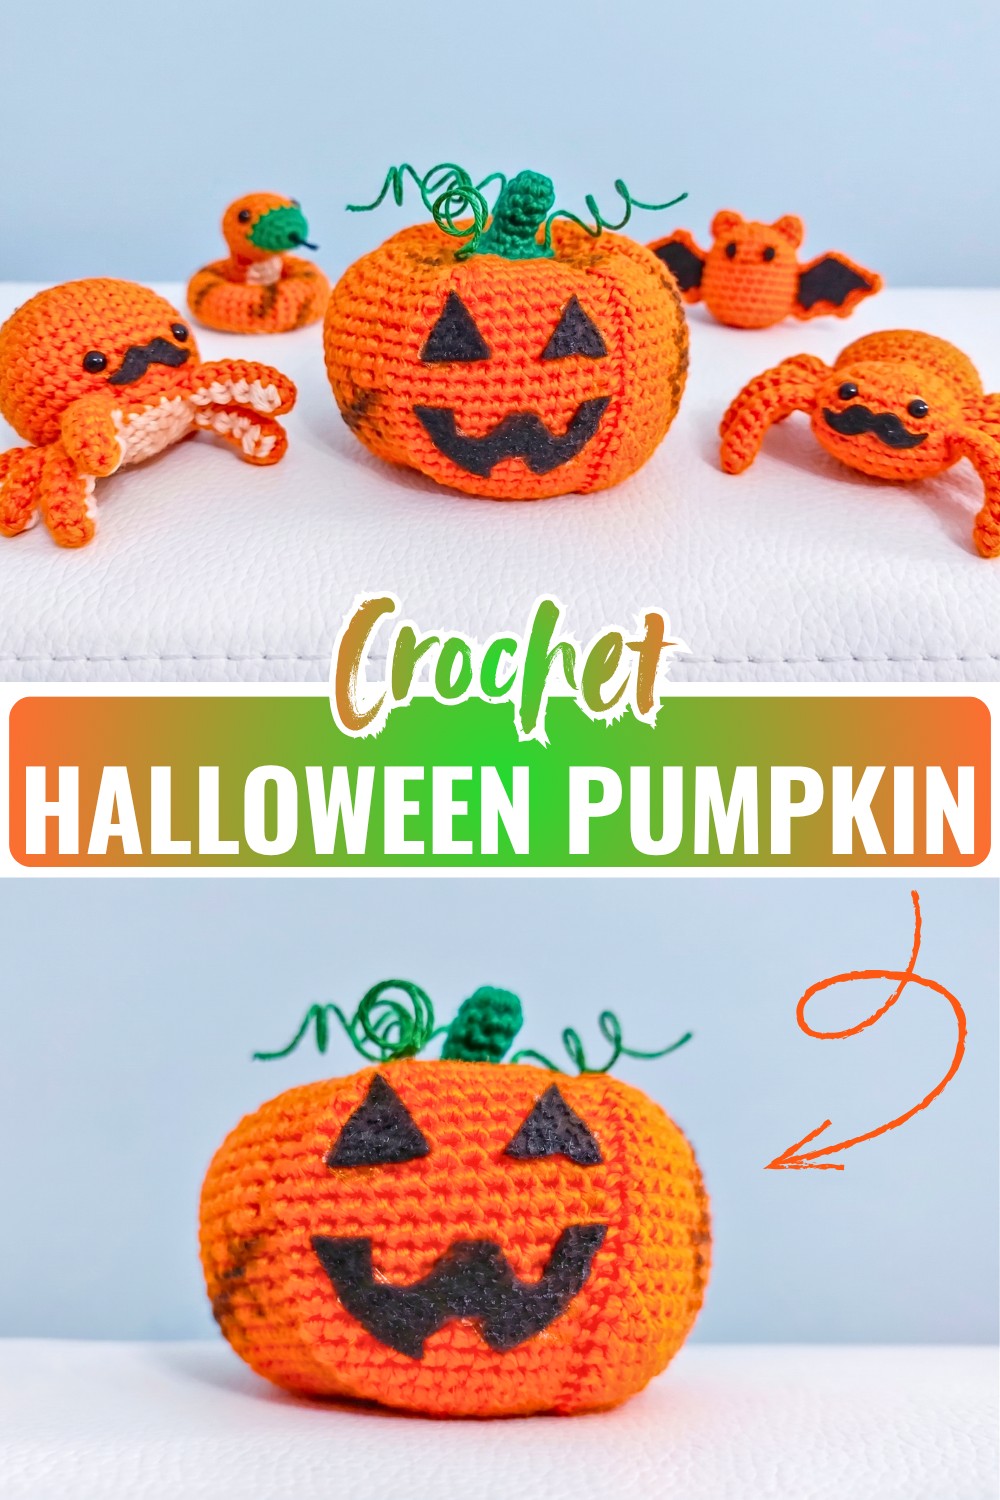
A small crochet pumpkin can add just the right amount of Halloween character to a shelf, desk, or seasonal display. This jack-o’-lantern design combines a rounded amigurumi shape with raised pumpkin ribs, a green stem, curled tendrils, and a simple felt face.
The pumpkin body is made with basic single crochet increases and decreases, while back-loop-only stitches create ridges that make the shaping easier to see later. Along the way, you’ll also learn how to stuff the pumpkin evenly, pull the yarn to form six sections, position the stem, and add the finishing details that give this little crochet piece its Halloween look.
Materials and Tools
- Orange yarn
- Green yarn
- 2.0 mm crochet hook
- Fiberfill stuffing
- Large sewing needle
- Scissors
- Black felt
- Hot glue gun
- Crayon or marker
- Thin craft wire
- Floral tape
Finished Size and Customization
The finished pumpkin is designed as a small tabletop or shelf decoration. Its exact size will vary depending on your yarn weight, hook size, and crochet tension.
You can easily change the appearance without changing the crochet instructions:
- Cut different shapes for the felt eyes and mouth to create different jack-o’-lantern expressions.
- Use a crayon or marker to add lines, scars, stitches, or shading.
- Make several pumpkins with different faces for a varied Halloween display.
Crochet Abbreviations
- ch: chain
- sl st: slip stitch
- sc: single crochet
- inc: increase, or 2 sc in the same stitch
- dec: decrease, or work 2 sc together
- sc BLO: single crochet in the back loop only
- ( ) × N: repeat the instructions inside the parentheses the indicated number of times
- [ ]: total stitch count at the end of the round
Before You Start
This pumpkin is shaped in three stages: the stitch count first increases to create the rounded body, stays at 72 stitches through the middle section, and then decreases to close the opening.
The repeated sc BLO stitches create raised ridges. These ridges are not just decorative; they also give you natural lines to follow when you shape the finished pumpkin into six sections.
When a round says something like (sc BLO, 3 sc, inc) × 6, work the instructions inside the parentheses six times in the same order. The sc BLO is the first stitch of each repeat; the following regular sc stitches are worked normally unless the pattern specifically says otherwise.

Step-by-Step Pattern Instruction
Crochet the Pumpkin
Use orange yarn and a 2.0 mm crochet hook. Work the pattern in rounds, keeping the stated stitch count at the end of each round as your checkpoint.
Increase the Pumpkin Body
Round 1: Make a magic ring and work 6 sc into the ring. [6]
Round 2: Work an increase in each stitch around, placing 2 sc in each stitch. [12]
Round 3: Repeat sc BLO, inc around. [18]
Round 4: Repeat sc BLO, 1 sc, inc around. [24]
Round 5: Repeat sc BLO, 2 sc, inc around. [30]
Round 6: Repeat sc BLO, 3 sc, inc around. [36]
Round 7: Repeat sc BLO, 4 sc, inc around. [42]
Round 8: Repeat sc BLO, 5 sc, inc around. [48]
Round 9: Repeat sc BLO, 6 sc, inc around. [54]
Round 10: Repeat sc BLO, 7 sc, inc around. [60]
Round 11: Repeat sc BLO, 8 sc, inc around. [66]
Round 12: Repeat sc BLO, 9 sc, inc around. [72]
As the increases continue, the crochet circle becomes wider and begins forming the rounded pumpkin body. Keep the tension even so the stitches remain tight enough to hold the stuffing later.

Work the Middle Rounds
Rounds 13–22: For each round, repeat sc BLO, 11 sc around. Keep the stitch count at 72 stitches in every round.
This section builds the height of the pumpkin without making it wider. The BLO stitches continue creating the raised lines that will help define the six pumpkin sections.
Shape the Bottom
Round 23: Repeat sc BLO, 9 sc, dec around. [66]
Round 24: Repeat sc BLO, 8 sc, dec around. [60]
Round 25: Repeat sc BLO, 7 sc, dec around. [54]
Round 26: Repeat sc BLO, 6 sc, dec around. [48]
Round 27: Repeat sc BLO, 5 sc, dec around. [42]
Round 28: Repeat sc BLO, 4 sc, dec around. [36]
Round 29: Repeat sc BLO, 3 sc, dec around. [30]
Round 30: Repeat sc BLO, 2 sc, dec around. [24]
Round 31: Repeat sc BLO, 1 sc, dec around. [18]

Stuff the Pumpkin
Add fiberfill through the remaining opening before closing the pumpkin completely. Work with small amounts of stuffing and distribute them around the body rather than filling only the center.
The pumpkin should feel full and rounded, but not so tightly packed that the stitches stretch or the body becomes difficult to shape. Leave enough flexibility for the yarn-shaping step that comes next.
Round 32: Repeat sc BLO, dec around. [12]
Round 33: Repeat dec around. [6]
Fasten off and leave a long orange yarn tail for shaping the pumpkin ribs.
Shape the Six Pumpkin Ribs
Thread the long orange tail onto a large sewing needle. Pass the needle through the center of the top of the pumpkin and down through the center of the bottom.
Next, bring the yarn around the outside of the pumpkin along the raised BLO ridge lines. Pull the yarn firmly enough to draw the body inward and form a rib, then continue around the pumpkin to define all six sections.
Work gradually rather than pulling everything tightly at once. After each section, look at the pumpkin from the top and adjust the tension if necessary so the six ribs remain as evenly spaced as possible.
Once all six sections are shaped, secure the yarn at the center.
This shaping step is what gives the crocheted body its pumpkin-like form, so take a moment to check the symmetry before moving on to the stem.
Crochet the Green Stem
Use green yarn and a 2.0 mm crochet hook.
Round 1: Make a magic ring and work 6 sc into the ring. [6]
Round 2: Work 6 sc around. [6]
Rounds 3–4: Work 6 sc around each round. [6]
Round 5: Repeat 2 sc, inc twice. [8]
Round 6: Repeat 3 sc, inc twice. [10]
Round 7: Repeat 4 sc, inc twice. [12]
Fasten off.
The stem is attached to the pumpkin with hot glue in the finishing steps, so a long sewing tail is not needed for this attachment.

Attach the Stem
Find the indentation at the top center of the pumpkin created during the rib-shaping step. This is the natural position for the stem.
Apply hot glue to the bottom of the green stem and press it firmly into the center indentation. Hold it in position until the glue sets.
Before the glue fully hardens, check the stem from several angles to make sure it is sitting upright rather than leaning toward one of the pumpkin ribs.

Add Curled Tendrils
Wrap floral tape around thin craft wires to cover the wire surface. Then wrap each taped wire around a crayon or pencil to create a spiral.
Remove the crayon or pencil and gently adjust the curl if needed. Insert the straight end of each tendril into the pumpkin near the stem.
Position the tendrils so they frame the stem without covering the face area. Take care when handling the wire and make sure no sharp end is exposed.
Add the Jack-o’-Lantern Face
Cut two triangular eyes and a jagged mouth from black felt.
Before using glue, place the felt pieces on the front of the pumpkin and check their position. Choosing the section that looks most centered will help the face appear balanced between the raised ribs.
Once you’re happy with the expression, attach the felt pieces with hot glue.
You can make the face friendly, spooky, surprised, or playful simply by changing the shape and angle of the felt pieces.
Add Shading and Details
Shading is optional, but it can make the raised pumpkin sections stand out more clearly.
Use a crayon or marker to add lines and subtle shading along the body. Follow the direction of the raised ribs instead of applying random marks across the surface.
Start lightly and build the shading gradually. This gives you more control over the finished look and helps keep the crochet texture visible.
Decorating Ideas
Once finished, this little pumpkin can be used in several ways:
- Place it on a shelf, desk, or side table with other Halloween decorations.
- Group several pumpkins with different faces for a seasonal display.
- Add one to a classroom or craft-room display.
- Make several versions with different shading and facial expressions.
- Pair the pumpkin with other handmade fall decorations.

Final Finishing Check
Before placing the pumpkin on display, check the following:
- The six ribs are reasonably even.
- The top indentation remains centered.
- The stem is positioned securely in the center.
- The tendrils are firmly inserted and have no exposed sharp wire ends.
- The felt face is securely attached.
- The stuffing is evenly distributed.
- The shaping yarn is securely fastened.
- Any loose yarn ends have been trimmed or tucked away.
Final Notes
This crochet Halloween pumpkin gets its character from a combination of simple crochet shaping and thoughtful finishing details. The basic body uses familiar increases, decreases, and single crochet stitches, while the BLO ridges make the final rib shaping easier to control.
Once the pumpkin is shaped, the stem, curled tendrils, felt face, and optional shading give you plenty of ways to change its personality. Make one for a small Halloween display or create several with different expressions for a more playful arrangement.