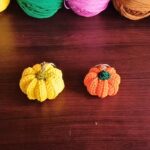
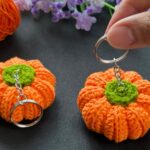
Create a tiny ribbed crochet pumpkin keychain with a simple rectangle, firm stuffing, and six sculpted segments for a cute Halloween accessory.
The textured pumpkin starts as an easy flat rectangle worked in single crochet through the back loops. Once the piece is folded and seamed, the ribbed rows naturally become the ridges that give the finished crochet pumpkin its character.
After the orange body is shaped and stuffed, a small green stem and leaf-style extension are added at the top, followed by the keychain ring. The most important part of the finishing is the sculpting: six evenly spaced wraps pull the center inward and turn the soft tube into a plump crochet pumpkin shape.
Materials & Tools Needed
- Medium-weight yarn in Orange and Green
- Crochet hook (visually matches a 3.5mm or 4.0mm hook)
- Yarn needle (tapestry needle)
- Polyfill stuffing
- Keychain ring with chain
- Scissors
Finished Size & Customization Ideas
Finished Size: The resulting mini pumpkin is approximately 1.5 to 2 inches wide, making it a perfect Halloween accessory for your keys or a backpack.
Customization: You can easily adjust the size of the pumpkin by chaining more stitches for a taller pumpkin, or crocheting more rows for a wider one.
Pattern Abbreviations & Terminology
- ch: chain
- sc: single crochet
- BLO: back loop only
- sl st: slip stitch
- st(s): stitch(es)

Step-by-Step Detailed Crochet Instructions
Pumpkin Body
Work the pumpkin body in Orange yarn. The rectangle is what creates the ribbed texture, so keep your back-loop-only stitches consistent throughout the rows.
Foundation: Chain 13.
Row 1: Sc in the 2nd ch from the hook, and in each of the remaining 11 chains across. (12 sc) Ch 1, turn.
Row 2: Working in the BLO (Back Loops Only), sc in each of the 12 sts across. (12 sc) Ch 1, turn.

Rows 3–24: Repeat Row 2 to create a continuous ribbed texture. You will crochet a total of 24 rows, which visually creates 12 prominent ridges on the fabric.
Finishing the Body: Fasten off, leaving an extra-long yarn tail of about 20–24 inches. This same tail will be used for the seam, both cinched ends, and the pumpkin sculpting.

Stem & Leaf
Make the stem and small leaf-style extension separately in Green yarn.
Base: Make a Magic Ring.
Round 1: Work 6 sc into the ring. Sl st to the first sc to join.
Stem Extension: Ch 3. Sl st in the 2nd ch from the hook, sc in the next ch, then sl st back into the original join of the circle.
Finishing: Fasten off, leaving a long green tail for sewing.

Forming the Pumpkin
Once the ribbed rectangle is complete, the long orange tail becomes your main finishing thread. Try not to cut it between the shaping stages because the same strand is needed to close, stuff, and sculpt the pumpkin.
Seam the Rectangle: Fold the orange ribbed rectangle in half, bringing the first and last rows together. Thread the long orange yarn tail onto your yarn needle and whip stitch the two short ends together to form a continuous tube.
Cinching the Bottom: Keep the yarn attached. Weave the needle in and out along the row ends of one open side. Pull the yarn tightly to cinch the opening completely closed, then tie a small knot to secure it.
Move Through the Center: Push the needle through the center hole you just closed so it comes out through the other open end of the tube.
Stuff the Pumpkin: Fill the pumpkin firmly with polyfill stuffing. Add enough stuffing to give the pumpkin a full, rounded shape without making the fabric difficult to close.
Close the Top: Weave the needle in and out around the remaining open edge. Pull tightly to close the opening and secure it with a knot.
Shape Check
Before sculpting the segments, check that the stuffing is spread evenly from top to bottom. If one side feels noticeably flatter, adjust the stuffing now; once the outer ridges are formed, changing the shape becomes more difficult.

Sculpting the Pumpkin Segments
The final shaping is what changes the stuffed tube into a recognizable pumpkin.
Sculpt the Center: Push the needle down through the top center of the pumpkin and bring it out through the bottom center.
Create the Ridges: Pull the yarn tightly around the outside of the pumpkin to create an indentation. Repeat this process a total of 6 times, spacing the wraps evenly around the pumpkin so you create 6 distinct, plump segments.
Finish the Shaping: Fasten off and hide the yarn tail inside the stuffing.
Attach the Stem & Keychain
With the orange body fully shaped, add the green details at the top.
Attach the Stem: Thread the green yarn tail onto your needle and sew the green stem securely to the top center of the pumpkin.
Attach the Keychain: Sew the bottom loop of the metal keychain ring directly to the top of the green stem.
Final Finish: Secure and weave in the remaining ends so the keychain is ready to attach to your keys or backpack.