Looking for a cute crochet pumpkin pie for fall? This 3D pie combines a crimped crust, pumpkin filling, whipped cream, and an optional woven lattice top.
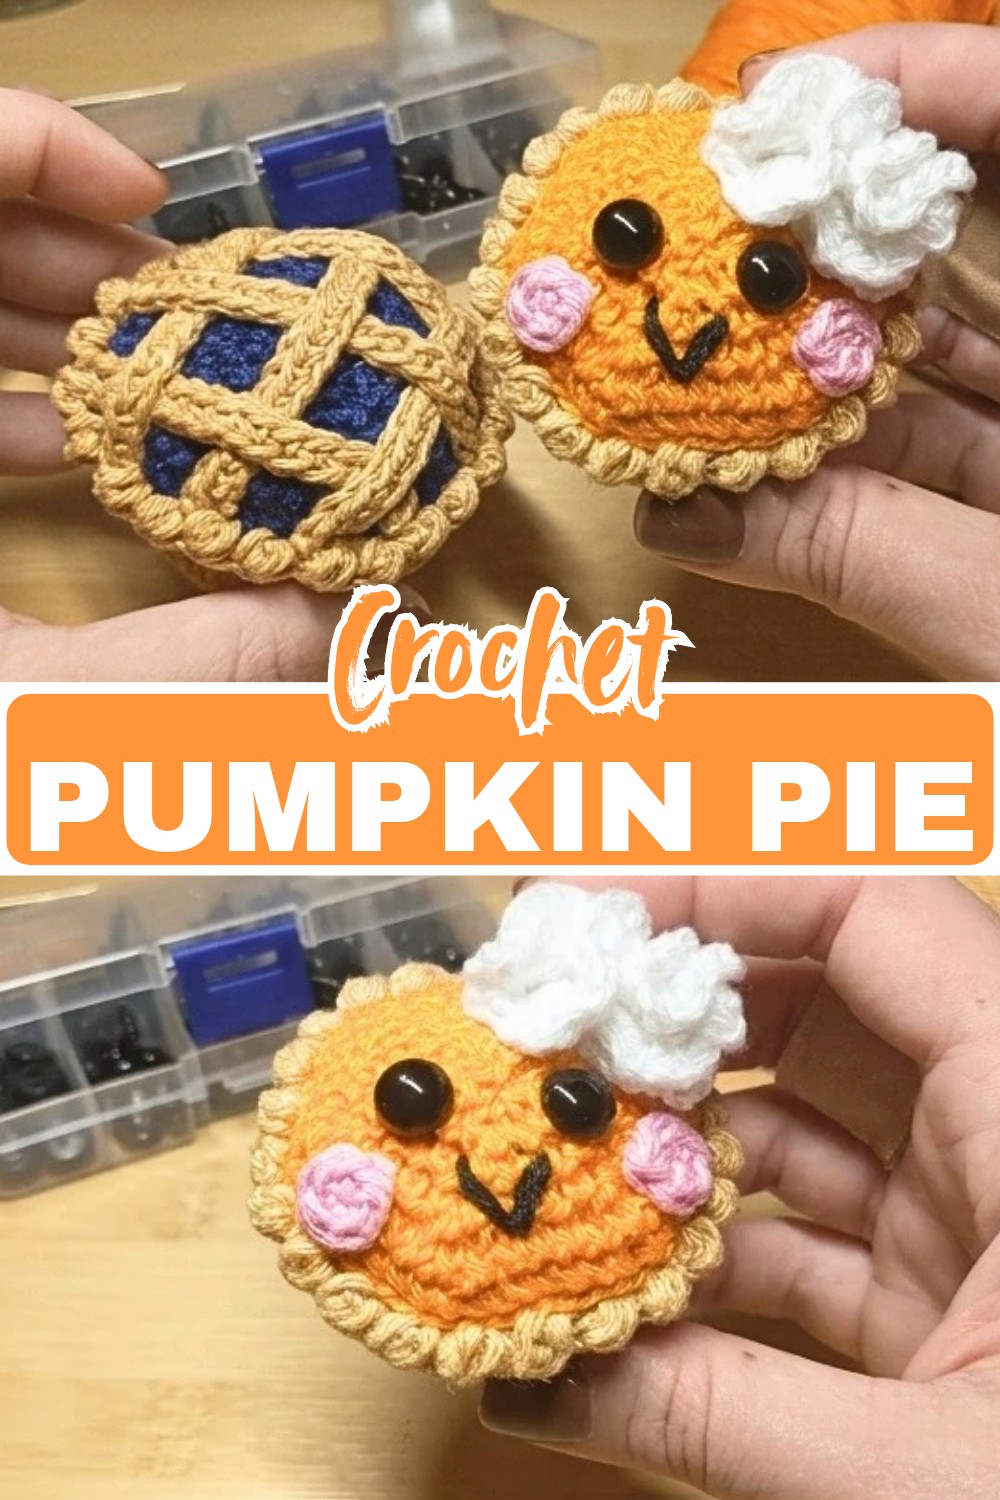
Few crochet pieces capture the look of a homemade dessert quite like a little pumpkin pie. This version has a rounded pie shape, a textured crimped crust, and two different ways to finish the top, so you can make either a sweet amigurumi crochet pie with a face or a more traditional lattice-topped version.
The crochet pattern also keeps the sewing fairly simple. You’ll build the pie from the base upward, add the orange filling inside the crust, then choose the finish that suits your style. Along the way, the instructions point out where to place the cardboard base, when to add safety eyes, and how to keep the lattice sitting neatly on top.
Credit Coffee Crochet Repeat
Materials and Tools
- Light brown yarn: For the crust and lattice
- Orange yarn: For the pumpkin filling
- Pink yarn: For the optional cheeks
- White yarn: For the whipped cream
- Black yarn or embroidery thread: For the mouth
- 3.0 mm crochet hook
- Polyfill or toy stuffing
- Cardboard: Cut to fit the bottom of the pie
- Safety eyes: For the amigurumi version
- Scissors
- Darning or tapestry needle
- Stitch marker
- Sewing pins
- Invisible nylon thread: Optional, for securing the lattice
Choose Your Pie Finish
Before you begin, decide which version you want to make.
Amigurumi pumpkin pie: The finished pie has a cute face, pink cheeks, and a curled whipped-cream topping. It makes a playful seasonal decoration or plush-style accent.
Lattice pumpkin pie: Instead of the face and cream, you’ll make light brown crochet strips and weave them across the orange filling to create a classic pie-crust look.
The pumpkin filling can also become another pie flavor simply by changing the yarn color. Try blue for blueberry, red for cherry, or green for apple.
Pattern Notes and Abbreviations
This pattern is written using US crochet terminology.
For a firm amigurumi fabric, the X single crochet can be used instead of the traditional V-shaped single crochet. This is made by working the yarn under the hook before the first pull-up and then yarning over normally for the second pull-through.
- MR: Magic Ring / Magic Circle
- ch: Chain
- sc: Single crochet
- hdc: Half double crochet
- inc: Increase – 2 sc in the same stitch
- inv dec: Invisible decrease – sc 2 together through the front loops
- sl st: Slip stitch
- inv sl st: Invisible slip stitch
- BLO: Back loop only
- FLO: Front loop only
- st(s): Stitch(es)

Crochet the Pie Base and Crust
Start with the light brown yarn and the 3.0 mm hook. Work the first six rounds in continuous rounds, using a stitch marker to keep track of the beginning of each round.
The increases are staggered as the base grows. This helps the circle stay smooth rather than developing obvious corners.
Round 1: 6 sc in a MR. (6 sts)
Round 2: Inc in every st around. (12 sts)
Round 3: [Inc, 1 sc] repeat 6 times. (18 sts)
Round 4: [1 sc, inc, 1 sc] repeat 6 times. (24 sts)
Round 5: [Inc, 3 sc] repeat 6 times. (30 sts)
Round 6: [2 sc, inc, 2 sc] repeat 6 times. (36 sts)

Create the Side Transition
Before Round 7, remove the stitch marker. Insert your hook into the first stitch of the round from back to front, then pull the working loop through to the back of the piece. Ch 1 and turn the piece around.
This changes the direction of the work so the next round can create the side wall of the pie rather than continuing to widen the base.
Round 7: Working in BLO, sc in each st around. (36 sts)
From this point, the pie sides gradually widen with exactly three increases in each round.
Round 8: [Inc, 11 sc] repeat 3 times. (39 sts)
Round 9: [Inc, 12 sc] repeat 3 times. (42 sts)
Round 10: [Inc, 13 sc] repeat 3 times. (45 sts)
Round 11: [Inc, 14 sc] repeat 3 times. (48 sts)
Join the final round with an inv sl st to the first stitch, pulling the loop from back to front. Ch 1.
Crust Edge Check
Before starting the crimped edge, look closely at Round 11. You should be able to see the front loops along the outside edge and the corresponding back loops sitting behind them.
The next round uses the front loops for the textured crust. Afterward, the orange filling will attach to the unworked back loops behind this edge. Keeping these two sets of loops distinct is what allows the crust to sit neatly in front of the filling.

Give the Crust Its Crimped Edge
The light brown yarn stays in place for this textured edge. Work entirely into the FLO of Round 11.
Round 12: Insert your hook into the FLO of the first st and pull up a loop. Yarn over, insert the hook into the same FLO and pull up another loop. Yarn over, insert the hook into the same FLO once more and pull up a third loop. (6 loops on hook.) Yarn over and carefully pull through all 6 loops to form the mini puff. Sl st into the FLO of the next st. Repeat this puff-and-slip-stitch sequence around the entire edge.
When you reach the beginning again, pull the final loop toward the back of the work, between the unworked back loop and the new crimped edge. Secure the yarn on the inside with a darning needle and cut it.
The resulting edge should have a small repeated ridge around the pie, giving the otherwise smooth crust a handmade, fluted appearance.
Add the Pumpkin Filling
Switch to orange yarn. The orange section begins behind the textured crust, using the back loops that were left untouched in Round 11.
Round 13: Attach orange yarn to any unworked back loop from Round 11, leaving a tail to weave in later. Ch 1, then sl st in the same st. Work 1 sl st in every back loop around. (48 sts)
Round 14: Working in the BLO of the slip stitches just made, sc in each st around. (48 sts)
Round 15: [2 inv dec, 4 sc] repeat 6 times. (36 sts)
Round 16: [2 inv dec, 2 sc] repeat 6 times. (24 sts)
Pause here. Place the cardboard piece inside the bottom of the pie so the finished base has a firm, flat foundation. Begin adding polyfill and stuff the pie firmly enough to hold its rounded shape.
Round 17: [1 inv dec, 2 sc] repeat 6 times. (18 sts)
If you are making the amigurumi version, this is a good point to add the safety eyes. Place them directly opposite one another, just below the halfway point of the orange filling. Check from the front before securing them so the face stays level.
Round 18: [1 inv dec, 1 sc] repeat 6 times. (12 sts)
Round 19: Inv dec around. (6 sts)
Cut the yarn, leaving a long tail. Thread the tail onto a darning needle and weave it in and out through the front loops of the six remaining stitches. Pull firmly to close the opening, then weave in the end.

Add the Optional Pie Face
For a friendly amigurumi version, add two small pink cheeks and a simple embroidered mouth.
Cheeks – Make 2
Using pink yarn, make 5 sc in a MR. Close the ring and sl st into the first stitch. Fasten off, leaving a long sewing tail.
Sew one cheek just underneath the outer edge of each eye.
Embroidered Mouth
Thread your darning needle with black yarn or thread. Stitch a small V- or U-shaped mouth between the eyes.
For a slightly bolder expression, go over the stitched lines a second time.
Make the Whipped Cream Topping
The whipped cream is made from a long ruffled chain that is gathered into a small curled dollop.
Whipped Cream: Ch 22. In the 3rd ch from the hook, work [1 hdc, ch 1, 1 hdc] in the same chain. Repeat [1 hdc, ch 1, 1 hdc] in every chain across. At the end, ch 2 and sl st into the original starting chain. Fasten off, leaving a very long tail.
Thread the long tail onto your needle and run it in and out through the base of the original chain. Pull the yarn gradually to gather the strip into a curled cream shape.
Once the ruffle has tightened into a dollop, use the remaining tail to secure it to the center top of the pie.
This also gives you a useful way to cover the closing area at the top of the filling.
Make the Woven Lattice Top
If you prefer a traditional pumpkin pie instead of the amigurumi face, leave out the cheeks, mouth, eyes, and whipped cream.
Use light brown yarn for the lattice.
Long strips – Make 2: Ch 16. Starting in the 2nd ch from the hook, work 15 sc across. Fasten off, leaving a few inches of yarn tail.
Short strips – Make 4: Ch 13. Starting in the 2nd ch from the hook, work 12 sc across. Fasten off, leaving a few inches of yarn tail.

Weave and Attach the Lattice
Find the center of the orange pie filling. Place the two long strips across the center in a cross shape.
Use sewing pins to position the short strips around the cross: two on the left and right of the vertical strip, and two above and below the horizontal strip.
Once the arrangement looks even, weave the strips over and under one another just as you would with a traditional pastry lattice.
Pin the strip ends in place so they do not shift while you sew.
Thread each yarn tail onto the darning needle and secure the strip ends into the light brown crust edge. When sewing, catch the crust rather than the orange filling, and pull the knot toward the inside so it stays hidden.
For an especially neat finish, use invisible nylon thread to tack the overlapping lattice sections together. A few small stitches at the crossings will keep the strips flat without making the attachment obvious.

Finish Your Pumpkin Pie
Whether you choose the smiling amigurumi version or the woven lattice finish, the finished pie has the same rounded pumpkin-colored filling and textured brown crust.
The amigurumi version works especially well as a playful Thanksgiving decoration, while the lattice version has a more traditional dessert look. You can also make several pies in different filling colors—orange for pumpkin, red for cherry, blue for blueberry, or green for apple—and create a small seasonal dessert collection.
The cardboard base is particularly useful if you want the pie to sit upright on a shelf or table, while the stuffed filling keeps the piece soft and dimensional from every angle.