Here, delicate ruffles, tiny roses, and contrasting yarn transform this mini crochet dress into a charming keychain or festive handmade gift.

Handmade accessories can feel especially special when they combine decorative details with everyday usefulness. This crochet mini dress is a lovely choice for beginners who want to explore shaping, layered ruffles, and miniature floral embellishments without creating a large garment.
Inside, this crochet tutorial covers the bodice, flared skirt, two ruffle layers, shoulder straps, and mini roses. You’ll also learn how to attach keychain hardware and finish loose yarn ends neatly. Follow each section to assemble your own miniature crochet dress charm.
Credit Erfin R. Tangdilintin
Materials & Tools
Prepare all supplies before starting so color changes and finishing are easier to manage.
- Color A – Red or green yarn: For the bodice, middle accent rows, and decorative ruffle.
- Color B – White yarn: For the skirt base and shoulder straps.
- Accent yarn: A small amount of red or pink for two miniature roses.
- Crochet hook: 2.5 mm.
- Keychain hardware: Keychain ring with a jump ring or short chain.
- Tapestry needle or hot glue gun: For attaching roses and securing decorative details.
- Scissors: For trimming yarn.
- Lighter or yarn cutter: Optional for appropriate acrylic yarn ends only. Use caution around heat and follow safe handling practices; weaving in ends with a tapestry needle is a safer alternative.
Finished Size & Customization
The finished dress measures approximately 2.5–3 inches tall, excluding keychain hardware.
- Christmas style: Combine red and white for a festive ornament or bag charm.
- Spring colors: Try pastel pink and blue for a softer, playful look.
- Alternative embellishments: Replace crochet roses with tiny bows, pearls, or securely sewn buttons.
Crochet Abbreviations
These instructions use standard US crochet terminology.
- ch: Chain
- sl st: Slip stitch
- sc: Single crochet
- dc: Double crochet
- inc: Increase; work two stitches in the same indicated stitch
- BLO: Back loop only
- FLO: Front loop only
- st/sts: Stitch/stitches
- [ ] or ( ): Repeat the enclosed instructions as directed
Pattern note: Ch 3 counts as the first dc wherever specified. Keep track of beginning chains and joining stitches carefully, especially when working increases around small sections.

Step-by-Step: Crochet Mini Dress Keychain
Work from the bodice downward through the white skirt, then add the middle accent ruffle, shoulder straps, roses, and hardware.
Step 1: Form the Top Bodice
Yarn: Color A
Hook: 2.5 mm
Start by creating a small closed foundation ring. This forms the upper section of the miniature dress.
- Make a slip knot and ch 12.
- Insert your hook into the first chain and work a sl st to close the chain into a ring.
- Ch 3; this counts as the first dc.
- Work 3 dc into the ring.
- Ch 1, then work 6 dc into the ring.
- Ch 1, work 4 dc into the ring.
- Ch 1, work 6 dc into the ring.
- Ch 1, then join with a sl st into the third chain of the beginning ch 3.
Check your work: The foundation should form a compact ring with four separated chain spaces. These spaces help establish the bodice shape in the next row.
Teaching tip: Keep the starting chain ring loose enough for your hook to enter comfortably, but avoid leaving a large opening in the center.
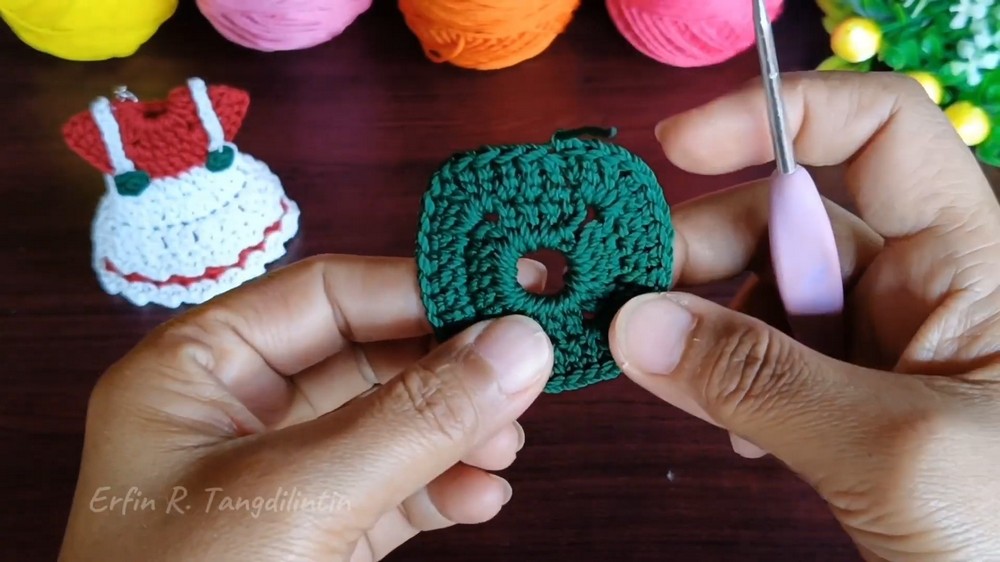
Step 2: Shape the Bodice
Continue with Color A to create the upper section and define its shaping points.
- Ch 3.
- Work 3 dc.
- In the next chain space, work (2 dc, ch 1, 2 dc).
- Work 6 dc.
- In the next chain space, work (2 dc, ch 1, 2 dc).
- Work 6 dc.
- In the next chain space, work (2 dc, ch 1, 2 dc).
- Join with a sl st into the third chain of the beginning ch 3.
- Fasten off Color A and secure the yarn end.
Teaching tip: The grouped stitches in chain spaces create shaping rather than a plain circular edge. Check their placement against the original tutorial before attaching the skirt.
Step 3: Attach White Yarn for the Skirt
Yarn: Color B – White
The white section creates the skirt beneath the bodice. Its first row establishes the connection, while later rows add width and fullness.
- Attach white yarn to a designated chain space on the bodice.
- Ch 3.
- Work 8 dc in BLO.
- Work 1 dc inside the designated chain space.
- Turn your work.
- Work 8 dc in BLO.
- Join with a sl st into the top of the beginning ch 3, following the original tutorial.
Teaching tip: BLO means inserting your hook under the back loop only, leaving the front loop unworked. This creates a visible ridge that can help separate the skirt from neighboring sections.
Important: The supplied instructions do not fully clarify how the two groups of 8 dc and the chain-space stitch are distributed around the entire bodice. Follow the original demonstration for exact placement rather than assuming this is a conventional full circular round.
Step 4: Widen the Skirt
Row 4 – Increase Round
This row adds fullness to the white skirt.
- Ch 3.
- Work 1 dc in the next stitch.
- Work a dc increase in the following stitch.
- Repeat the supplied sequence, (2 dc, dc inc), five more times around.
- Join with a sl st into the third chain of the beginning ch 3.
The supplied pattern lists 24 dc as the target stitch count.
Check your work: The skirt should begin widening below the bodice rather than remaining a narrow strip.
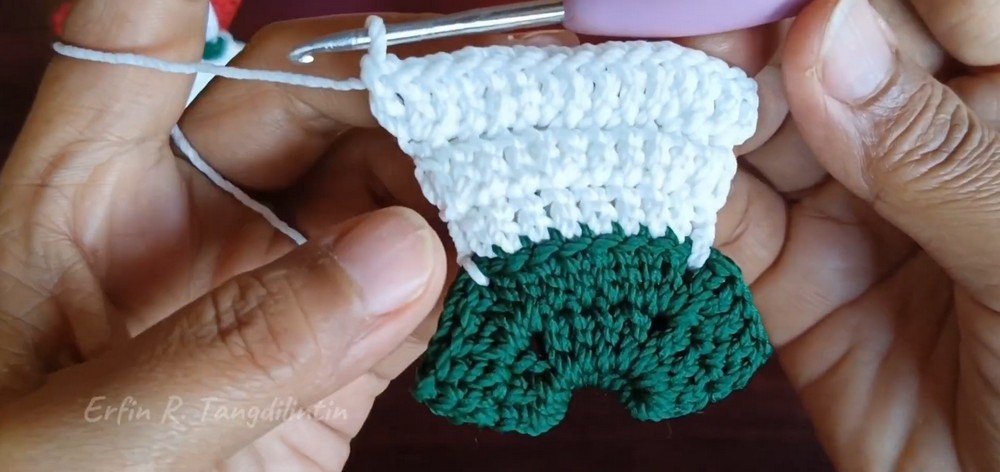
Step 5: Add More Skirt Width
Row 5 – FLO Increases
Work into the front loops to create a ridge and prepare for the lower ruffle.
- Ch 3.
- Work 2 dc in FLO.
- Work a dc increase in FLO.
- Repeat the supplied sequence, (3 dc in FLO, dc inc in FLO), five more times around.
- Join with a sl st.
The supplied pattern lists 30 dc at the end of this row.
Teaching tip: Keep the hook inside the front loop only for every stitch specified in FLO. Accidentally working through both loops will make the decorative ridge less distinct.
Step 6: Crochet the Bottom Skirt Ruffle
Yarn: Color B – White
The lower ruffle creates small scalloped sections around the skirt hem.
- Ch 1.
- Work 1 sc into the same stitch.
- Ch 2.
- Work another sc into that same stitch.
- Skip the next stitch.
- Repeat the sequence (1 sc, ch 2, 1 sc in the same stitch, skip 1 stitch) 14 more times around.
- Join with a sl st into the first sc.
- Fasten off and secure the yarn end.
The supplied pattern describes 15 ruffle petals.
Check your work: Each repeated section should form a small looped scallop. Keep the ch-2 spaces consistent so the ruffle has an even appearance.
Step 7: Attach Color A for the Middle Ruffle
Turn the dress upside down to reach the unworked loops along the back of the bodice-to-skirt transition.
Yarn: Color A
- Attach Color A to the designated BLO at the transition row.
- Ch 3.
- Work 3 dc in BLO.
- Work a dc increase in BLO.
- Repeat the supplied sequence (4 dc in BLO, dc inc in BLO) around.
- Join with a sl st into the third chain of the beginning ch 3.
The supplied pattern lists 30 dc for this row.
Teaching tip: Turning the dress upside down helps expose the unworked loops. Keep the skirt and bodice out of the way so your hook catches the intended loops instead of the finished ruffle.
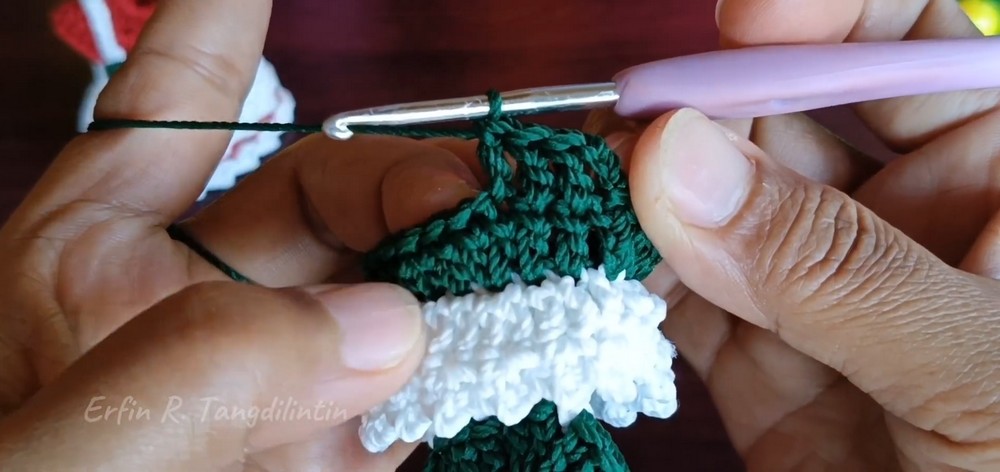
Step 8: Expand the Middle Accent Section
Continue with Color A to build the second row of the middle accent.
- Ch 3.
- Work 3 dc.
- Work a dc increase.
- Repeat (4 dc, dc inc) around.
- Join with a sl st.
The supplied pattern lists 36 dc for this row.
Check your work: The accent section should be broad enough to support its decorative edge without bunching tightly against the dress.
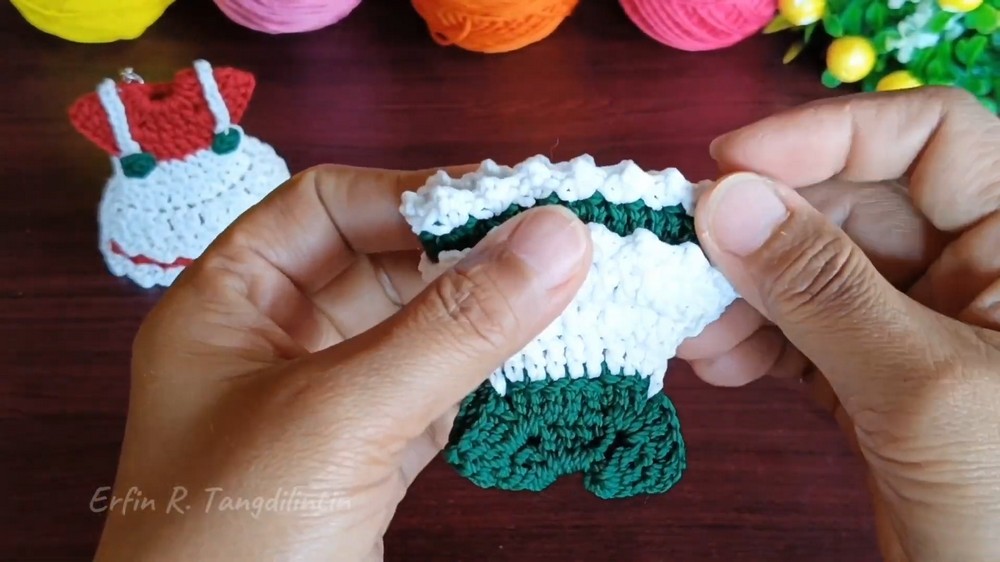
Step 9: Finish the Middle Ruffle
Work the decorative edge using Color A.
- Ch 1.
- Work 1 sc into the designated stitch.
- Ch 2.
- Work another sc into the same stitch.
- Skip the next stitch.
- Repeat (1 sc, ch 2, 1 sc in the same stitch, skip 1 stitch) 17 more times around.
- Join with a sl st.
- Fasten off and secure the yarn end.
The supplied pattern describes 18 ruffle petals.
Teaching tip: Arrange the dress so the middle ruffle is visible between the bodice and white skirt. If the edge twists, check that each repeat is worked into the intended stitch.
Step 10: Make the First Shoulder Strap
Yarn: Color B – White
The straps connect the bodice to the top hardware and complete the miniature dress silhouette.
- Attach white yarn to a designated FLO on the front yoke.
- Ch 16 loosely to form the first strap.
- Position the chain across the shoulder area.
- Attach it with a sl st to the corresponding front loop on the back side of the dress.
- Fasten off and secure the yarn end.
Teaching tip: Avoid pulling the chain too tightly. A little flexibility helps the strap sit naturally instead of drawing the bodice inward.

Step 11: Add the Second Strap
Repeat the same process on the opposite side.
- Attach white yarn at the corresponding front loop.
- Ch 16, keeping tension similar to the first strap.
- Attach the chain to the matching loop on the back.
- Fasten off and secure the end.
Check your work: Lay the dress flat and compare both straps. They should have similar lengths and sit symmetrically without twisting.
Step 12: Crochet Two Mini Roses
Yarn: Red or pink accent yarn
Make two small roses to decorate the front bodice.
For each rose:
- Form a magic ring.
- Ch 1.
- Work 5 sc directly into the center of the ring.
- Pull the ring tight to close the center.
- Join with a sl st into the first sc.
- Ch 1, fasten off, and trim the yarn.
Repeat for the second rose.
Teaching tip: These instructions create tiny circular accents rather than elaborate layered rose petals. Keep both pieces similar in size so they sit neatly side by side.
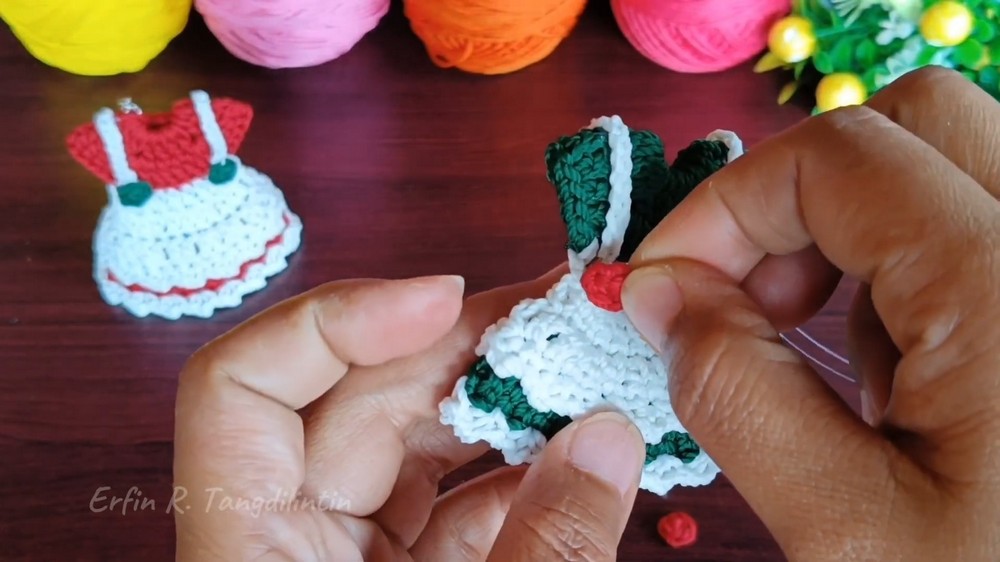
Step 13: Attach the Roses
Position the two roses on the center front of the bodice, close to the strap area.
- Arrange both roses side by side before attaching them.
- Check that they are centered and do not cover the straps.
- Secure them using a small amount of hot glue or sew them in place with matching yarn and a tapestry needle.
- Allow glue to cool and set fully before handling the accessory.
Finishing tip: Sewing is a useful alternative when you want to avoid glue residue or need extra security for a frequently handled keychain.
Step 14: Attach the Keychain Hardware
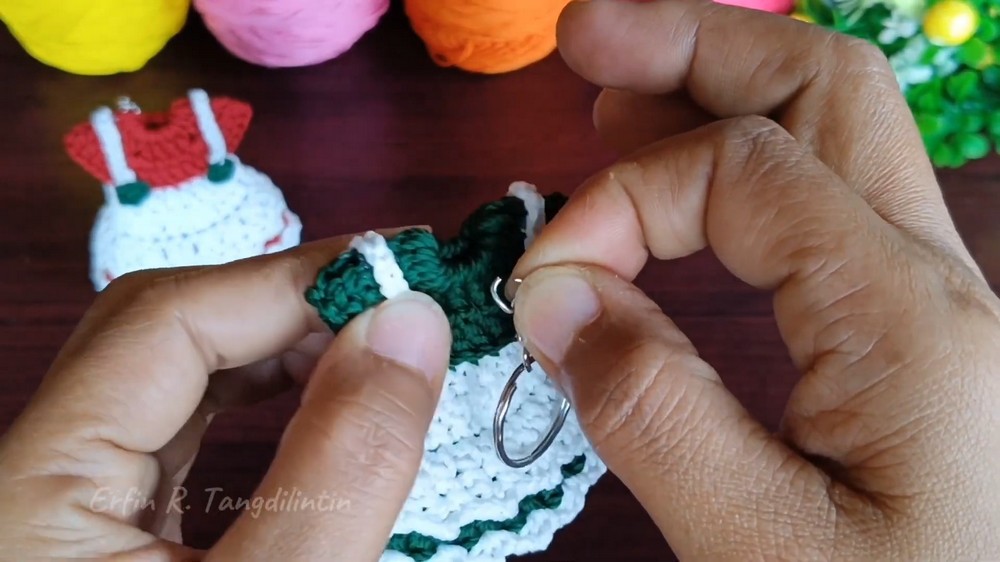
The final step turns the miniature dress into a usable charm.
- Locate the secure top loops formed by the dress straps.
- Attach the keychain ring or jump ring through the intended top connection.
- Close the hardware securely.
- Gently tug the connection to check that it does not loosen.
- Inspect the straps, roses, and yarn ends before using the accessory.
Safety note: Keep metal hardware and small decorative parts firmly attached. If the charm is intended for a young child, avoid loose parts that could present a choking hazard.
Finishing Checklist
Before using or gifting your mini dress keychain, confirm that:
- Both ruffles sit neatly.
- Shoulder straps are even and securely attached.
- Mini roses are firmly fixed to the bodice.
- Loose yarn ends are woven in or safely secured.
- Keychain hardware is closed and stable.