Want a cheerful crochet tree with a little more texture and character? This design combines looped green fringe, snowy white edging, a stuffed star, and a sturdy crocheted base for a charming holiday display.

Crochet Christmas Tree Pattern
This crochet Christmas tree brings together several simple techniques to create a finished decoration that feels much more detailed than its small size suggests. The green fringe gives the tree its full, layered shape, while the white edging adds a soft snowy finish and colorful pom-poms provide the ornaments.
Because the tree is built around a cardboard cone, you can focus on creating an even decorative covering without having to crochet the entire three-dimensional shape.
The construction also gives you a few useful crochet techniques to practice, including extended loop stitches, a picot star, increases, back-loop-only stitches, front post double crochet, and reverse single crochet. The order of assembly matters here, so it helps to complete the fringe, star, and trunk separately before joining everything together. Pay particular attention to the loop length and the way the fringe is wrapped around the cone, since those details have the biggest effect on the finished shape.
Credit Crochet Anywhere
Materials & Tools
- 4-ply yarn in: Dark Green, Brown, White, Yellow
- 2.5 mm crochet hook
- Cardboard or cardstock
- 1 large sheet for the cone
- 1 circular piece for the basket base
- 1 long strip for the basket wall
- 3 cm × 30 cm plastic ruler
- Small colorful pom-poms
- Fiberfill stuffing
- Hot glue gun and glue sticks
- Scissors
- Yarn needle
- Tape measure
- Pencil or pen
Pattern Abbreviations
- st / sts: stitch/stitches
- ch: chain
- sl st: slip stitch
- sc: single crochet
- hdc: half double crochet
- dc: double crochet
- inc / dc-inc: increase; 2 dc in the same stitch
- BLO: back loop only
- FPdc: front post double crochet
- MR: magic ring
- rsc: reverse single crochet, also called crab stitch

Before You Start
There are three crocheted components to complete:
- The green fringe strip for the tree body
- Two yellow star pieces
- The brown basket-style trunk
The cardboard cone is prepared separately and becomes the support underneath the green fringe.
The green strip is intentionally very long. Do not try to shape it into a cone while crocheting. It remains a straight strip until the assembly stage, when it is wrapped around the cardboard cone.
A Note About the Extended Loops
The 3 cm ruler controls the length of every loop in Row 2. Keep the ruler in the same position throughout the row and pull each loop to approximately the same height. Uneven loops will make the finished tree look irregular once the strip is wrapped around the cone.
Step-by-Step Instructions
Make the Cardboard Cone
- Use a pencil and measuring tape to mark an 18 cm radius sector on a sheet of cardboard.
- Cut out the marked sector.
- Bring the straight edges together and roll the cardboard into a cone.
- Adjust the cone until the bottom opening measures approximately 26 cm in circumference.
- Secure the overlapping edge with hot glue.
Shape Check
Before gluing the cone permanently, check the bottom circumference. This measurement determines how the crocheted fringe fits around the widest part of the tree.
Allow the glue to cool completely before beginning the fringe assembly.
Crochet the Green Tree Fringe
Work the entire strip in Dark Green yarn.
Row 1: Foundation Base – Ch 260, skip the first 2 ch, work 1 dc in each remaining chain across. Fasten off. (258 dc)
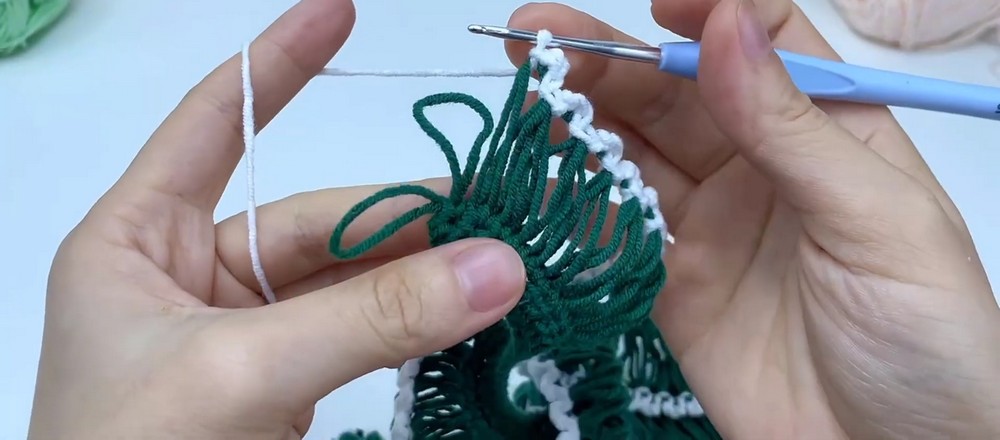
The starting chain is intentionally long because the finished strip will be wrapped around the full height of the cone.
Tip: Keep your foundation chain reasonably even. If the chains are pulled very tightly, the finished strip can become difficult to wrap smoothly around the cone.
Row 2: Extended Loop Fringe – Reattach Dark Green yarn at the beginning of Row 1, hold the 3 cm ruler along the back/top of the work, pull each loop over the ruler, and work 2 extended loop stitches into every stitch across. Finish with 1 ch, fasten off, and carefully slide out the ruler.
The ruler is being used as a physical size guide, so there is no need to judge every loop by eye.
Important: Do not remove the ruler until all the loops have been formed and secured. Pulling it out too early can make the loop lengths inconsistent.
Once the row is complete, gently slide the ruler out from the loops.
Row 3: White Snow Edging – Attach White yarn to the tip of each extended loop and work (1 sl st, ch 3, 1 sl st) into each loop tip across. Fasten off and weave in the ends.
This edging creates the small ruffled effect that sits along the ends of the green loops.
Placement Tip: Work into the actual tip of each loop rather than catching the lower part of the loop. Keeping the white stitches at the same height gives the snow edging a more even appearance.

Make the Yellow Star Topper
Make 2 identical star pieces in Yellow yarn.
The star is worked from the center outward, with each repeat creating one point.
Round 1: Work into a MR, ch 2, then work 10 hdc into the ring. Sl st to the top of the first hdc to join. (10 sts)
Pull the magic ring closed firmly enough that there is no large opening in the center.
Round 2: Ch 1, then repeat the following sequence 5 times around: 1 sc in the next st, then (1 hdc, 1 dc, ch-2 picot, 1 dc, 1 hdc) in the next st. Sl st to join, fasten off, and leave a long tail for sewing. (5 star points)
Each star point uses 2 stitches from Round 1: one stitch for the sc section and one stitch for the taller pointed section.
Shape Tip: When making the picot, keep the ch-2 chain loose enough to form a visible point. If the chain is pulled too tightly, the star points can look compressed.
Repeat the same instructions to make the second star piece.

Crochet the Brown Trunk Basket
Work the basket in Brown yarn using joined rounds.
Round 1: Into a MR, ch 2, work 16 dc into the ring, then sl st to the top of the first dc to join. (16 dc)
The ch-2 at the beginning does not count as a stitch in this round.
Round 2: Ch 2, work 2 dc in each stitch around, then sl st to join. (32 dc)
Round 3: Ch 2, repeat (1 dc, 1 dc-inc) around, then sl st to join. (48 dc)
Round 4: Ch 2, repeat (2 dc, 1 dc-inc) around, then sl st to join. (64 dc)
Round 5: Ch 2, work 1 dc in the BLO of each stitch around, then sl st to join. (64 dc)
This is the point where the flat circular base turns upward to create the basket wall.
Construction Tip: Make sure you are working into the back loop only in this round. This creates the bend needed for the sides to rise rather than continuing to expand the base.
Rounds 6–11: Ch 2, repeat (1 dc, 1 FPdc) around, then sl st to join. Repeat for 6 rounds. (64 sts each round)
These rounds create the ribbed texture on the trunk.
Texture Tip: Work the FPdc around the post of the appropriate previous stitch rather than into the stitch top. Keeping the raised stitches consistent will make the vertical ribbing look more even.
Round 12: Ch 1, work 1 reverse sc in each stitch around, then sl st to join. (64 sts)
Fasten off and weave in the yarn end.
The reverse single crochet gives the basket rim a firm, slightly raised finish.

Assemble the Tree
Once all three crocheted components are complete, you can begin putting the tree together.
Attach the Green Fringe to the Cone
- Place the cardboard cone upright.
- Apply a narrow strip of hot glue around the bottom outer rim of the cone.
- Press one end of the green fringe strip onto the glued edge.
- Begin wrapping the strip around the cone in a continuous upward spiral.
- Apply small amounts of glue to the cardboard as you work.
- Continue wrapping until you reach the tip of the cone.
Important Assembly Tip
Do not apply glue to the entire cone at once. Working in small sections gives you more control over the placement of the fringe.
Keep each new row of fringe close enough to the previous row to hide the cardboard underneath, but avoid pulling the strip so tightly that the loops become flattened.
The green fringe should gradually follow the narrowing shape of the cone.
At the tip, secure the end carefully and allow the glue to set.
Assemble the Star
- Place the two yellow star pieces together with their edges aligned.
- Use the long yarn tail and a yarn needle to whipstitch around the edges.
- Before completely closing the star, add a small amount of fiberfill stuffing.
- Finish sewing the remaining edge closed.
- Secure and trim the yarn.
Star Shape Tip
Use only a small amount of stuffing. The star should have enough filling to look slightly raised, but too much will stretch the stitches and make the points lose their defined shape.
Apply hot glue to the bottom tip of the finished star and attach it securely to the top of the tree.
Add the Pom-Pom Ornaments
Glue small colorful pom-poms onto selected green fringe loops around the tree.
You do not need to place one on every loop. Spacing the ornaments around different sections of the tree creates a more natural decorated appearance.
Placement Tip: Before gluing, arrange the pom-poms loosely and step back to check the overall balance. Once they are glued in place, they will be difficult to reposition.
Reinforce the Trunk Basket
The crochet basket benefits from an internal cardboard support because the tree needs to sit upright.
- Cut a circular piece of cardboard to fit inside the bottom of the basket.
- Cut a long cardboard strip approximately 4 cm high to fit around the inside wall.
- Carefully glue the circular piece into the bottom.
- Position the long strip against the inside of the basket wall and secure it with glue.
- Allow the adhesive to cool and set.
- Place the finished tree cone on top of the reinforced brown basket.
Before Final Placement
Check that the basket sits level on the surface. If the cardboard insert is uneven or too large, the tree may wobble once the cone is placed on top.

Customization Ideas
Change the Tree Color
Dark green gives the most traditional appearance, but you can create a softer version with:
- Sage green
- Pastel mint
- White
- A combination of green shades
Change the Decorations
Instead of colorful pom-poms, try:
- Tiny bells
- Small pearls
- Sequins
- Miniature stars
Keep heavier decorations limited, especially on the longer fringe loops, so they do not pull the crochet downward.
Turn the Base Into a Hidden Holder
The trunk basket can be left separate from the cone if you want to use the base as a small holiday holder for wrapped candy or another lightweight item.
This works particularly well because the basket already has a reinforced structure inside.
Helpful Tips for a Neater Finish
Keep the Loop Length Consistent
The 3 cm ruler is more than a convenience—it determines the visual fullness of the tree. Use it for every extended loop so the fringe remains uniform.
Check the Cone Before Gluing
Measure the bottom circumference before attaching the crochet strip. A correctly sized cone makes the spiral wrapping much easier.
Do Not Overstuff the Star
A lightly stuffed star keeps its points defined and prevents the stitches from becoming stretched.
Watch the BLO Round
Round 5 of the basket is the structural turning point. Working through the back loops creates the edge where the flat base begins forming the vertical wall.
Work the FPdc Consistently
The ribbed basket gets its texture from the alternating dc and FPdc stitches. Keep the raised posts facing the same direction throughout the six rounds.

Finishing
Once the glue has fully set, check the tree from all sides.
Trim any visible yarn tails, make sure the white edging is sitting evenly along the green loops, and check that the star is firmly attached. If any section of the fringe has lifted away from the cone, add a small amount of glue underneath rather than pulling the crochet tighter.
Your finished crochet Christmas tree is now ready to display on a tabletop, shelf, centerpiece, or holiday arrangement. The combination of textured green fringe, white snow-like edging, colorful ornaments, and the small stuffed star gives this handmade decoration plenty of character while keeping the overall construction manageable.