Need a tiny handmade present to brighten a tree, gift package, or holiday display? This flat crochet gift box is quick to shape with simple rows, then comes to life with a surface-stitched ribbon, hanging loop, and dimensional bow.

Crochet Christmas Gift Box Ornament
Small enough to make in an afternoon yet detailed enough to look like a wrapped present, this crochet gift box ornament is a lovely way to add handmade character to your holiday decorations.
The flat crocheted body keeps the main shape simple, while the contrasting ribbon cross and bow create the unmistakable look of a tiny gift.
The most important part of this pattern is not the basic single crochet-it is keeping the square shape even and placing the surface ribbon accurately. The hanging loop is also worked directly into the border rather than added afterward, so a little attention during the edging makes the finished ornament much neater. Once those details are in place, the bow provides the final raised accent that makes the flat gift box look ready to hang.
Credit Silva Crochet
Materials & Tools Needed
- Yarn: 5-strand milk cotton yarn in two contrasting colors:
- Color A: Gift box body and hanging loop – teal green, magenta, red, or your preferred color
- Color B: Ribbon cross and decorative bow – pink, yellow, green, or another contrasting shade
- Crochet Hook: 3.0 mm (5/0)
- Tapestry or Yarn Needle: For weaving in ends and securing the decorative details
- Scissors
- Hot Glue Gun and Glue Sticks: For attaching the bow
Finished Size
The finished flat ornament measures approximately 2.5 × 2.5 inches (6.5 × 6.5 cm), excluding the hanging loop.
Because the body is made from simple turned rows, you can easily personalize the look with different color combinations. Try red and green for a traditional appearance, magenta and yellow for something brighter, or teal and pink for a softer winter palette.
You can also make two matching body panels, add the ribbon cross to both, and join them around the edges with a small amount of stuffing between them. This turns the flat design into a softly puffed gift-box decoration.
For another variation, leave off the hanging loop and use the finished piece as a gift tag, or make several in coordinating colors and string them together for a festive garland.
Crochet Abbreviations
This pattern uses standard crochet terminology.
- ch: Chain
- sc: Single Crochet
- sl st: Slip Stitch
- st(s): Stitch(es)
- FO: Fasten Off
- [ ]: Total stitch count at the end of the row or section

Before You Start
The gift box body is worked flat in turned rows, rather than in continuous rounds. The finished rectangle is then edged with single crochet, and the hanging loop is incorporated directly into that border.
Keep the body flat as you work. Since the ribbon will later be placed across the center, an uneven edge or distorted rectangle will be much more noticeable once the contrasting color is added.
The border is worked continuously around the piece, but the hanging loop interrupts the first part of the top edge. It helps to think of the top edge as 5 stitches, the 20-chain loop, then 6 stitches rather than trying to place the loop after the entire border is finished.
Step-by-Step Crochet Gift Box Ornament
1. Crochet the Gift Box Body
Using Color A
The body is worked from the bottom upward in turned single crochet rows.
Foundation Chain: Ch 12.
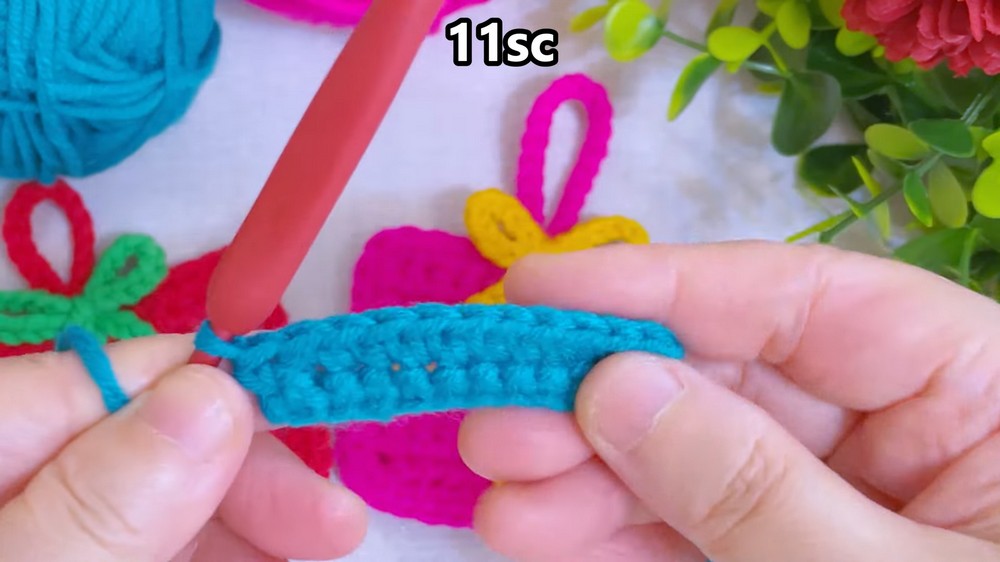
Row 1: Starting in the 2nd ch from hook, work 1 sc in each chain across, then ch 1 and turn. [11 sc]
Rows 2–8: Work 1 sc in each stitch across, then ch 1 and turn. [11 sc per row]
You should now have 8 rows of single crochet.
Shape Check
Before beginning the border, lay the piece flat and check its proportions. You should have a neat rectangular panel with straight sides and 11 stitches across each row.
The chain-1 turning chains do not count as stitches in the 11-stitch total. If you accidentally work into the turning chain, the edges can gradually widen or narrow, which will make the ribbon placement harder to keep centered later.
Add the Border and Integrated Hanging Loop
Continue with Color A without fastening off.
The border is worked around the entire body. The hanging loop is created while you are working across the first part of the top edge, so you do not need to sew a separate loop onto the finished ornament.
Top Edge and Hanging Loop
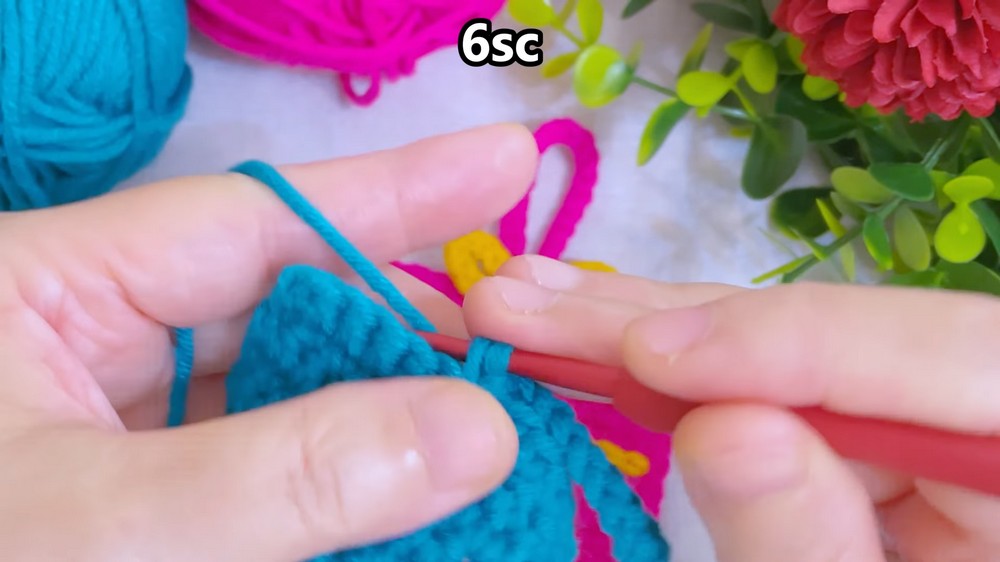
Top Edge: Work 5 sc across the first portion of the top edge.
Hanging Loop: Ch 20, then make 1 sl st back into the same top stitch where the chain began to secure the loop.
Top Edge: Continue with 6 sc across the remaining top edge.
At this point, the top edge has been divided into 5 sc + hanging loop + 6 sc. This placement is intentional and keeps the loop near the center of the ornament.
Continue Around the Remaining Edges
Corner 1: Work 2 sc into the corner.
Side Edge: Work 1 sc into each row end down the side, for 7 sc total.
Corner 2: Work 2 sc into the bottom corner.
Bottom Edge: Work 1 sc across the bottom edge, working into the foundation-chain stitches.
Corner 3: Work 2 sc into the next corner.
Final Side Edge: Work 1 sc into each row end up the remaining side.
Finishing Edge: Fasten off, leaving a short tail, and weave in all ends neatly on the back.
Border Placement Tip
The side edges are made by working into the ends of the completed rows, so there are 7 row-end stitches along each side. Keep those stitches evenly spaced rather than forcing them too tightly together.
At the corners, the extra sc helps the border turn without pulling the fabric inward. If your corner looks tight or starts curling, check that you have not skipped the corner stitch.

Add the Surface-Stitched Ribbon Cross
Using Color B
The ribbon is not crocheted as a separate strip. Instead, it is created directly on the front of the gift box with surface slip stitches.
This is the detail that makes the plain square instantly resemble a wrapped present, so take a little extra care with placement.
Vertical Ribbon
Insert your hook from front to back through the top-center stitch just below the base of the hanging loop.
Pull up a loop of Color B from the back.
Move down to the next row and insert the hook into the corresponding space below. Yarn over from behind and pull through to create a surface slip stitch.
Continue working surface slip stitches straight down the center column until you reach the bottom edge.
Fasten off on the back and secure the yarn ends neatly.
Placement Check
Look at the ornament from the front before moving on. The vertical ribbon should run as straight as possible through the center.
If the line begins to lean to one side, stop and correct the stitch placement before continuing. Surface slip stitches are much easier to adjust while the yarn is still attached than after all the ends have been woven in.

Horizontal Ribbon
Insert your hook through the center-left side edge of Row 4.
Pull up a loop of Color B from behind and work surface slip stitches horizontally across Row 4 toward the right edge.
Keep the stitches aligned with the same row as you move across the body.
Fasten off and weave in all ends on the back.
Ribbon Alignment Tip
The horizontal ribbon should cross the vertical ribbon near the center of the gift box. If your body tension is slightly different from the sample, use the visual center of the square as your guide rather than forcing the stitches into a position that makes the cross look uneven.
Crochet the Decorative Bow
Using Color B
The bow begins as one simple chain strand and is shaped by folding its ends toward the center.
Bow Base: Ch 32, then fasten off and cut the yarn.
Lay the chain flat and bring both outer ends inward toward the center to create two loops.
Use a separate length of Color B yarn to wrap firmly around the center of the loops. Tie the wrap securely on the back to hold the bow together.
Trim any excess yarn from the center wrap.

Bow-Shaping Tip
Try to make both loops approximately the same size before tightening the center wrap. If one loop is noticeably larger, adjust it while the yarn is still loose; once the center has been secured, reshaping the bow becomes more difficult.

Assembly
Attach the Bow
Heat the glue gun according to the manufacturer’s instructions.
Apply a small amount of hot glue to the top center of the gift box, directly at the base of the hanging loop.
Press the center of the crocheted bow onto the glue and hold it in place for a few seconds until secure.
If the bow loops or tails lift away from the body, add tiny amounts of glue underneath those areas to keep them positioned neatly.
Assembly Check
Before the glue sets completely, look at the ornament from the front.
The bow should sit directly over the center of the ribbon cross, while the hanging loop should remain unobstructed above it. If the bow is shifted too far to one side, the entire gift-box design can look off-center.
Finishing Touches
Once the bow is secure:
- Straighten both bow loops.
- Arrange the bow tails so they sit evenly.
- Check that the vertical ribbon remains centered.
- Make sure the horizontal ribbon crosses it cleanly.
- Pull the hanging loop gently into shape.
- Trim any visible yarn ends on the back.
The finished ornament should lie flat with the ribbon clearly visible and the bow adding just enough dimension to make it look like a tiny wrapped present.

Ways to Customize Your Crochet Gift Box
The simple construction makes this design easy to adapt.
Traditional Holiday Colors
Combine red for Color A with green for Color B, or reverse the colors for a different effect.
Bright and Modern
Try magenta with yellow, teal with pink, or any two shades that give you a strong contrast between the gift box and its ribbon.
Puffed Gift Box
Make two identical body panels. Add the surface ribbon cross to the front and back panels, then place the panels together and join them around the edges with single crochet or slip stitches. Add a small amount of stuffing before completely closing the edges.
Gift Tag
Skip the hanging loop and use the finished flat piece as a handmade tag attached to a wrapped present.
Garland
Make several gift boxes in different color combinations and string them together to create a small holiday garland for a mantel, shelf, or wall.