Materials & Tools Needed
- Yarn: Orange for the pumpkin body and Green for the stem
- Crochet Hook: Size appropriate for your yarn
- Tapestry Needle / Yarn Needle: For seaming, cinching, and sewing
- Polyfill / Stuffing
- Scissors
Finished Size & Customization Ideas
Finished Size
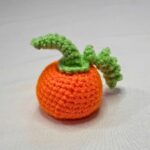
The tutorial creates a mini, roughly palm-sized pumpkin, making it a good choice for small seasonal decorations or keychains.
Customization Ideas
- Try Different Colors: White, black, or variegated autumn shades can give the pumpkin a different Halloween or Fall look.
- Make It Taller: Increase the starting chain length to create a taller pumpkin.
- Make It Wider: Add more rows to increase the width of the finished pumpkin.
- Go Jumbo: Use bulkier yarn with a larger hook for a larger version.
Pattern Abbreviations & Terminology
- ch: Chain
- hdc: Half Double Crochet
- sc: Single Crochet
- blo: Back Loop Only – inserting the hook only into the back loop of the “V” of the stitch
- sl st: Slip Stitch

Crochet Pumpkin Body
The orange section starts as a flat rectangle. The BLO rows give the fabric visible ridges, which help emphasize the pumpkin’s sections once the finished piece is shaped.
Foundation: Chain 16.
Row 1: Skip 2 chains, then make 1 Half Double Crochet (HDC) in each chain across.
Row 2: Chain 1, turn your work, then make 1 HDC in the Back Loop Only (BLO) of each stitch across.
Rows 3–18: Repeat Row 2 until you have completed a total of 18 rows.

Seam the Body
Fold the crocheted piece in half so the short ends meet. Join both inner loops of the two edges together with slip stitches across to form a tube.
Seam Check: Line up the short edges carefully before joining. Keeping the seam even will help the two open ends cinch more neatly when you begin shaping the pumpkin.

Close and Stuff the Pumpkin
With the tube formed, one end can now be gathered closed before the stuffing goes inside.
Step 1: Cut a long yarn tail and thread it onto your tapestry needle.
Step 2: Weave the needle in and out around the edge of one open side.
Step 3: Pull the yarn tightly to cinch the opening completely closed, then secure it with a knot.
Step 4: Stuff the inside of the pumpkin with polyfill or stuffing.
Step 5: Repeat the cinching process around the top open end to close the pumpkin.
Stuffing Check: Fill the pumpkin enough to give it a rounded body, but avoid packing it so tightly that the shaping yarn cannot pull the center inward.

Shape the Pumpkin Segments
This is where the flat, ridged body becomes a pumpkin. The shaping yarn pulls sections of the stuffed piece inward, creating the grooves between the rounded segments.
Step 1: Thread a long yarn tail onto your tapestry needle.
Step 2: Push the needle down through the top center of the pumpkin and bring it out through the bottom center.
Step 3: Wrap the yarn around the outside of the pumpkin and bring it back through the center.
Step 4: Pull the yarn tight enough to create a visible ridge.
Step 5: Repeat this process around the pumpkin 5–6 times to create its segments.
Shape Check: Look at the pumpkin from above as you work. The shaping passes should be distributed around the body rather than grouped together. If one section looks noticeably wider, reposition the yarn before securing it.
Crochet the Green Stem
The green top is a small circular piece made separately and then sewn onto the finished pumpkin.
Round 1: Chain 1, then make 6 Single Crochets (SC). This is typically worked into a magic ring or by chaining 2 and placing 6 SC in the first chain.
Join: Slip stitch to join.
Round 2: Make 2 SC in each stitch around. (12 SC)
Finish: Fasten off, leaving a yarn tail for sewing.

Add the Stem
Place the green piece at the top center of the pumpkin, directly over the point where the shaping sections meet.
Use the remaining green yarn tail to sew the piece securely to the pumpkin. Keep the stem centered as you stitch, so it sits naturally above the segmented body.
Once the green top is secured, the little pumpkin has its finished rounded form and is ready to be used as a seasonal decoration or turned into a small keychain.

Care Tips
Keep the crochet pumpkin away from moisture and clean it gently with a soft, dry cloth when needed. Avoid pulling on the stitched segments or green stem, as repeated tugging can loosen the shaping and sewing. Store it in a dry place when not in use to help the pumpkin keep its rounded shape.