
Looking for a playful Halloween crochet idea? This cute turtle combines bold seasonal colors, a rounded shell, and simple amigurumi techniques for a fun handmade decoration or gift.
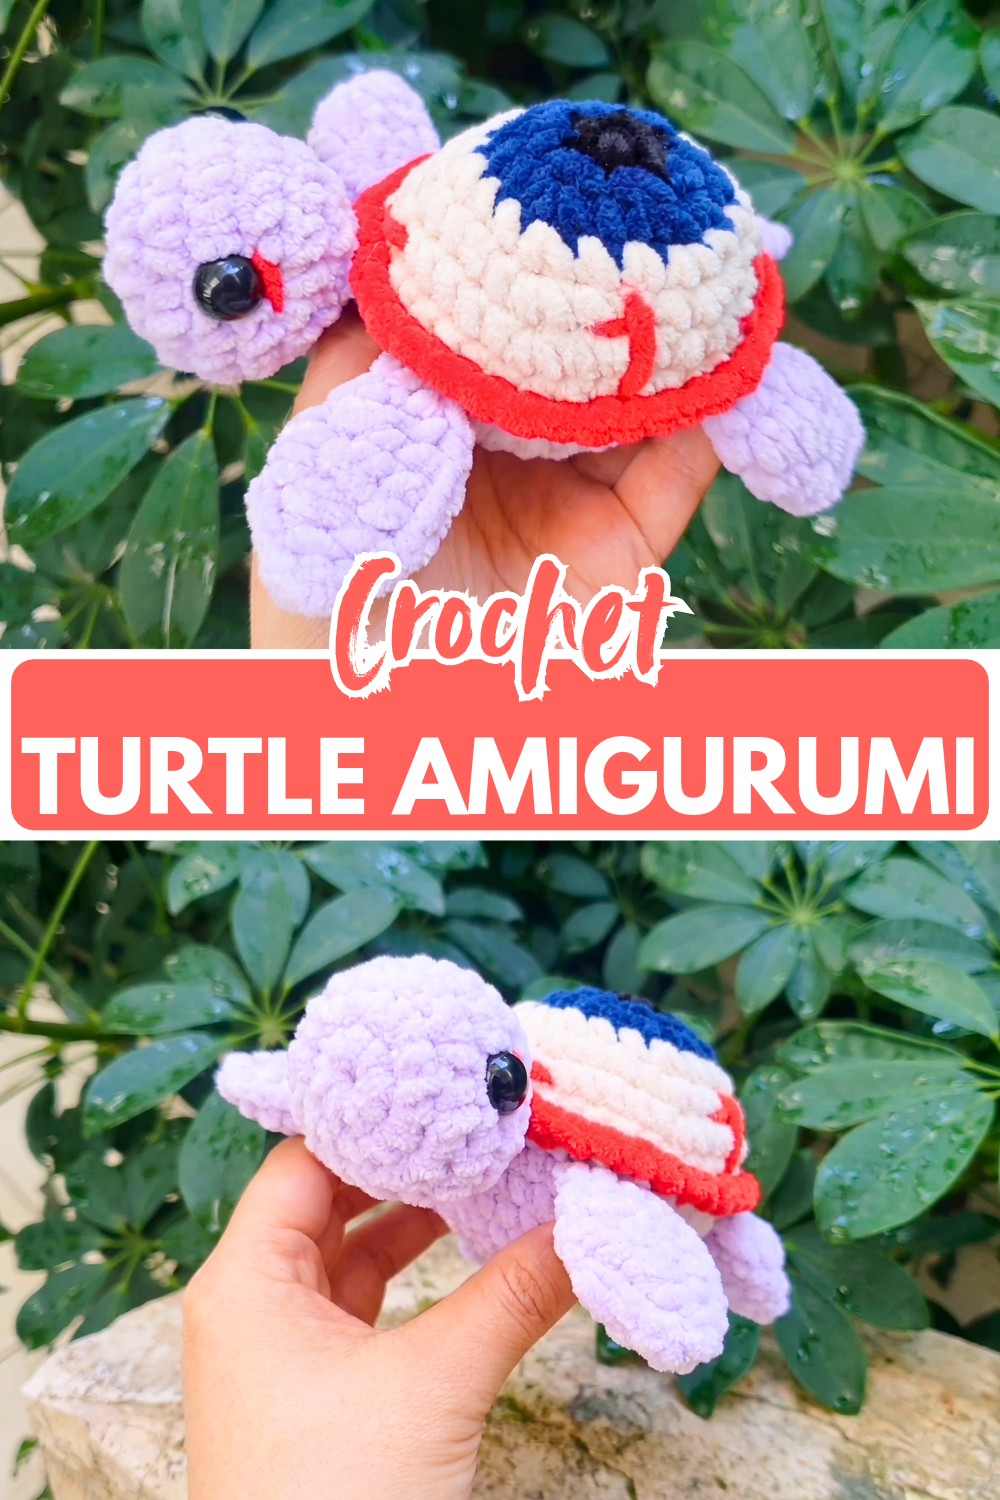
A little crochet turtle can bring an unexpected touch of charm to Halloween decorating. With its rounded shell, tiny fins, and playful mix of black, blue, red, and white, this amigurumi has a festive look that feels cheerful rather than overly spooky. Tuck it into a seasonal display, place it on a shelf, or give it as a handmade gift for a small Halloween accent with plenty of personality.
If you enjoy making small amigurumi, this crochet turtle offers an easy way to create something special without complicated shaping. The head, four fins, and colorful shell are worked with simple techniques, while the changing shades give the finished design its Halloween character. Once the crochet pieces come together, you have a tiny turtle that is just as fun to make as it is to display.
Materials and Tools
Gather the following supplies before you begin:
- Yarn: Black, dark blue, red, white, and blush yarn
- Crochet hook: 4 mm
- Safety eyes: 2
- Polyester fiberfill: For stuffing
- Scissors
- Yarn needle: For sewing and weaving in ends
The finished turtle will be approximately 3-5 inches in size, depending on your yarn weight, hook, and crochet tension.
Crochet Abbreviations
The pattern uses standard US crochet terminology:
- ch: Chain
- sc: Single crochet
- hdc: Half double crochet
- sl st: Slip stitch
- inc: Increase – 2 stitches worked into the same stitch
- dec: Decrease – 2 stitches combined into 1
- BLO: Back loop only
- FLO: Front loop only

Step-by-Step Instructions
Make the Four Turtle Fins
The turtle needs four matching fins. Make the first one, then repeat the same instructions three more times.
- Round 1: Ch 3. In the second chain from the hook, work 8 hdc. Sl st to close. [8 sts]
- Round 2: Work 2 hdc in each stitch around. [16 sts]
- Round 3: Work (1 hdc, inc) around. [24 sts]
Fasten off and weave in the yarn ends.
Repeat these steps until you have 4 fins.

Crochet the Turtle Head
The head is worked separately before it is attached to the shell.
- Round 1: Ch 3. In the second chain from the hook, work 8 sc. Sl st to close. [8 sts]
- Round 2: Work an increase in every stitch around. [16 sts]
- Round 3: Work (1 sc, inc) around. [24 sts]
- Rounds 4–5: Work 1 sc in each stitch around. [24 sts]
- Round 6: Work (1 sc, dec) around. [16 sts]
At this point, attach the two safety eyes between Rounds 4 and 5, leaving approximately 7 stitches between them.
- Round 7: Work a decrease in every stitch around. [8 sts]
- Round 8: Work 1 sc in each stitch around. [8 sts]
Lightly stuff the head with polyester fiberfill.
- Round 9: Fold the opening in half and sc across both sides to close it.
Fasten off and secure the yarn end.

Build the Colorful Turtle Shell
The shell creates the main body of the turtle and is worked in several colors for a festive Halloween look.
Shape the Shell
- Round 1: With black yarn, ch 3. Work 6 sc into the second chain. Sl st to close. [6 sts]
- Round 2: Change to dark blue yarn. Work an increase in every stitch around. [12 sts]
- Round 3: Work (1 sc, inc) around. [18 sts]
- Round 4: Change to white yarn. Work (2 sc, inc) around. [24 sts]
- Round 5: Work (3 sc, inc) around. [30 sts]
- Round 6: Work (4 sc, inc) around. [36 sts]
- Round 7: Work 1 sc in each stitch around. [36 sts]
The shell should now have a broad, rounded shape.
Add the Halloween Color Detail
- Round 8: Change to red yarn and work in the FLO. Sc around. [36 sts]
- Round 9: Switch back to the previous yarn and work in the BLO.

This round also incorporates the fins and head into the body. Follow the attachment sequence carefully:
- Sc in the first 2 stitches.
- Attach the first fin with 2 sc.
- Sc in the next 8 stitches.
- Attach the second fin with 2 sc.
- Sc in the next 2 stitches.
- Attach the head with 4 sc.
- Sc in the next 2 stitches.
- Attach the third fin with 2 sc.
- Sc in the next 8 stitches.
- Attach the fourth fin with 2 sc.
- Finish with 2 sc.
- Sl st to close.
Check your work as you go and make sure you finish with 36 stitches.
Shape the Bottom of the Shell
Continue with the decreases to bring the underside of the turtle together.
- Round 10: Work (4 sc, dec) around. [30 sts]
- Round 11: Work (3 sc, dec) around. [24 sts]
- Round 12: Work (2 sc, dec) around. [18 sts]
- Round 13: Work (1 sc, dec) around. [12 sts]
- Final Round: Work a decrease in every stitch around. [6 sts]
Before completely closing the shell, stuff the turtle firmly with polyester fiberfill. Add enough stuffing to give the shell a rounded, full appearance without stretching the stitches.
Fasten off and weave in the remaining yarn ends.
Finish and Assemble the Turtle
Once the main crocheted pieces are complete, check the placement of each part before securing everything permanently.
Secure the Shell
If the shell top and bottom need additional joining, thread your yarn needle with yarn that matches the shell edge.
Stitch around the edges, keeping the two sections aligned evenly. Leave a small opening while you make any final adjustments to the stuffing, then close the remaining gap securely.
Check the Fins
Look at the four fins from all sides to make sure they are positioned evenly around the turtle. Secure any loose stitches where the fins meet the shell.
The fins should sit naturally against the body rather than pulling the shell out of shape.

Add the Finishing Details
For a little extra character, add a small amount of blush to the cheeks using pink yarn embroidery or a suitable blush-colored detail.
Check the turtle’s overall shape and add a little more stuffing if any part looks too flat.
Halloween Customization Ideas
The color combination already gives this turtle a festive seasonal appearance, but there are several ways to make it even more distinctive.
- Glow-in-the-dark turtle: Use glow-in-the-dark yarn for selected shell details.
- Pumpkin shell: Add a small embroidered pumpkin face to the shell.
- Different fin colors: Use a contrasting shade for the fins to make them stand out.
- Spooky embellishments: Add tiny spider or pumpkin-themed decorative elements where appropriate.
- Classic Halloween palette: Try combinations of orange, black, purple, and white for a more traditional Halloween look.
When making the turtle for a young child, embroidered eyes and facial details can be considered instead of detachable safety eyes.

Where to Use Your Crochet Turtle
This small amigurumi works especially well as a seasonal shelf decoration, tabletop accent, or handmade Halloween gift. Its compact size also makes it easy to include in a larger autumn display.
Place several turtles in different color combinations together for a playful Halloween arrangement, or give one as a small handmade gift to someone who loves both crochet and cute seasonal decorations.
Your Halloween Crochet Turtle Amigurumi is ready to add a cheerful, spooky-cute touch to the season. With its colorful shell, little fins, and customizable details, it is a fun pattern to make and an easy one to personalize.


