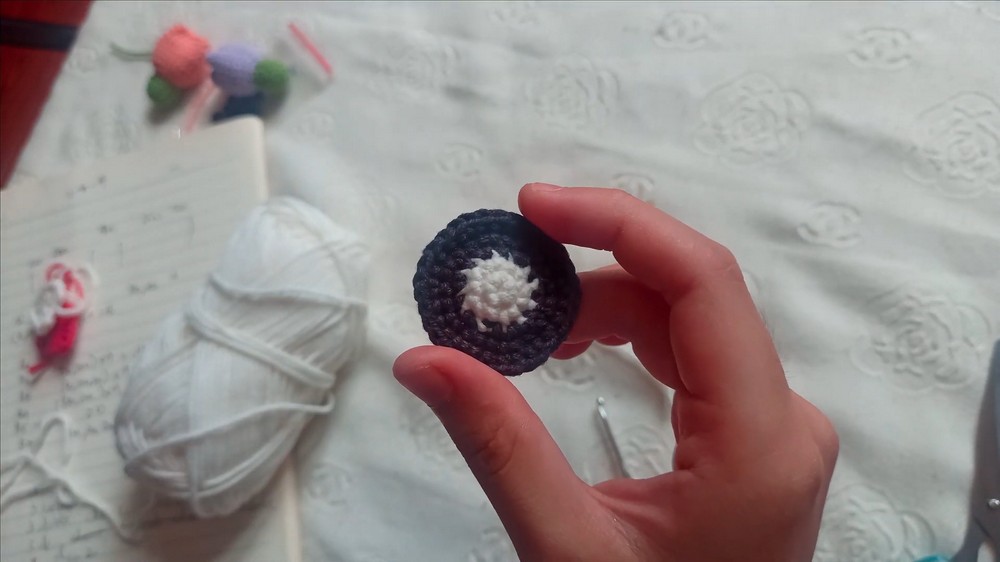
Turn a love of music into a tiny handmade accessory with this crochet vinyl record keychain, featuring a colorful center label and classic black record edges.

A miniature vinyl record makes a fun crochet accessory for music lovers. Its round shape and contrasting center label recreate the look of a classic record, while the compact size makes it a cute addition to a backpack, handbag, or set of keys.
This crochet pattern builds the record from a small center circle, then expands it with simple increases to create the black outer section. You will make two matching circles and join them back-to-back for a sturdier, reversible charm, with options to change the label color or add small details inspired by crochet record grooves.
Credit: Gbluecrochet
Materials & Tools Needed
- Yarn: Black yarn for the vinyl record and an accent color of your choice (e.g., red or white) for the center label.
- Crochet Hook: 2.5 mm crochet hook.
- Tapestry Needle: For weaving in ends and joining the two circles.
- Scissors: For cutting yarn.
- Keychain Hardware: A metal keychain ring or cord for hanging the finished charm.
Finished Size & Customization Ideas
The finished vinyl record is a compact, lightweight circle designed to be used as a keychain or bag charm. The supplied pattern does not specify the exact finished measurements.
Personalize your record with an accent color that reflects your favorite album artwork, music genre, or team colors. Red, white, yellow, or another contrasting shade can make the center label stand out against the black yarn.
For extra detail, you can add small white French knots to the black rows to suggest record grooves or highlights. Keep these embellishments small so the circular shape remains clear.

Pattern Abbreviations & Terminology
The pattern uses US crochet terms.
- ch: Chain
- sc: Single crochet
- inc: Increase; work 2 single crochets in the same stitch
- sl st: Slip stitch
- MR / MG: Magic ring / magic circle
- st(s): Stitch(es)
- R: Round
How to Crochet a Vinyl Record Keychain
The keychain is made from two identical crocheted circles. Each circle begins with the colored center label, then changes to black yarn for the outer record section. Once both circles are finished, join them around the edge and attach the keychain hardware.
Part 1: Crochet the Center Label
Choose your accent color and use the 2.5 mm crochet hook. The center label begins with a magic ring and grows from 6 stitches to 12 stitches.
Round 1
- Make a magic ring.
- Work 6 sc into the ring.
- Pull the starting tail tightly to close the center hole.
- Join with 1 sl st into the first stitch.
- Ch 1 to prepare for the next round.
Stitch count: 6 sts.
Check that the center is closed before continuing. If a small hole remains, gently pull the starting tail again.
Round 2: Work 6 increases around, placing 2 sc in every stitch from the previous round.
Each of the 6 stitches receives 2 single crochets, doubling the total stitch count. Stitch count: 12 sts.

Change to Black Yarn
Change colors at the end of Round 2 so the center label transitions into the black record.
- Begin the final stitch of Round 2 with the accent yarn as usual.
- Stop before the final pull-through of that stitch.
- Drop the accent yarn and pick up the black yarn.
- Use the black yarn to complete the final pull-through.
- Make 1 sl st into the first stitch to join the round.
- Ch 1 to begin Round 3.
Changing color at the final pull-through helps create a cleaner transition between the center label and the black record section. Keep both yarns secure, but avoid pulling them so tightly that the circle begins to cup.

Part 2: Crochet the Black Vinyl Record
Continue with black yarn. The next three rounds expand the circle through evenly spaced increases.
Round 3: Repeat the following sequence 6 times around:(1 sc, 1 inc).
Work 1 single crochet in the next stitch, then work 2 single crochets in the following stitch. Repeat this sequence around the circle.
Join with 1 sl st and ch 1 to begin the next round. Stitch count: 18 sts.
Round 4: Repeat the following sequence 6 times around:(1 sc, 1 inc, 1 sc).
Work 1 single crochet in the next stitch, an increase in the following stitch, and 1 single crochet in the next stitch. Repeat the sequence around.
Join with 1 sl st and ch 1 to begin the next round. Stitch count: 24 sts.
Round 5: Repeat the following sequence 6 times around: (3 sc, 1 inc).
Work 1 single crochet in each of the next 3 stitches, then work 2 single crochets in the following stitch. Repeat this sequence around the circle.
Join with 1 sl st, then fasten off, leaving a long yarn tail for joining the two record pieces. Stitch count: 30 sts.

Check the Circle Before Fastening Off
Lay the circle on a flat surface. It should look reasonably flat, with the colored center surrounded by black stitches.
If the circle starts to curl into a bowl, check that you have completed the stated increases and stitch counts. If the edge looks wavy, check that you have not accidentally worked extra stitches into a stitch that should receive only one single crochet.
Make the Second Record Circle
Repeat the center label and black record instructions to make a second identical circle.
Make sure both pieces have the same stitch counts and the same color placement. Matching circles are easier to join neatly and help the finished charm sit evenly when viewed from either side.
Assembly & Finishing
Once both record circles are complete, join them back-to-back to create a thicker charm.
1. Weave in the Interior Ends
Use a tapestry needle to weave in the starting tails and other interior yarn ends securely between the stitches.
Leave the long black yarn tail from Round 5 available for joining the outer edges. Keeping the joining tail intact saves you from needing to attach a new length of yarn for the seam.
2. Position the Two Circles
Place the circles wrong sides together, with the more attractive sides facing outward. Align the center labels and outer edges.
Before stitching, check that the circles match around the circumference. If one piece is twisted or shifted, adjust it now so the color centers line up.
3. Join the Outer Edges
Using the long black yarn tail, join the outer edges with a whip stitch or mattress stitch.
Work around the Round 5 edges, joining the two circles securely. Keep the seam even and avoid pulling the yarn so tightly that the outside edge puckers.
Continue until the circles are joined all the way around. Secure the yarn and weave in the remaining tail.
4. Attach the Keychain Ring
Attach a metal keychain ring securely through the edge stitches. Alternatively, make a sturdy crocheted loop or hanging strap and fasten it firmly to the record.
Check that the attachment is secure before using the charm. The ring or loop should be firmly connected to the joined layers rather than hanging from a loose yarn end.
Optional Decoration: Add Record-Groove Details
For a little extra personality, add small white French knots to selected black rows. These can suggest the highlights and grooves associated with a vinyl record.
Keep the knots small and space them carefully so they do not overpower the colored center label. Secure the embroidery yarn on the inside of the charm and weave in the ends before attaching the keychain hardware.