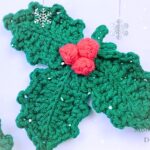
Learn how to crochet Christmas holly with red berries and vibrant leaves for decor, gift toppers, or garlands. Easy and perfect for beginners.

Christmas decorations feel even more special when every detail is handmade. This crochet Christmas holly combines pointed green leaves with bright red berries to create a timeless holiday accent that looks beautiful on trees, wrapped gifts, garlands, and festive displays. The clean shaping and classic color combination give it a cheerful seasonal finish.
The crochet design comes together with carefully shaped leaf points, puffed berry clusters, and a simple final assembly that creates a polished decoration in very little time. Each step builds naturally toward the finished holly, making the tutorial easy to follow while revealing how a few simple crochet stitches create a festive decoration worth displaying.
Credit Silva Crochet
Everything to Gather Before You Begin
It looks like you’re preparing for a crochet pattern involving holly leaves and berries! Here’s a list of materials to ensure you have everything ready before you begin:
- Green Yarn
- Type: Medium/DK weight yarn
- Purpose: Used for crocheting holly leaves and the hanging loop.
- Red Yarn
- Type: Medium/DK weight yarn
- Purpose: Used for creating holly berries.
- Crochet Hook
- Size: 2.5mm crochet hook (e.g., Tulip 4/0)
- Tip: Ensure the hook size complements your chosen yarn weight.
- Scissors
- For trimming yarn ends during and after the pattern.
- Yarn Needle
- Used for weaving in loose tails after crocheting.
- Hot Glue Gun & Glue Sticks
- Purpose: For quick assembly of holly leaves, berries, and potentially attaching the finished work to surfaces or ideas.
Additional Considerations
- Work Area: Prepare a flat, well-lit workspace for comfort.
- Pattern (if applicable): Keep the crochet pattern close by for easy reference.
- Optional Embellishments: If you want to add extra flair, like glitter or beads, have those ready too.
A Few Details That Make a Big Difference
- Construction:
- Holly Leaves: Worked flat in rows.
- Berries: Created in continuous rounds/loops.
- Assembly: Use hot glue or sewing to finish.
- Stitch Techniques:
- Leaves use single crochet (sc), half double crochet (hdc), double crochet (dc), treble crochet (tr), and picot-style points.
- Berries employ magic ring and puff/cluster stitches for a plump appearance.

Pattern Overview & How It’s Made
Begin by making two or three holly leaves with green yarn. Each leaf starts with a foundation chain and is worked along both sides using single crochet, half double crochet, double crochet, treble crochet, and picot-style points to create the signature holly shape. Once finished, fasten off and weave in the yarn ends.
Next, attach green yarn to one completed leaf and crochet a chain to form the hanging loop before securing it back at the base. Then make three red berries by starting with a magic ring and forming a puffed cluster using unfinished double crochet stitches before tightening the ring and fastening off.
To finish, overlap the bases of the leaves and secure them together with sewing or hot glue. Attach the three berries in the center where the leaves meet, then adjust the leaves if needed so the pointed edges sit neatly and the finished Christmas holly is ready to display.
Build Every Piece with Confidence Step-by-Step
Shaping the Signature Holly Leaves (Make 2 or 3)
Starting with the Base Chain
- Chain 13 with green yarn.
- Work the first side of the foundation.
Side 1 (Leaf Edge)
- Skip the first 2 chains, then:
- Work 1 sc and 1 hdc into the next chain.
- Point 1:
- Work 1 dc, chain 1, sl st in the top of the dc, then 1 dc into the next chain.
- Work 2 dc into the next 2 chains.
- Point 2:
- Work 1 tr, chain 1, sl st in the top of the tr, then 1 tr into the next chain.
- Work 2 dc into the next 2 chains.
- Point 3:
- Work 1 tr, chain 1, sl st in the top of the tr, then 1 tr into the next chain.
- Work 2 dc into the next 2 chains.
- Point 4:
- Work 1 dc, chain 1, sl st in the top of the dc, then 1 dc into the next chain.
- End Side 1 with 1 hdc and 1 sc in the last chain.
- Chain 1 and rotate your work to begin the opposite side.
Side 2 (Opposite Edge)
- Mirror the stitch pattern along the underside of the foundation chain:
- Work 1 hdc, 1 dc
- Point 1: Work 1 dc, chain 1, sl st in the top of the dc, then 1 dc.
- Work 2 dc
- Point 2: Work 1 tr, chain 1, sl st in the top of the tr, then 1 tr.
- Work 2 dc
- Point 3: Work 1 tr, chain 1, sl st in the top of the tr, then 1 tr.
- 1 dc/ch 1/sl st/1 dc
- Work 1 hdc, 1 sc.
Fasten off and weave in all ends.
Adding the Finishing Loop
- Attach green yarn to the base (stem) of one finished leaf.
- Chain 30 stitches to form the hanging loop.
- Slip stitch back into the base and fasten off.
Holly Berries (Make 3)
Round 1
- Begin with a Magic Ring using red yarn.
Round 2
- Chain 3, then make 5 unfinished double crochet stitches into the magic ring.
(To make an unfinished double crochet: yarn over, pull up a loop, yarn over and pull through only the first two loops on the hook. Continue until 5 incomplete stitches are created.) - Pull yarn through all the loops on the hook to form a puffed berry cluster.
- Pull the magic ring tail tightly to close the cluster into a firm circle.
- Fasten off and trim the yarn ends.
Bringing Every Piece Together
- Position the Leaves Naturally:
- Layer 2 or 3 holly leaves together with the base stems overlapping slightly.
- Keep Everything Firmly in Place:
- Use hot glue or sew with yarn to attach the leaves securely.
- Add Berries:
- Glue or stitch 3 red berries into the center where the leaves meet.

Helpful Fixes & Fresh Decorating Ideas
- Troubleshooting Tips:
- Curling Leaves: Block lightly with steam or adjust each picot point manually to flatten.
- Loose Berries: Ensure yarn tails are cinched tightly for perfect berry shapes.
- Simple Ways to Make It Your Own
- Use variegated green yarn for realistic leaves or metallic thread on the berries for sparkle.
- Skip the hanging loop to turn these into applique pieces for stockings, gift wrap, or decor.
Your Handmade Holly Is Ready to Shine
Are you ready to add a personal touch to the holiday season? Grab green and red yarn and start this quick, festive project today!