Need personalized crochet keychains for gifts or everyday accessories? These compact letter Y and U designs use simple stitches, layered pieces, and a contrasting border for a polished finish.
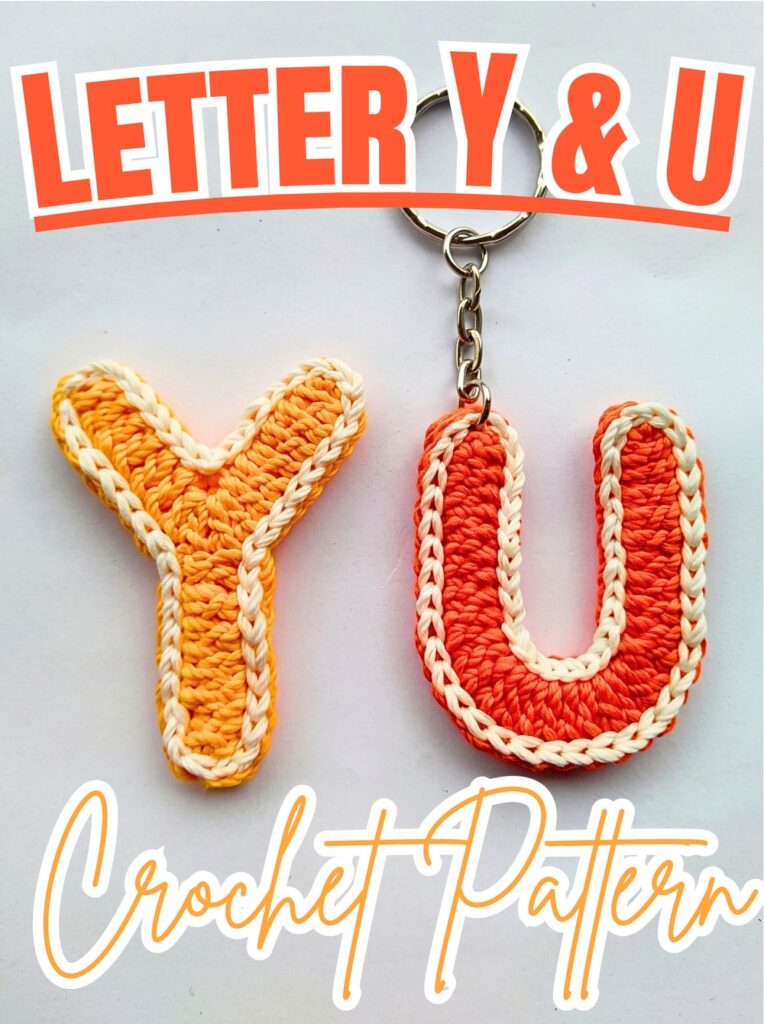
Small crochet letters work well when you want something personal without using much yarn. These Y and U keychains combine colorful letter shapes with white edging, creating sturdy little accessories for keys, bags, zippers, and lanyards.
This tutorial explains how to create two matching layers for each letter, shape the Y branches and U body, join each pair with white slip stitches, and add keychain hardware. Color changes also make customization easy.
Credit Erfin R. Tangdilintin
Materials & Tools
Prepare your yarn, hook, finishing tools, and hardware before beginning.
- Milk cotton or similar sport/DK weight yarn
- Yellow and White: Letter Y
- Orange and White: Letter U
- Crochet hook: Appropriate size for your yarn, such as 2.0–2.5 mm
- Tapestry needle: For shaping, joining, and weaving ends
- Scissors
- Lighter: To melt and secure yarn tails as demonstrated in the tutorial
- Metal keychain ring with jump rings
Finished Size & Customization
Each finished letter measures approximately 2.5–3 inches tall, creating a compact and lightweight keychain accessory.
Change the main colors to match:
- School colors
- Favorite team colors
- Personal initials
- Gift recipient preferences
You can also attach finished letters to zippers, bags, or lanyards instead of using them only as keychains.
Pattern Abbreviations
- ch: Chain
- sl st: Slip stitch
- dc: Double crochet
- dc2inc: Double crochet increase – 2 dc worked in the same stitch
- st(s): Stitch(es)

Step-by-Step Crochet Letter Keychain Instructions
Part 1: Make Letter Y
You will create 2 identical Yellow pieces. These matching layers will later be placed back-to-back and joined with White yarn.
Step 1: Build the First Y Branch
Start shaping the main stem and first arm of the letter.
Make a slip knot and ch 14.
In the 4th chain from the hook, work 6 dc in one stitch.
Then work 1 dc in each of the next 5 chs.
Skip 1 st, then work 6 dc into the next st.
Work 6 dc down the opposite side of the starting chain.
Finish with a sl st in the base.
Fasten off and seal the yarn end with a lighter as demonstrated.
This first section establishes one upper branch and part of the central Y shape, so keep the stitches positioned neatly.

Step 2: Add the Second Y Branch
Attach Yellow yarn to the base shaping point.
Ch 9.
Work 1 dc in each of the next 8 chs down the chain.
Skip 1 st, then finish with a sl st into the base.
Fasten off and secure the yarn end.
At this stage, both upper arms should extend from the same central area.
Step 3: Shape the Y Fork
Use your yarn needle to arrange and secure the two upper branches.
Weave the two branches together neatly at the center fork so the finished piece clearly resembles the letter Y.
Take time with this joining point because clean central shaping makes the letter easier to recognize.
Step 4: Make the Second Y Piece
Repeat Steps 1–3 in Yellow to create the second identical Y layer.
Before moving to assembly, compare both pieces and make sure their branches and central fork are aligned as closely as possible.
Part 2: Make Letter U
Create 2 identical Orange pieces for the U. These will become the front and back layers.
Step 5: Start the U Body
Create the long foundation that forms the U shape.
Make a slip knot and ch 28.
Working down the chain, make: 10 dc, then dc2inc 3 times.
The increases begin forming the rounded lower section of the letter.
Step 6: Shape the Bottom Curve
Continue along the foundation chain.
Work 1 dc in each of the next 4 chs, then work dc2inc 3 times.
These increases provide matching fullness on the opposite side of the U.
Step 7: Complete the Second Side
Finish the remaining length of the U.
Work 10 dc down the remaining chain, then finish with a sl st.
Fasten off and secure the yarn end with a lighter as demonstrated.
Check the overall shape before assembly. Both sides should curve toward the rounded bottom rather than forming a completely straight strip.

Step 8: Make the Second U Piece
Repeat the complete U-body instructions in Orange to create the second identical piece.
You should now have two matching U shapes ready for layering.
Part 3: Layer and Join Each Letter
Step 9: Align Matching Layers
Take the two Y pieces or two U pieces and place them back-to-back.
Align their entire outer edges carefully.
Good alignment at this stage will make the contrasting white border look even once both layers are joined.
Step 10: Add the White Border
Use White yarn for the contrasting outer finish.
Join White yarn through both layers at a top corner.
Insert your hook through the front and back pieces simultaneously.
Work sl st evenly all the way around the entire outer edge.
Continue around the complete letter until both layers are sealed together.
The White border serves two purposes: it joins the matching pieces and creates a clean outline around the colored letter.
Step 11: Finish the Border
Once you have worked completely around the letter, fasten off invisibly.
Weave in all remaining yarn tails and trim them cleanly.
Check the outer edge for any loose sections before attaching hardware.
Part 4: Attach Keychain Hardware
Step 12: Add the Metal Ring
Use the attached jump ring or chain loop to connect the metal keychain ring directly through the top loop or suitable top edge of the finished letter.
Secure the hardware firmly so the letter hangs evenly when attached to keys, bags, or other accessories.
Personalize Your Letter Keychains
These letter designs can be adapted beyond the original Yellow Y and Orange U.
Try changing the main letter color to represent:
- Initials for personalized gifts
- School or sports colors
- Favorite color combinations
- Matching sets for friends or family
The same finished letters can also become bag charms, zipper pulls, or lanyard accessories.