Looking for tiny crochet pattern? Learn how to make this mini bag keychain with textured loop stitches, simple rows, sturdy handles, and easy finishing.
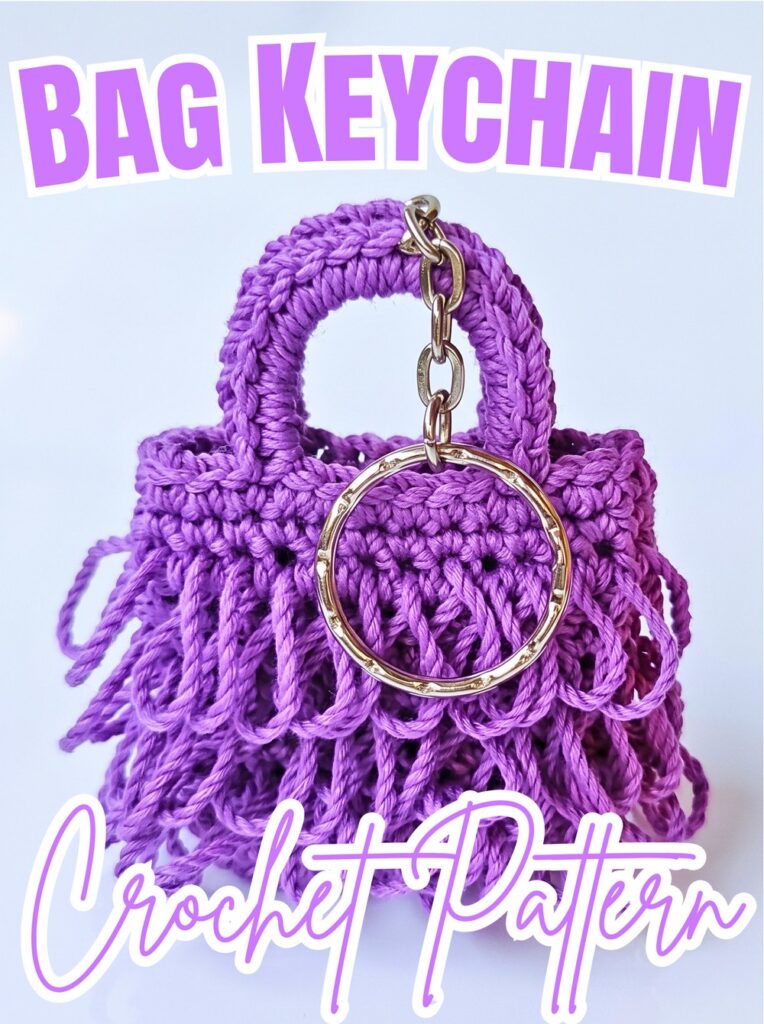
Tiny crochet accessories are useful when you want something quick, portable, and easy to personalize. Mini bag designs can still feel confusing when several stitch types and small handles need to come together neatly.
This crochet tutorial guides you through foundation chain, shaped base, textured loop-stitch rows, two handles, and final keychain attachment. You’ll also get concise tips for keeping each crochet section neat as you work. Let’s begin.
Credit Erfin R. Tangdilintin
Materials & Tools
- Yarn: Poly yarn or any preferred yarn size or weight. Vibrant orange or purple can create a bright finish.
- Crochet Hook: 2.0 mm hook.
- Tapestry Needle: For weaving in loose yarn ends.
- Scissors: For trimming yarn after finishing.
- Metal Keychain Ring: For turning finished mini bag into a keychain charm.
Finished Size & Customization
Finished piece is approximately miniature keychain size, making it suitable for tiny coin pouches, gift envelopes, or decorative key rings.
For more color variety, alternate bright contrasting shades between rows. You can also add lobster clasp and chain ring if you prefer using finished piece as a removable charm for bags or keys.
Pattern Abbreviations
- ch: Chain
- sc: Single Crochet
- hdc: Half Double Crochet
- dc: Double Crochet
- rev sc: Reverse Single Crochet / Crab Stitch
- loop st: Crochet Loop Stitch / Fur Stitch
- sl st: Slip Stitch
- st(s): Stitch(es)

Step-by-Step Crochet Process
Step 1: Make Foundation Chain
Start with slip knot, then ch 14.
Keep foundation chain even without pulling stitches too tightly. This chain becomes starting edge for your miniature bag, so consistent tension will make first row easier to work around.
Once 14 chains are complete, keep chain oriented so you can work along its length before turning around opposite side.
Step 2: Build First Row Around Chain
Work along chain using this sequence: 1 sc, 1 hdc, 9 dc
In final chain space, work: 1 hdc and 1 sc
Now continue around opposite side of foundation chain. Work: 1 sc, 1 hdc, 9 dc
Finish this side with: 1 hdc and 1 sc
Join with sl st to first stitch.

Teaching tip: Instead of treating foundation chain as flat strip, keep working around both sides. This creates continuous base shape needed for miniature bag.
Step 3: Add Single Crochet Base Row
Chain 1, then work 1 sc in each stitch around, using supplied pattern count of 13 sc.
Join with sl st.
Keep tension controlled here. This row gives cleaner structure beneath textured sections that follow, so loose or uneven stitches can make later rows look irregular.
Step 4: Finish Base Edge With Reverse Single Crochet
Chain 1, then work 1 rev sc / crab stitch in each stitch around.
Join with sl st.
Reverse single crochet creates raised edging, giving base section more definition before taller stitches begin.
Result check: Lower edge should look visibly defined rather than flat and unfinished.
Step 5: Raise Body With Double Crochet
Chain 3, counting chain as 1 dc.
Work 1 dc in each stitch around, then join with sl st.
This taller row begins building vertical height for mini bag body. Keep stitches reasonably even so loop-stitch row can sit neatly above it.
Step 6: Add First Loop-Stitch Texture
Chain 1.
Work 1 loop st in each stitch around.
Join with sl st.
Loop stitch forms textured surface, so pay attention to keeping loops consistent in size. Very loose loops can become difficult to control, while overly tight loops may lose visible texture.
Step 7: Stabilize Texture With Single Crochet
For Rows 6–7, chain 1 and work 1 sc in each stitch around.
Join with sl st after each row.
These rows sit between textured sections and help create separation within body design.
Progress check: At this stage, body should show first textured band followed by smoother single-crochet rows.
Step 8: Repeat Second Loop-Stitch Band
For Row 8, chain 1.
Work 1 loop st in each stitch around, then join with sl st.
Keep loop height visually similar to first loop-stitch row. Matching texture between bands will make finished miniature bag look more balanced.
Step 9: Continue With Rows 9–10
For Rows 9–10, repeat single-crochet construction from Rows 6–7: ch 1, 1 sc in each stitch around
Join with sl st after each row.
These smoother rows continue shaping body before final loop-stitch band and top edge.
Step 10: Add Final Loop-Stitch Row
For Row 11, repeat Row 8: ch 1, 1 loop st in each stitch around
Join with sl st.
Check texture before moving upward. Three textured bands should now be visible, separated by smoother sections.
Step 11: Prepare Top Edge
For Row 12, chain 1 and work 1 sc in each stitch around.
Join with sl st.
This smoother row provides transition toward top trim and handles, giving handle placement more defined edge to work from.

Step 12: Complete Top Trim
For Row 13, chain 1 and work 1 sc in each stitch around, using supplied pattern count of 11 sc.
This finishes top section before handles are formed.
Pause here and identify opposite sides of bag opening. Handle placement depends on keeping both sides balanced.
Step 13: Create First Handle
For first handle, ch 15.
Skip 6 stitches along bag opening, then join with sl st into 6th stitch.
Now work 17 sc densely around chain-15 loop.
Work stitches closely around chain so handle gains enough structure to hold its loop shape.
Helpful tip: Avoid spreading 17 sc too loosely around chain. Dense stitches help make small handle look defined and compact.
Step 14: Cross Top Edge
After first handle is complete, work 13 sc across top edge toward opposite side.
Keep these stitches even as you move across. This section connects first handle with placement point for second handle.
Step 15: Form Second Handle
Create second handle using same construction:
- ch 15
- Skip 6 stitches
- Join with sl st into 6th stitch
- Work 17 sc densely around chain-15 loop
Try to keep second handle similar in size and tension to first one.
Result check: Both handles should sit opposite one another and have similar loop height.
Step 16: Secure Final Trim
Work 2 sc, then make sl st to secure edge.
Fasten off yarn.
Leave enough tail for neat finishing before cutting yarn.
Step 17: Weave In Loose Ends
Use tapestry needle to weave all loose yarn tails neatly into wrong side of mini bag.
Work yarn through several nearby stitches before trimming excess. This keeps finishing secure while preventing loose ends from showing on outer surface.
Step 18: Attach Keychain Ring
Take metal keychain ring and attach it through center loop of one handle.
Position ring so mini bag hangs naturally rather than twisting sideways.
This final attachment turns finished crochet piece into usable keychain charm for keys, bags, or small gift accessories.
Final Finishing Check
Before using finished keychain, check that:
- Both handles are firmly attached.
- Loop-stitch sections have consistent texture.
- Loose yarn ends are securely woven in.
- Metal ring passes securely through handle loop.
- Bag hangs evenly when lifted by keychain ring.
Finished mini bag is now ready to use as tiny pouch-style charm or decorative keychain.