Looking for a crochet flip-flop keychain for your keys, bags, or handmade gifts? See how this tiny design comes together with a clever finishing touch.

Tiny details can make the biggest impression, and this crochet flip-flop keychain is proof. A shaped sole, neat straps, and bright color changes turn a small handmade piece into a cheerful accessory that looks polished from every angle. The clever construction keeps every step interesting as the crochet design comes together.
The signature crochet flip-flop shape starts to appear sooner than you might expect as each simple step builds on the last. This tutorial begins by shaping two matching soles before adding the straps and joining everything with a clean decorative edge. The finishing touch turns your crochet piece into a lightweight keychain that is easy to personalize with different color combinations.
Credit Hook & Loop Crochet Tutorials
Materials Needed
Yarn:
- Fine cotton yarn (Category 2) in 3 contrasting colors:
- Green: For the sole.
- Orange: For the straps.
- Blue: For the border.
Hook:
- 2.0 mm crochet hook: Ideal for working with fine yarn for small and precise designs.
Hardware:
- Metal keyrings or lobster claw clasps: Perfect for turning your miniature crochet creation into a keychain or bag accessory.
Tools:
- Tapestry needle: For weaving in loose ends and attaching parts securely.
- Embroidery scissors: Small, sharp scissors for precise cuts without fraying.
- Optional: Pliers: These are handy for securing clasps or rings onto your finished project.
Would You Like Help With
- Step-by-step crochet instructions: A pattern for creating miniature sandals or a similar design.
- Joining hardware tutorial: Easy tips for attaching your crochet work to keyrings or clasps.
Abbreviations (US Terms)
- ch: chain
- sc: single crochet
- hdc: half double crochet
- dc: double crochet
- sl st: slip stitch
- st(s): stitch(es)

Pattern Overview & Making Process
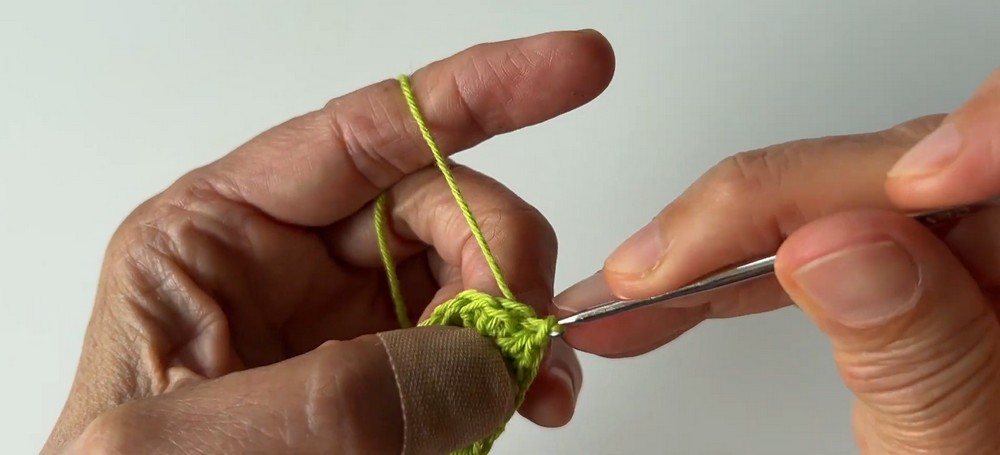
The pattern begins by making two matching oval soles. Each sole starts with a foundation chain, followed by double crochet stitches to build the shape. A second round of half double crochet and single crochet smooths the sides and forms the rounded toe before both soles are finished.
Next, the straps are added to the top sole using a contrasting yarn color. Chain stitches create the front and side straps, while slip stitches secure and strengthen them, giving the flip-flop its familiar shape with a neat finish.
Finally, both sole pieces are placed together and joined around the edge with surface slip stitches, creating a clean border while connecting the layers. After weaving in the remaining ends, a keyring or clasp is attached through the edge stitches, completing a compact crochet flip-flop keychain ready to use.
Step-by-Step Pattern
Part 1: Creating the Sole Pieces
You will make two identical oval soles for this pattern.
Foundation & Round 1:
- Foundation:
- Chain 15 (
Ch 15).
- Chain 15 (
- Start in 4th chain from hook:
- Work 2 double crochets (dc) in the 4th chain from the hook.
- Work 1 dc in the next 10 chains.
- Work 5 dc into the last chain.
- Turn to work opposite side:
- On the opposite side of the foundation chain, work 1 dc in the next 10 chains.
- Work 2 dc in the last chain (the same chain containing the starting stitches).
- Join:
- Slip stitch (
sl st) into the top of the starting chain-3 to join.
- Slip stitch (
Round 2: Contouring the Sole
- Begin with hdc:
- Chain 2 (
Ch 2) – counts as 1 half-double crochet (hdc). - Work 1 hdc in the same stitch.
- Chain 2 (
- Contouring the sides:
- Work 2 hdc in each of the next 2 stitches.
- Work 1 hdc in the next 6 stitches.
- Work 1 single crochet (sc) in the next 3 stitches.
- Work 1 hdc in the next stitch.
- Across the toe curve:
- Work 2 hdc in each of the next 5 stitches (10 hdc total).
- Continue down the other side:
- Work 1 hdc in the next stitch.
- Work 1 sc in the next 3 stitches.
- Work 1 hdc in the next 6 stitches.
- Work 2 hdc in each of the last 2 stitches.
- Join:
- Slip stitch (
sl st) into the 2nd chain of the starting chain-2 to join.
- Slip stitch (
- Finishing:
- Fasten off and weave in ends.
- Repeat:
- Make a second identical sole piece.
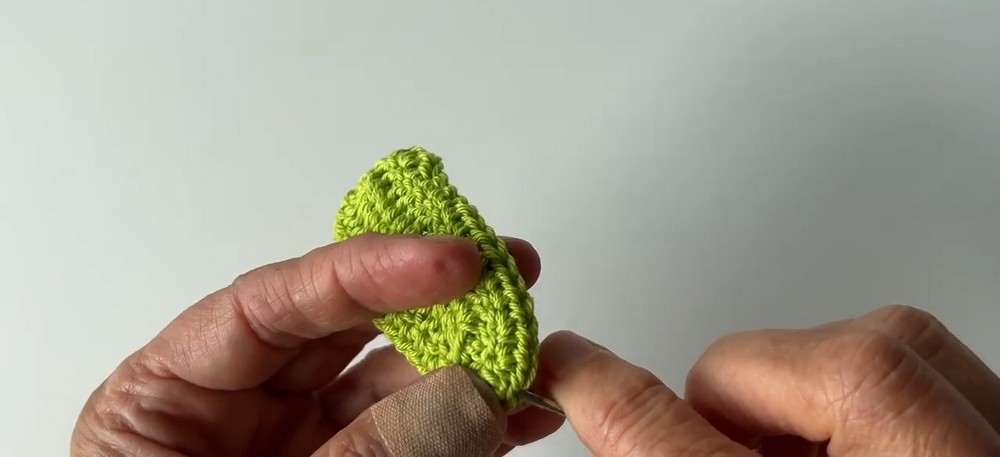
Part 2: Adding the Straps
Step 1: Create the Front Toe Strap
- Attach Color B (strap color):
- Insert your hook between the 1st and 2nd single crochet stitches near the toe area of the top sole piece.
- Pull up a loop and chain 12 (
Ch 12).
Step 2: Forming the V-Strap
- Anchoring:
- Insert hook into the center of the sole body below the toe curve.
- Pull through and make a slip stitch (
sl st).
- Reinforce at the chain:
- Slip stitch (
sl st) into the next 2 chain stitches along the strap chain. - Create a secondary strap with a new chain: Chain 10 (
Ch 10).
- Slip stitch (

Step 3: Anchor the Side Strap
- Anchor:
- Insert the hook between the 2nd and 3rd single crochet stitches on the opposite side of the toe area.
- Pull up a loop, and anchor with a slip stitch (
sl st).
- Thicken the straps:
- Work slip stitches into each chain stitch along the straps to give them thickness.
- Finish off:
- Fasten off and weave ends to the back side of the top sole.

Part 3: Joining the Layers
Stack the pieces:
- Place the top sole and bottom sole back-to-back with right sides facing out.
- Attach Color B:
- Using a slip knot, attach Color B (or a contrasting border color).
- Join with slip stitches:
- Surface slip stitch through both layers along the outer edge.
- This step joins the soles neatly while creating a decorative trim.
- Finishing:
- Fasten off, weave in any remaining yarn ends, and trim close.
Final Touch: Attaching the Keyring
- Attach the keyring or clasp:
- Use pliers to thread the keyring through corner stitches of the sole piece.
- You can also attach a lobster clasp or zipper clip for alternative uses.
Troubleshooting & Creative Customization Ideas
Common Fixes
- Curling soles: Loosen your stitch tension or switch to a slightly larger hook.
- Uneven straps: Adjust chain counts for straps if they bow upward too much.
Creative Add-Ons
- Personalization: Add beads, pearls, or tiny sequins to the center of the straps.
- Color themes: Use bold neon or pastel yarns for fun variations.
- Versatility: Attach them to backpacks or use them as zipper pulls instead of keychains.
Ready to Start?
Grab your crochet hook, stash-friendly yarn, and keyring hardware—you’ll have this adorable summer accessory ready in under 20 minutes! Who’s ready to make their keyring flip-flop fabulous?