Learn step-by-step how to crochet a pumpkin turtle, blending Halloween decor with a touch of cuteness. Perfect for beginners and kids alike.
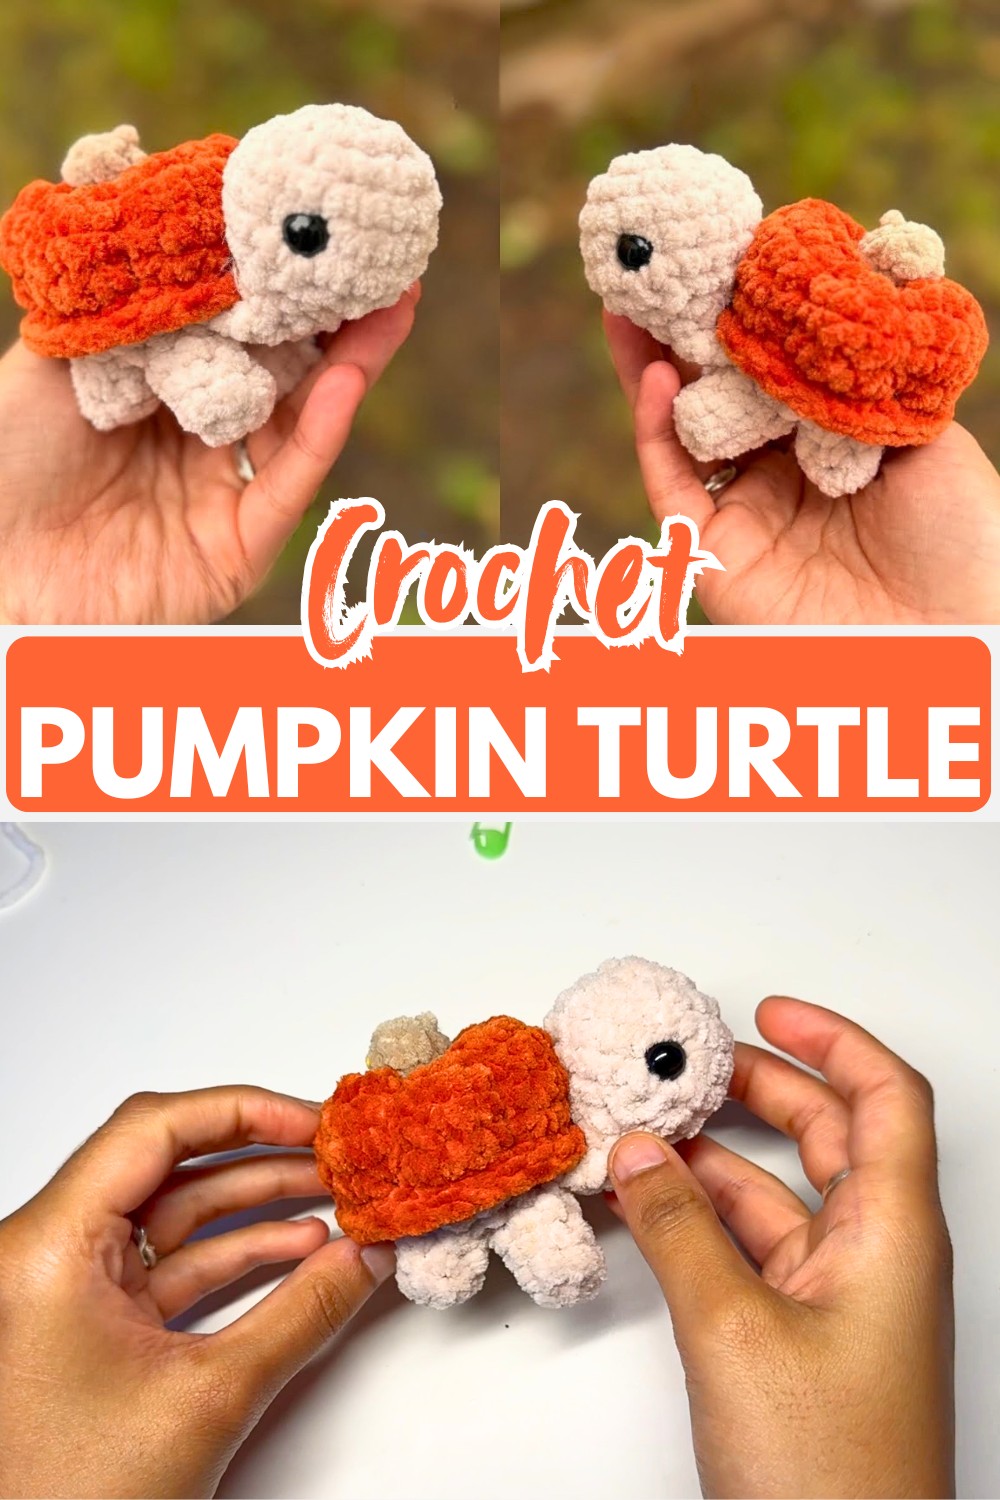
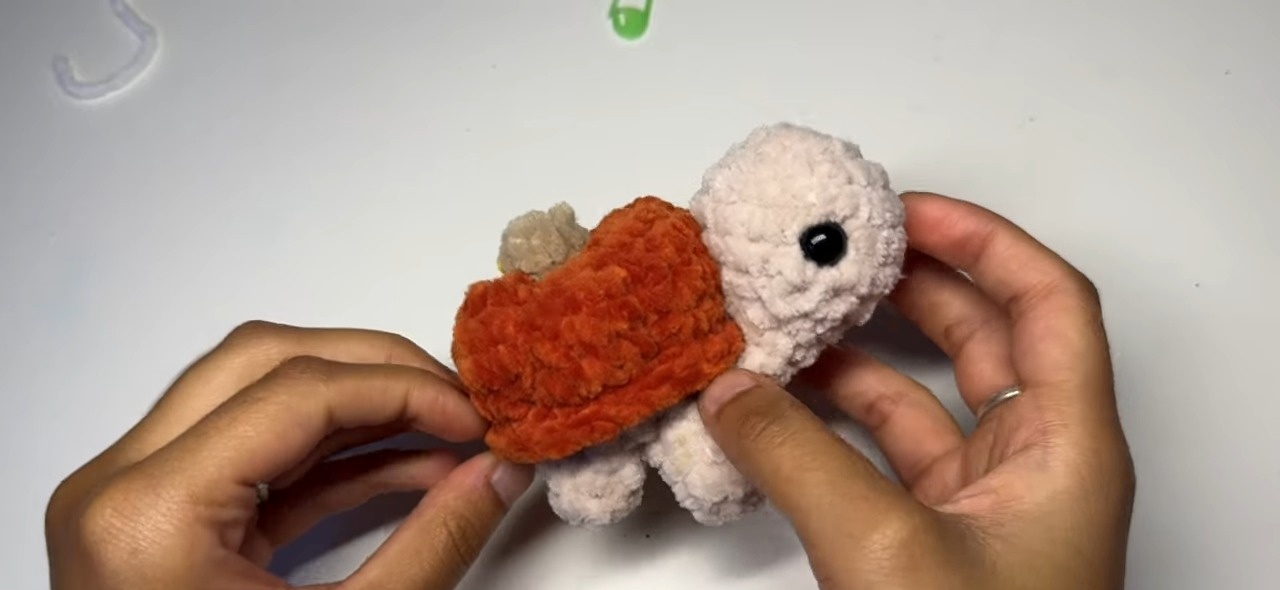
This crochet pumpkin turtle brings together Halloween charm and an adorable plush design in one fun make. The rounded pumpkin shell, tiny legs, and sweet little face slowly come to life as each section is completed, making every stage enjoyable from start to finish.
The pattern is worked in separate pieces before everything is joined together for its final shape. Simple crochet stitches, careful assembly, and sculpted pumpkin ridges give the finished design its signature look, with the final shaping bringing the crochet pumpkin shell beautifully to life.
Credit Raeesaart
Materials and Tools Needed
- Yarn:
- Orange (for the pumpkin body).
- Two shades of brown (for the turtle’s legs and head).
- Hook: 4.5 mm crochet hook.
- Stuffing: Fiberfill to shape the turtle.
- Eyes: 10 mm safety eyes.
- Notions: Stitch marker, needle, and scissors.
Key Techniques and Terminology
- Magic ring: Starting point for most parts (legs, head, body).
- Single Crochet (sc): The main stitch used throughout.
- Increasing and decreasing: Shaping the body and closing the head.
- Stitch marker: Essential to track rounds in circular crochet.
Pattern Highlights
- Start with a magic ring to create the head, legs, and body.
- Attach the legs in a unique configuration with two long front legs and two shorter back legs.
- Shape the pumpkin-style turtle shell using clever sewing techniques.
- Finish with details: secure eyes, add stuffing, and sculpt ridges for the pumpkin shell to complete the look.

Pattern Overview & Making Process
The pattern begins by making the turtle’s individual parts. Two short legs, two longer front legs, and the head are all worked from a magic ring using single crochet with gradual increases and decreases to create smooth shaping. Safety eyes are added, the head is stuffed, and the opening is closed before assembly.
Next, the body is started with a magic ring, and the legs are attached directly while crocheting. The remaining stitches are completed around each leg, and the head is joined flat across the front as the body is finished, creating the turtle’s complete base.
The pumpkin shell is crocheted separately with steady increases followed by even rounds to build its rounded shape. After stuffing, the shell is joined to the body, then a long yarn tail is used to sculpt the pumpkin ridges. Finally, the head is secured to keep it upright, and a small brown stem is crocheted and sewn to the top to complete the pumpkin turtle.
Step-by-Step Crochet Pattern
This pattern is divided into clear sections to guide you through crocheting each part of the design seamlessly. Follow the step-by-step instructions for assembly to complete your creation.
Short Legs (Make 2)
- Round 1: Magic ring (MR), chain 1 (counts as 1 single crochet), and work 5 single crochet (sc) into the ring (6 stitches total). Pull tight to close the ring.
- Round 2: 1 sc in each stitch around (6 stitches).
- Round 3: 1 sc in each stitch around (6 stitches). Fasten off.
Long Legs (Make 2)
- Rounds 1–3: Follow the same instructions for the short legs.
- Round 4: 1 sc in each stitch around (6 stitches). Fasten off.
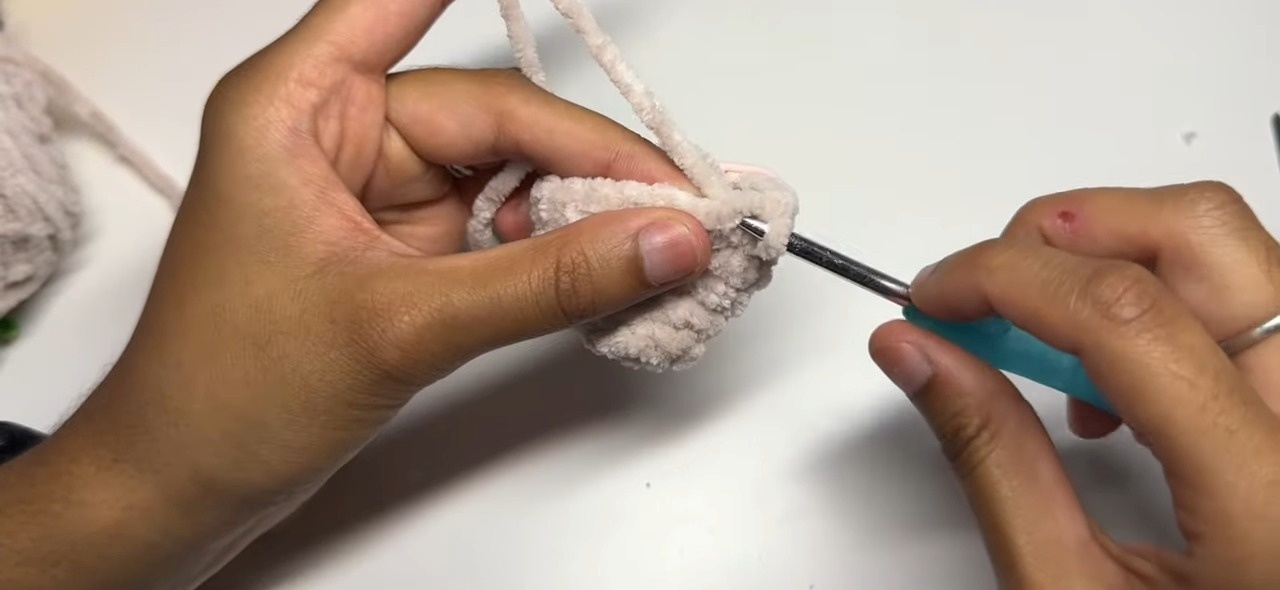
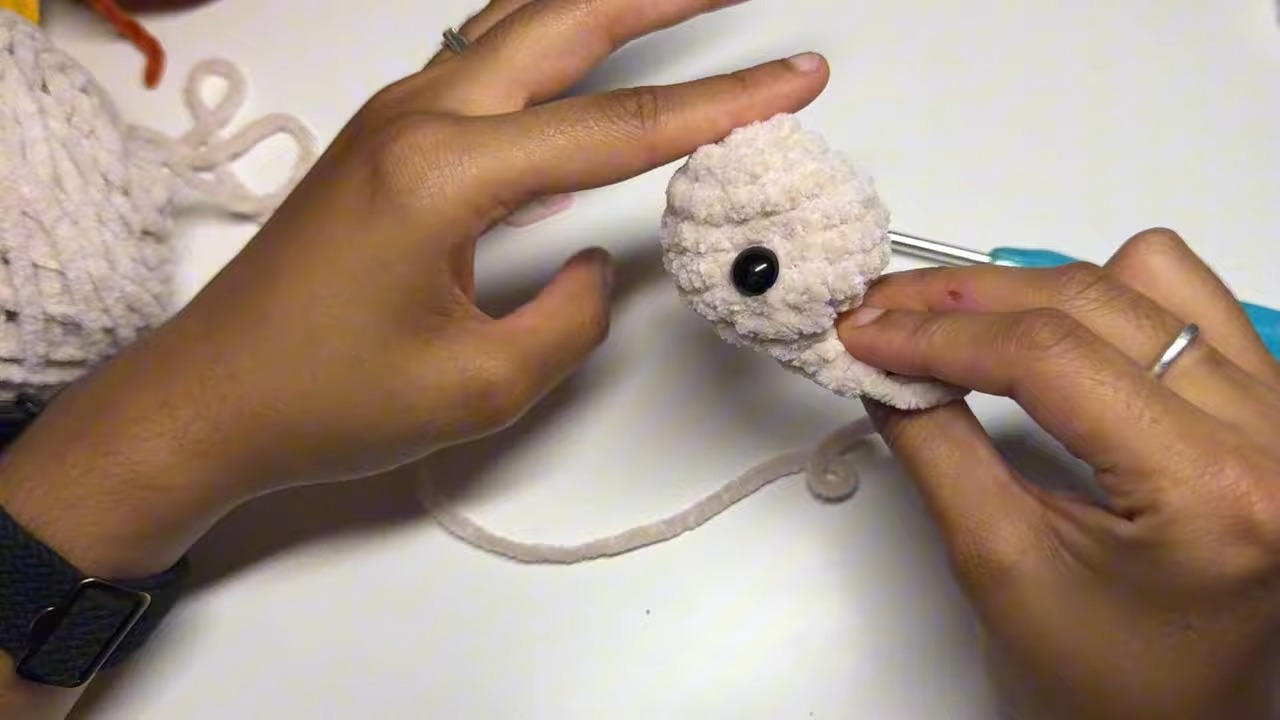
Head
- Round 1: Magic ring (MR), chain 1 (counts as 1 sc), and work 5 sc into the ring (6 stitches).
- Round 2: Increase (Inc) in each stitch around (12 stitches).
- Round 3: [1 sc, 1 inc], repeat 6 times (18 stitches).
- Rounds 4–6: 1 sc in each stitch around (18 stitches).
- Round 7: [1 sc, 1 decrease (dec) in front loops only], repeat 6 times.
- Round 8: [2 sc, 1 decrease], repeat 3 times.
- Rounds 9–10: 1 sc in each stitch around.
Closure
- Insert 10 mm safety eyes between Rounds 5 and 6.
- Stuff the head firmly with filling material.
- Fold the head flat and single crochet through both sides to seal (4 sc). Fasten off.
Body Assembly
- Round 1: Magic ring (MR), chain 1, and work 7 sc into the ring (8 stitches).
- Round 2: Attach the legs:
- Insert your hook from the inside out through the legs and body.
- Attach both long legs (2 sc each) and short legs (2 sc each).
- Round 3: Work 4 sc into the remaining unjoined stitches on each leg around.
- Round 4: [1 sc, 1 increase] around, working through both the head seam and body stitches to attach the head flat across the front. Fasten off.
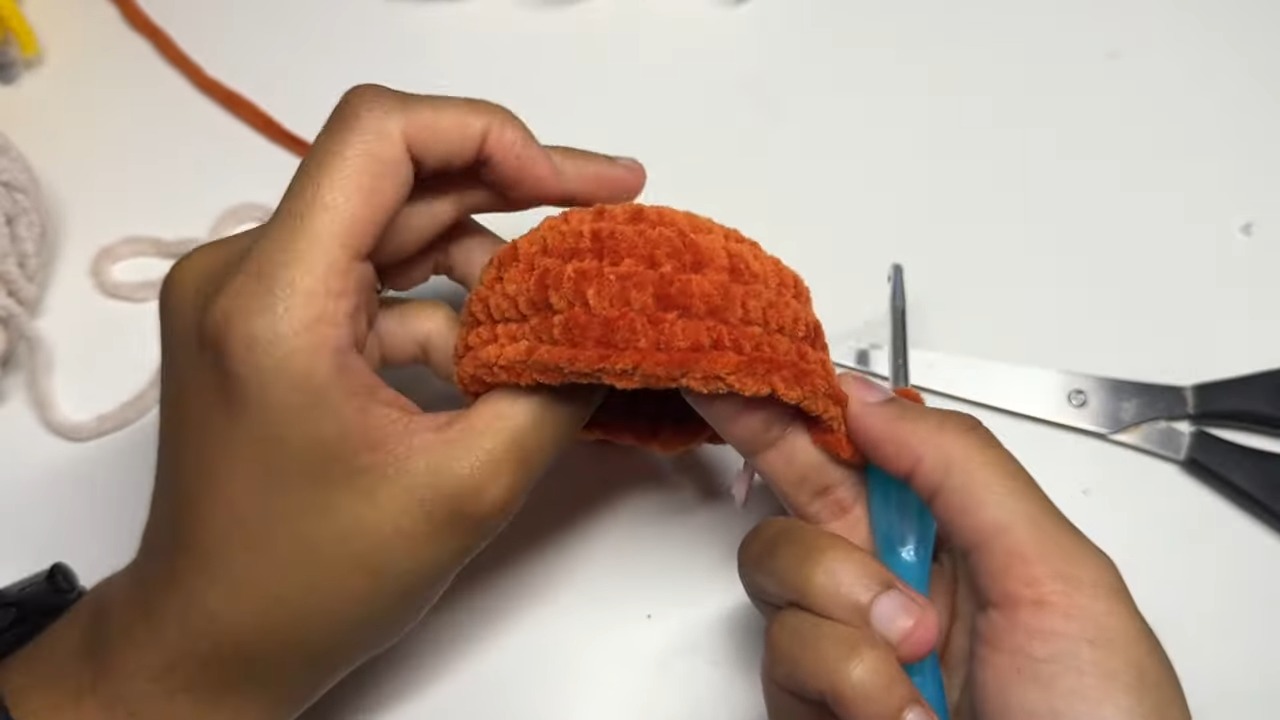
Pumpkin Shell
- Round 1: Magic ring (MR), chain 1, and work 5 sc into the ring (6 stitches).
- Round 2: Increase in each stitch around (12 stitches).
- Round 3: [1 sc, 1 inc], repeat 6 times (18 stitches).
- Round 4: [2 sc, 1 inc], repeat 6 times.
- Rounds 5–7: 1 sc in each stitch around.
Assembly Instructions
- Shell & Body Joining:
- Match the edges of the shell and body and single crochet around to join.
- Stuff the legs and shell before sealing. Leave a long yarn tail for shaping.
- Pumpkin Ridge Sculpting:
- Use the long yarn tail to pass through the top center to the bottom center of the pumpkin, pulling tightly to shape the shell.
- Wrap the tail around the outside of the shell multiple times to create distinct rigid segment lines.
- Securing Head:
- Sew the back of the head to the front edge of the pumpkin shell to keep the head upright.
- Stem Attachment:
- With a second brown yarn shade, work a magic ring with 4 sc.
- Round 2: Work 4 sc in the round.
- Sew the stem onto the center top of the pumpkin.
Notes:
- This pattern is designed for an adorable pumpkin-themed figure! Adjust colors and thread size as desired to customize your creation.
- Use proper stuffing to ensure consistent shaping for the legs, head, and shell for a finished look.
Troubleshooting & Suggestions
- Problem: Uneven or messy stitches.
- Use a stitch marker to track the start of each round and count carefully for consistency.
- Joining the legs: This can be tricky. Keep leg stitch counts even and pin in place if needed before crocheting.
Customization Options:
- Experiment with different yarn colors, such as green for a more turtle-centric design or white for a ghostly Halloween pumpkin.
- Add embellishments like miniature crochet leaves on the pumpkin shell for extra detail.
Conclusion & Final Notes
This pumpkin turtle is a delightful mix of whimsy and beginner-friendly techniques. With structured guidance, sculpted detailing, and endless opportunity for creativity, it’s a design you’ll want to make over and over. Gather your materials, follow the step-by-step guide, and share your spooky, cuddly creation with the community online


