
Create a delicate crochet oak leaf with nine decorative lobes using simple stitches, then customize its size and autumn colors for garlands, wreaths, and seasonal decor.

A tiny crochet oak leaf can bring a natural autumn touch to blankets, clothing, wreaths, and handmade decorations. Its pointed lobes and narrow stem give it the recognizable shape of an oak leaf, while different yarn colors make it easy to match your seasonal crochet patterns.
This crochet pattern builds the leaf through a foundation chain, seven shaping rows, and a decorative edging that forms nine leaf lobes. You will also learn how to finish the stem, secure the loose ends, and prepare your finished crochet leaf for sewing onto another pattern.
Credit Crochet Oli
Materials & Tools Needed
- Yarn: Standard crochet yarn in your preferred color. Brown, yellow, orange, and green are lovely choices for autumn leaves.
- Crochet Hook: Choose an appropriate size for your yarn.
- Tapestry or Yarn Needle: Use this to weave in loose ends and sew the leaf onto another pattern.
- Scissors: For cutting the yarn.
Finished Size & Customization Ideas
The finished piece is a delicate, multi-lobed miniature oak leaf with a narrow stem and decorative edges. It works well as an applique for garments and blankets or as an accent for autumn garlands, wreaths, and other seasonal decorations.
You can personalize your leaf in two simple ways:
- Adjust the size: Change the yarn weight and crochet hook size to make the leaf larger or smaller.
- Try autumn color variations: Use brown, yellow, orange, or green yarn. Variegated autumn-toned yarn can also create natural-looking color changes throughout the leaf.
Pattern Abbreviations & Terminology
- Ch: Chain stitch
- Sc: Single crochet
- Hdc: Half double crochet
- Dc: Double crochet
- Sl st: Slip stitch
- St(s): Stitch(es)
In the supplied tutorial terminology, single crochet is described as a column without a yarn over, while double crochet is described as a column with a yarn over.

How to Crochet an Oak Leaf
The leaf is made in three main stages: shaping the center, creating the stem and outer lobes, and finishing the piece. Follow the supplied row instructions in order, keeping track of the stitches and chain spaces as you work.
Foundation and Core Shaping
Before you begin: If you plan to sew the leaf onto a garment, blanket, or decorative project, leave a long yarn tail before making your first chain. This tail can be used later to attach the finished leaf.
Foundation Chain: Make 10 chain stitches.
Row 1
- Starting in the second chain from the hook, work 4 single crochet stitches into the back loops.
- Work 1 half double crochet in the next stitch.
- Work 2 double crochet stitches across the next two stitches, with 1 double crochet in each stitch.
- Work 1 half double crochet in the last stitch, then work 2 single crochets. Make an arch with 3 chain stitches and 2 single crochets.
- Continue down the opposite side of the foundation chain. Work 1 half double crochet, then 2 double crochets in each of the next two stitches, followed by 1 half double crochet and 1 single crochet. Leave 3 stitches unworked and turn your work.
Row 2
- Chain 1.
- Work 7 single crochet stitches.
- In the 3-chain arch space, work 2 double crochets, chain 3, and work 2 single crochets.
- Work another 7 single crochet stitches. Leave 3 stitches unworked and turn.

Row 3
- Chain 1.
- Work 9 single crochet stitches.
- Form the next arch with 2 double crochets, chain 3, and 2 double crochets.
- Work 6 single crochet stitches, described in the supplied tutorial as columns without a yarn over. Leave 3 stitches unworked and turn.
Row 4
- Chain 1.
- Work 8 single crochet stitches.
- Make an arch with 2 double crochets, chain 3, and 2 double crochets.
- Work 8 single crochet stitches in total. Leave 3 stitches unworked and turn.
Row 5
- Chain 1.
- Work 10 single crochet stitches in total.
- Chain 1, then work 2 more single crochet stitches, followed by an additional 3 stitches.
- Skip the next 7 stitches and turn your work.
Note: The supplied Row 5 instructions do not clearly identify the placement of every stitch after the first 10 single crochets. Check the original tutorial at this point before crocheting if the stitch placement is unclear.

Row 6
- Chain 1.
- Work 5 single crochet stitches.
- Form an arch with 2 double crochets, chain 3, and 2 double crochets.
- Work 5 single crochet stitches. Leave 7 stitches unworked and turn.
Row 7
- Chain 1.
- Work 7 single crochet stitches.
- Work 1 single crochet into the arch.
- To make the stem, chain 5.
- Starting in the second chain from the hook, work 4 single crochet stitches into the back loops.
- Work 1 additional single crochet into the arch.
The foundation and shaping rows establish the central structure of the leaf, while the chain-5 section forms its narrow stem. The next stage adds the decorative lobes around the outside edge.
Edging and Shaping the Nine Leaf Lobes
The outer edging creates the distinctive pointed, multi-lobed shape of the oak leaf. Work the following sequences around the leaf perimeter, following the supplied tutorial’s instructions to move up or down rows where indicated.
First Feather
- Work 1 single crochet.
- Work another single crochet.
- Work 1 half double crochet.
- Work 2 half double crochets in the next stitch.
- Chain 1 and make a slip stitch into that same stitch to finish the first lobe.
Second Feather
- Work 1 slip stitch.
- Work 1 single crochet.
- Work 1 half double crochet.
- In the top stitch, work 2 double crochets.
- Chain 2 and make a slip stitch into the same stitch.

Third Feather
- Move down two rows.
- Work 1 slip stitch, 1 single crochet, 3 half double crochets, and 1 double crochet.
- In the last stitch, work 3 double crochets.
- Chain 3 and make a slip stitch into the same stitch.
Fourth Feather
- Move down two rows to the next stitch.
- Work 1 slip stitch, 1 single crochet, and 1 half double crochet.
- Work 2 double crochets.
- Chain 2 and make a slip stitch into the same stitch.
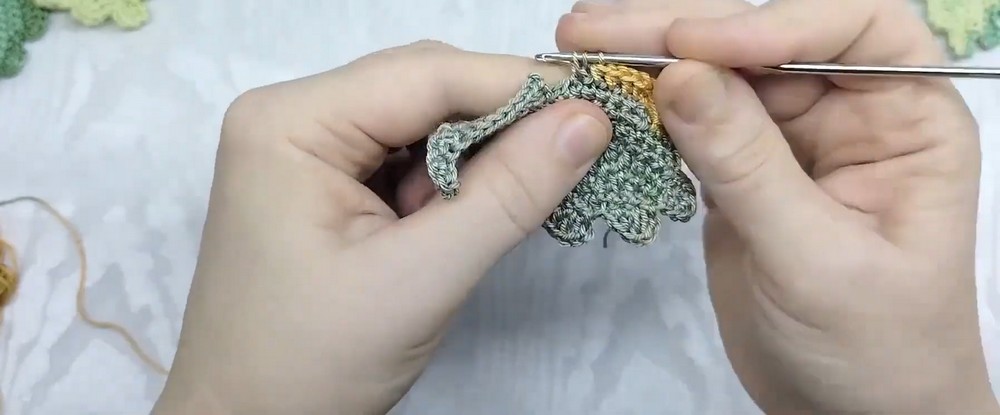
Fifth Feather – Top Tip
- Move down two rows.
- Work 1 slip stitch.
- Work 1 single crochet.
- Work 2 single crochets in the next stitch.
Mirror Side: Feathers Six Through Nine
Continue along the opposite side of the leaf, working the remaining lobes according to the supplied sequences.
Sixth Feather
- Move up two rows.
- Work 1 slip stitch.
- Chain 2, then work 2 half double crochets in the same stitch.
- Work 1 half double crochet and 1 single crochet.
- Finish with a slip stitch.
Seventh Feather
- Move up two rows.
- Work 1 slip stitch.
- Chain 2, then work 3 double crochets in the same stitch.
- Work 1 double crochet.
- Work 3 half double crochets.

Eighth Feather
- Work 1 single crochet and 1 slip stitch.
- Move up two rows and work 1 slip stitch.
- Chain 2, then work 2 double crochets in the same stitch.
- Work 1 half double crochet and 1 single crochet.
- Finish with a slip stitch.
Ninth Feather
- Work 1 slip stitch.
- Chain 1.
- Work 2 half double crochets in the same stitch.
- Work 1 half double crochet and 1 single crochet.
- Finish with a slip stitch.
Edging tip: The edging instructions use relative directions such as “move down two rows” and “move up two rows.” If the correct insertion point is not obvious, consult the original tutorial’s visual demonstration rather than guessing where to insert your hook.
Finishing the Crochet Oak Leaf
Once the edging is complete, finish the leaf carefully so it is ready to use.
- Cut the working yarn.
- Pull the yarn through to fasten off securely.
- Thread the remaining yarn end through your tapestry needle.
- Weave in and hide the loose ends neatly on the back of the leaf.
- If you left a long starting tail, use it to sew the leaf onto a garment, blanket, wreath, or other decorative project.
Take care not to pull the stitches too tightly while securing the ends, as this can affect the shape of the delicate leaf.
Ways to Use Your Finished Oak Leaf
A miniature crochet oak leaf is a versatile accent for autumn and nature-inspired crafts. Sew it onto a blanket or garment as an applique, attach several leaves to a handmade garland, or add it to a seasonal wreath.
For a coordinated autumn display, make several leaves in different shades of brown, yellow, orange, and green. Changing the yarn weight and hook size also gives you a way to create a collection of leaves in different sizes.
With its shaped center, narrow stem, and decorative lobes, this little leaf offers a useful way to add handmade seasonal detail to your crochet patterns.