
Want to make a tiny crochet bee in about 30 minutes? This mini amigurumi features cheerful stripes, a fluffy white trim, and an expressive little face.

With its rounded yellow head, black-and-yellow body, fluffy white collar, and tiny grumpy-cute expression, this crochet mini bee has plenty of personality in a small shape. The contrast between the bright colors and the soft white trim makes it stand out beautifully as a bag charm or a little crochet handmade decoration.
One of the best things about this crochet bee is that its main pieces are small and simple to work. The supplied tutorial makes the yellow upper section and black lower section separately, then joins them after stuffing, so this version is not completely no-sew. Lets started.
Credit: ghazi craft
Materials & Tools Needed
Prepare these supplies before you begin.
- Yarn: Yellow, black, and white polyester yarn.
- Crochet hook: No. 3 or 2.5 mm hook, as specified in the source.
- Fiberfill stuffing: To make the bee plump and rounded.
- Tapestry needle: For joining the body sections and embroidering facial details.
- Scissors: For trimming yarn ends.
- Optional lighter: Mentioned in the source for securing synthetic yarn ends. Use extreme caution around polyester yarn, which can melt or ignite. Do not singe yarn while it is attached to the bee or near stuffing; weaving in and securely trimming ends is safer.
- Optional keychain hardware: A ring or clip for turning the finished bee into a bag charm or keychain.
- Optional pink yarn or blush: For the rosy cheeks shown in the design.
Safety note: If you are making the bee for a young child, embroider the eyes and other facial details instead of using small safety eyes or detachable parts. Keep keychain hardware and sharp tools away from young children.
Finished Size
This pattern creates a miniature amigurumi bee suitable for keys, bags, zippers, and small decorative displays. The source doesn’t provide exact finished measurements, so the final size depends on your yarn thickness, hook, and tension.
You can adjust the size by using a different yarn weight and a matching hook. Thicker yarn generally makes a larger bee, while finer yarn creates a smaller charm. Keep the stitches close together so the stuffing does not show through the fabric.
Skill Level
Beginner-friendly, with a few finishing techniques.
You will use a magic ring, single crochet, increases, decreases, and slip stitches. The main body sections are small, but you will also need to stuff them, join them securely, and add the face and antennae.
If you are new to amigurumi, mark the beginning of each round and count your stitches before moving on. This is especially useful in rounds where the stitch count changes quickly.

Special Stitches & Techniques
- Magic ring (MR): An adjustable loop that lets you begin crocheting in a circle and close the center tightly.
- Increase (inc): Work 2 single crochet stitches into the same stitch to widen the round.
- Decrease (dec): Combine 2 stitches into 1 to narrow the shape.
- Back loops only (BLO): Insert your hook through only the back loop of each stitch. This leaves the front loops available and can help define a decorative edge.
- Joining rounds: The supplied instructions use a slip stitch to join the end of each round, then chain to begin the next.
- Embroidery: Use a tapestry needle and yarn or thread to add the antennae, eyes, and mouth.
Crochet Mini Bee Pattern: Step by Step
The source tutorial makes the yellow upper section and black lower section separately. The white trim is added as a decorative detail, and the two stuffed sections are joined during assembly.
Step 1: Crochet the Yellow Head and Upper Body
Use yellow yarn to begin the rounded upper section.
Round 1
- Make a magic ring.
- Chain 1.
- Work 7 single crochet stitches into the ring.
- Join with a slip stitch to the first stitch, then chain 1. Total: 7 stitches.
Pull the ring closed so the center is neat and secure.
Round 2
- Work an increase in every stitch around, making 2 single crochet stitches in each stitch.
- Join with a slip stitch and chain 1. Total: 14 stitches.
The circle should grow evenly as the increases widen the round.
Round 3
- Work the sequence (1 increase, 3 single crochet) 3 times.
- Then work 1 increase and 1 single crochet.
- Join with a slip stitch and chain 1. The source states a total of 18 stitches.
The written sequence does not appear to match the stated total of 18 stitches when counted as written. Please check the original video at approximately 01:57 before continuing, so the head has the correct number of stitches for the next rounds.
Rounds 4-5
- Work 1 single crochet in every stitch around.
- Join with a slip stitch at the end of each round.
- Chain 1 before beginning the next round.
- Repeat for both rounds.

Total stated in the source: 18 stitches per round.
These even rounds build the yellow head’s height. Keep the tension consistent so the sides stay smooth.
Round 6
The supplied sequence is: work 2 increases, 4 single crochet stitches, then repeat (1 single crochet, 3 increases) 4 times.
The source states a total of 32 stitches, but the written sequence does not appear to produce that count as written. Check the video at approximately 03:07 to confirm the exact repeat and stitch placement before working this round.
Round 7
- Work (2 single crochet, 1 decrease) 8 times around.
- Join with a slip stitch and chain 1. Total: 24 stitches.
The decreases begin to narrow the yellow section. Keep them evenly spaced to keep the shape even.
Round 8
- Work 1 decrease in each pair of stitches around, repeating 12 times.
- Join with a slip stitch.
- Chain 1 and cut the yellow yarn, leaving a tail for finishing if needed. Total: 12 stitches.
This closes the yellow section enough for shaping. Before cutting the yarn, check the original tutorial to confirm the round is complete and the remaining opening matches the video.
Step 2: Add the Eyes and Blush
The source tutorial adds the facial details during the finishing stage. You can plan their positions now, but embroider them before you close up any area that will be hard to reach.
- Decide where the eyes should sit on the yellow head.
- Use black yarn or embroidery thread to stitch the simple sleeping-eye shapes shown in the reference.
- Add a small embroidered smile beneath the eyes.
- Add a soft pink touch to each cheek using pink yarn or a suitable blush detail.
- Check the face from the front to make sure the features look balanced.
Step 3: Crochet the White Ruffled Collar
Use white yarn for the decorative trim.
- Find the designated round or exposed loops where the white trim is meant to be attached.
- Join the white yarn at that point.
- Work in the back loops only if the round has been prepared for BLO.
- Repeat the sequence (chain 3, skip 1 stitch, slip stitch into the next stitch) around the base.
- Fasten off and weave in the end.
The chain loops create a ruffled or fluffy-looking edge around the bee. Keep the loops similar in length so the trim looks even.

Step 4: Crochet the Black Lower Body
Use black yarn to make the lower section. Work this separately and attach it to the yellow section during assembly.
Round 1
- Make a magic ring with black yarn.
- Chain 1.
- Work 6 single crochet stitches into the ring.
- Join with a slip stitch and chain 1. Total: 6 stitches.

Round 2
- Work an increase in every stitch around.
- Join with a slip stitch and chain 1. Total: 12 stitches.
Round 3
- Work (1 single crochet, 1 increase) 6 times around.
- Join with a slip stitch and chain 1. Total: 18 stitches.
Round 4
- Work 1 single crochet in every stitch around.
- Join with a slip stitch and chain 1.
- Cut the black yarn, leaving a tail for joining if you plan to sew the sections together. Total: 18 stitches.
The black lower section should form a small rounded piece. Keep its opening accessible until you have added the stuffing.

Step 5: Stuff, Close, and Shape the Bee
The supplied tutorial describes stuffing both body sections and then joining them.
- Add fiberfill to the yellow upper section, spreading it evenly so the head stays rounded.
- Add fiberfill to the black lower section, keeping the stuffing firm but not so tightly packed that the stitches stretch.
- Check the shape of both sections before joining them.
- Position the black section against the open base of the yellow section.
- Sew the two sections together securely with a tapestry needle, or use an appropriate craft glue only if it suits the materials and the finished item will not be given to a young child.
- Check the join all the way around to make sure there are no large gaps.
- Weave in any loose yarn ends.
Important: Because the source specifically says to sew or glue the lower section onto the upper section, this is not a fully no-sew pattern as written. Sewing is generally the more secure choice for a keychain that will be handled often.

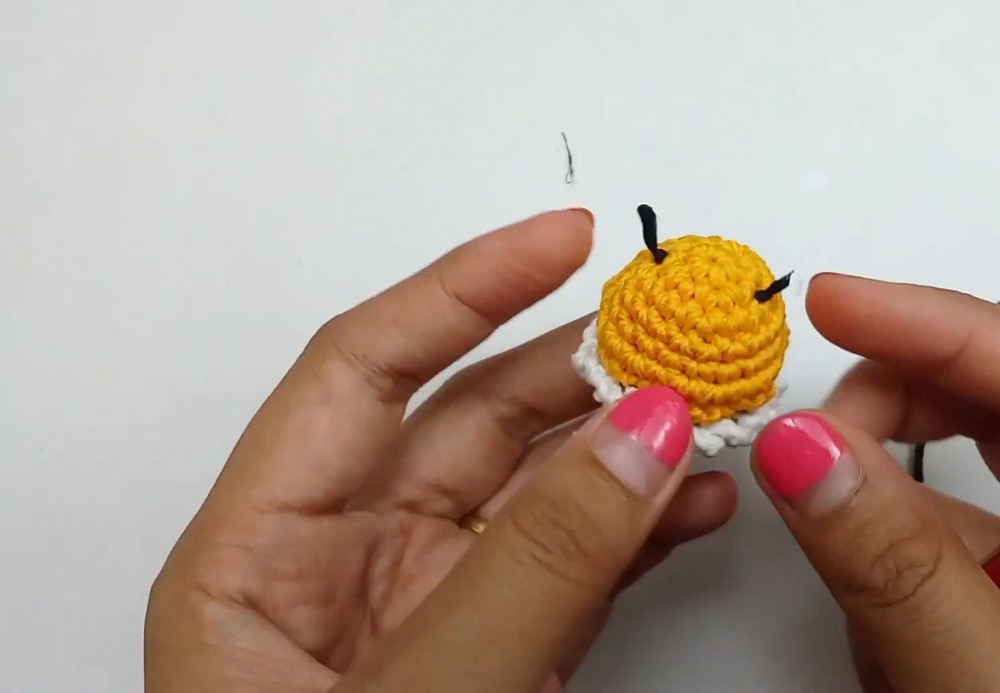
How to Make the Antennae
The antennae give the bee its recognizable silhouette and help complete the face.
- Thread black yarn or embroidery thread onto your tapestry needle.
- Position the two antennae at the top of the yellow head.
- Make two small embroidered lines or loops, following the look in your reference.
- Secure the yarn on the inside of the head where possible.
- Carefully trim the ends and weave them into the stitches.
The video notes mention lightly singeing synthetic yarn ends with a lighter. For safety, avoid this method on a finished stuffed toy, especially near polyester yarn and fiberfill. Secure the ends with stitching instead, and keep any flame away from the work.
Embroidering the Face Details
A few small stitches can add a lot of personality to your bee.
- Eyes: Embroider the sleeping-eye shapes with black thread or yarn.
- Mouth: Add a small smile or the expression shown in your reference image.
- Cheeks: Use a little pink yarn or a suitable blush detail to add color.
- Placement: Check that the eyes and cheeks are balanced before securing the final ends.
If the expression looks uneven, adjust the position before weaving in the yarn ends. On a small amigurumi, even a slight placement change can make the face look noticeably different.
How to Turn the Bee into a Keychain
Once the bee is assembled, you can add keychain hardware to make it a portable charm.
- Choose a secure point at the top of the bee’s head.
- Attach a small metal ring, clip, or keychain fitting using a strong loop or securely sewn attachment.
- Pass the yarn through several sturdy stitches rather than attaching it to one loose strand.
- Secure the yarn ends and gently test the attachment.
- If the bee will hang from a bag, make sure the hardware doesn’t pull the stitches out of shape.
The supplied tutorial lists scissors, a tapestry needle, stuffing, and a lighter, but it does not include detailed keychain-attachment steps. The hardware method above is a general finishing suggestion; use a fitting that suits your finished bee and attach it securely.

Final Tips & Variations
For a neat finish
- Use a stitch marker to keep track of the beginning of each round.
- Count stitches after increase and decrease rounds, especially where the source notes have unclear totals.
- Keep stuffing away from the closing stitches so the opening can be secured neatly.
- Make the embroidered features before the body becomes difficult to handle.
- Weave in yarn ends securely instead of relying on a lighter to seal them.
For a personalized bee
- Classic bee: Keep the yellow and black body with white trim.
- Pastel bee: Try pale yellow, soft gray, and cream for a gentle color palette.
- Bright mini charm: Use vivid colors for a playful backpack decoration.
- Different yarn texture: Try milk cotton or velvet yarn with a matching hook, keeping in mind that thicker yarn will change the finished size and texture.
This mini bee is a cheerful way to use small amounts of yarn and practice basic amigurumi techniques. With its contrasting stripes, textured trim, and expressive face, it can become a sweet keychain, bag charm, or handmade gift.


