
This crochet Christmas star ornament pairs a crisp white center with colorful pointed petals, creating a sturdy double-sided decoration for trees and holiday garlands.

Festive decorating gets a handmade touch with this petite crochet Christmas star, worked with a neat white center and bold red or dark green points. Making two matching motifs and joining them gives the star extra body, so it hangs nicely instead of feeling too light or floppy.
Follow the two-round motif carefully, especially when working into each chain-5 space and forming the tiny chain-3 points. You’ll also see how to align the matching stars, sew their edges neatly, and finish the crochet ornament with a simple hanging loop and wooden bead.
Credit CrochetMagic Channel
Materials & Tools Needed
- Yarn: Medium-weight yarn in white for the center and red or dark green for the outer petals
- Crochet Hook: 3.0 mm crochet hook
- Tapestry Needle: For weaving in ends and sewing the two motifs together
- Scissors: For trimming yarn
- Small Wooden Bead: For finishing the hanging loop
Finished Size & Customization
This pattern creates a petite, double-thick star ornament that works well on Christmas trees or as part of a holiday garland. The two crocheted layers give the finished star a little more substance while keeping the design simple.
For a different holiday palette, try combinations such as gold and white, or use sparkly yarn for a little extra shine. You can also add a small amount of stuffing between the two motifs before closing the seam if you prefer a softly raised, plush effect.
Pattern Abbreviations
- MR: Magic Ring
- ch: Chain
- sl st: Slip Stitch
- hdc: Half Double Crochet
- dc: Double Crochet
- st(s): Stitch(es)
Crochet Christmas Star Pattern
You’ll make two identical star motifs. Each motif has a small white center followed by five colorful pointed petals. Once both pieces are finished, they are placed back-to-back and sewn around the outside.
White Star Center
Begin with white yarn and form the foundation that the five petals will later grow from. The five chain-5 spaces are important because each one becomes the working space for one complete petal in Round 2.
Round 1: Make an MR, ch 3 (counts as first dc), work 2 dc into the ring, (ch 5, 3 dc into the MR) repeat 4 more times, ch 5, pull the MR tail to close the center, sl st into the top of the beginning ch-3, fasten off and weave in the ends; you should have 5 groups of 3 dc separated by 5 chain-5 spaces.
Check your work: The center should look like a small five-section shape rather than a loose collection of stitches. Make sure all five chain-5 spaces are clearly visible, since you will work the petals directly into these spaces next.
Five Star Petals
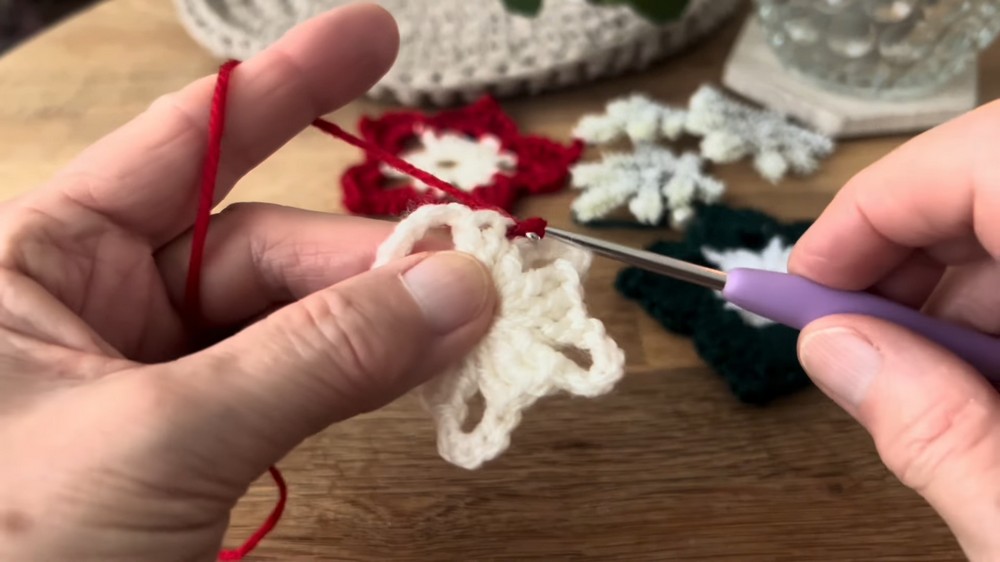
Switch to red or dark green yarn and attach it inside any chain-5 space. Each petal is worked completely within one chain-5 space, so you do not need to search for individual stitches from the white clusters.
Round 2: Attach the new color in any ch-5 space, (1 hdc, 4 dc, ch 3, sl st into the first ch to form the point, 4 dc, 1 hdc) in the same ch-5 space, move to the next ch-5 space and repeat around for all 5 spaces, then sl st into the first hdc to join; fasten off, leaving a long tail on one star for sewing.
As you form each point, the chain-3 loop creates the sharp tip while the stitches on either side spread back toward the center. Keep the petal sequence consistent so the five points develop at roughly the same size.
Visual check: After completing several petals, the white center should sit between five colorful sections, with each chain-3 point forming the outer tip of a star. If one point looks unusually narrow or wide, check that all of its hdc and dc stitches were worked into the same chain-5 space.

Make the Second Star
Repeat Rounds 1 and 2 to make a second star motif. Keep this piece identical to the first so the outer points line up when the two layers are joined.
For the second motif, you can weave in its loose ends as usual. On the first motif, keep the long yarn tail from Round 2 available because it will be used to sew the two stars together.
Joining the Two Motifs
Before sewing, place the stars back-to-back with the right side of each motif facing outward. Take a moment to rotate the pieces until all five points and the petal edges line up. This small alignment check makes the finished ornament look much cleaner.
Thread the long yarn tail onto your tapestry needle and begin whip-stitching around the outer edges. Work through corresponding stitches on both motifs rather than catching only the loose outer loops. This keeps the two layers together and gives the ornament a firm finished edge.
Before You Close the Seam
If you want a slightly fuller star, this is the point to add a small amount of stuffing between the two layers. Use only enough to gently lift the center and petals; too much can push the edges apart or make the points lose their crisp shape.
If you prefer the flatter, classic ornament style, simply continue sewing without stuffing.
Once you have sewn completely around the star, secure the yarn with a firm knot and weave the remaining tail into the inside of the joined layers before trimming it.

Add the Hanging Loop
Cut a separate strand of matching yarn for the hanger. Thread it through the very top point of one star petal, keeping both ends together so the loop hangs from the center of the point.
Pass both loose ends through a small wooden bead and slide the bead down until it rests snugly against the star tip. Tie a firm knot above the bead to secure the loop, then trim any excess yarn.
Your finished star is now ready to hang from a Christmas tree branch, add to a holiday garland, or pair with other handmade ornaments in coordinating colors.






