Here’s a festive crochet Mrs. Claus with a soft plush body, white bun, curls, holly, and sweet embroidered details to pair beautifully with Santa.

Crochet a cuddly Mrs. Claus with plush yarn, a rounded body, bright red dress, fluffy white hair, and a tiny holly accent tucked into her bun. Her detailed face and classic holiday colors give her the unmistakable look of a cheerful Christmas companion, while the soft amigurumi finish makes her especially fun to display beside a crochet Santa.
Following the crochet pattern from the arms and boots through the joined body, head, skirt, hair, and facial details will help you keep each section in the right proportion. You’ll also see where to place the safety eyes, how to position the arms and hair cap, and how small finishing details such as eyeliner, a curved smile, buttons, and holly bring her character to life.
Credit Keep Calm and Crochet
Materials & Tools Needed
- Plush Yarn (Super Bulky/Chenille): Red, White, Gray or Black for the belt and boots, and Skin Color
- Green Yarn: Small amount for the holly leaves
- DK Weight Yarn: Small amount of Black for eyeliner and Red or Pink for the mouth
- Crochet Hook: 5.5 mm
- Safety Eyes: 16 mm
- Stitch markers
- Darning needle
- Scissors
- Fiberfill stuffing
Finished Size & Customization
The finished doll is sized to coordinate with standard plush amigurumi patterns, making her especially suitable as a companion piece for a plush Santa.
You can change her personality with small finishing choices. Instead of the three embroidered buttons, try a white apron. The hair parting, curl placement, eyeliner length, and curve of the smile can also be adjusted to give your Mrs. Claus her own expression.
Pattern Abbreviations
- ch: chain
- sc: single crochet
- inc: increase – 2 sc in the same stitch
- dec: decrease – single crochet 2 stitches together
- hdc: half double crochet
- dc: double crochet
- sl st: slip stitch
- BLO: back loops only
- FLO: front loops only
- ( ): repeat the instructions inside the brackets the stated number of times

Crochet Mrs. Claus Pattern
Crochet the Arms
Make 2 arms, beginning with Skin Color yarn. The small skin-colored section forms the hand before the red sleeve is added, so keep the decreases neat at the transition.
Rnd 1: Ch 2, work 6 sc in the 2nd ch from the hook. (6)
Rnd 2: 6 inc. (12)
Rnd 3: 12 sc. (12)
Rnd 4: (2 sc, 1 dec) x 3. (9)
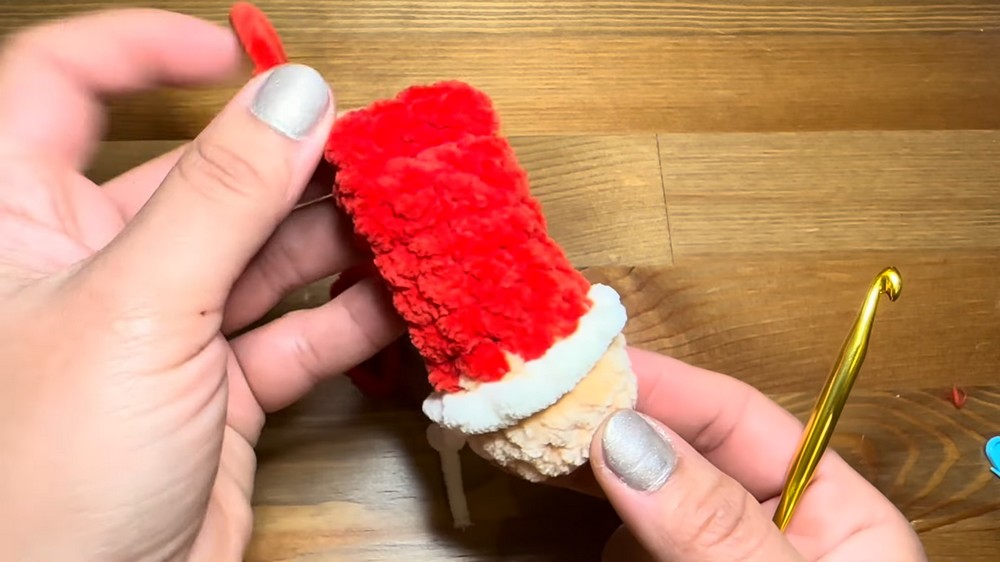
Fasten off the Skin Color with a sl st. Join Red yarn through the BLO of the next round. This creates the edge where the white cuff will later be attached from the opposite side.
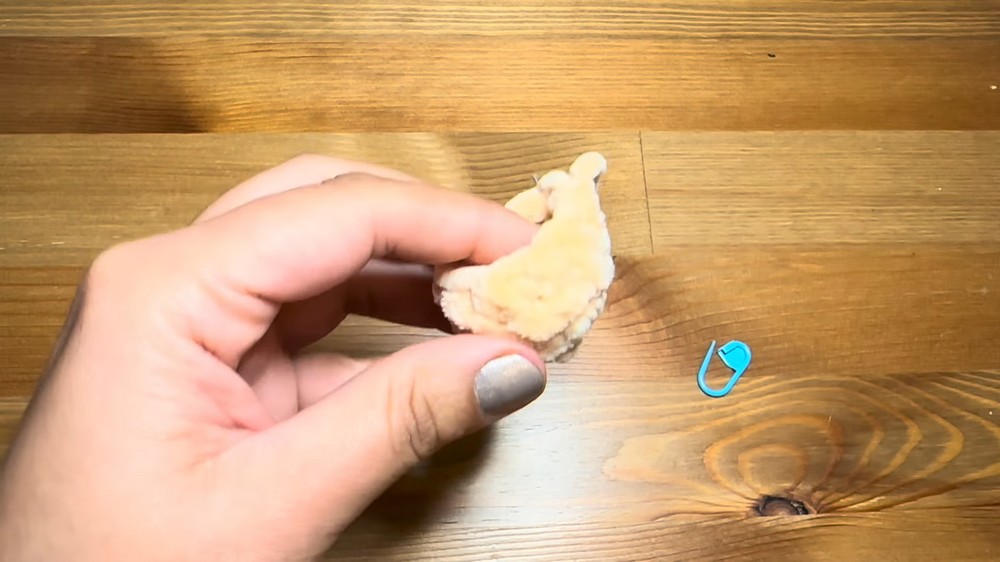
Rnd 5: In BLO, 9 sc. (9)
Rnds 6–11: In both loops, 9 sc for 6 rounds. (9)
Stuff each arm about three-quarters full. Keep the filling firm enough to give the sleeve some shape without making the stitches stretch.
Rnd 12: Pinch the opening flat and sc 4 across through both layers to close the arm. Fasten off, leaving a sewing tail.
Add the White Cuff
Join White yarn to the FLO of Rnd 4, where the Red yarn was originally attached.
Rnd 1: 9 sc in FLO around, sl st to the first st to finish. Fasten off, tie the ends, and weave them inside.
Make the second arm in the same way. At this stage, each arm should have a small skin-colored hand, a red sleeve, and a white cuff.
Shape the Legs and Boots
Make 2 legs, beginning with Gray or Black yarn for the boots. The first rounds widen the foot, while the decreases in Rnds 6–7 narrow it before the red leg section begins.
Rnd 1: Ch 2, work 7 sc in the 2nd ch from the hook. (7)
Rnd 2: 7 inc. (14)
Rnd 3: (1 sc, 1 inc) x 7. (21)
Rnds 4–5: 21 sc for 2 rounds. (21)
Rnd 6: 6 sc, 5 dec, 5 sc. (16)
Rnd 7: 1 dec, 4 sc, 3 dec, 4 sc. (12)
Sl st to fasten off the Gray or Black yarn. Join Red yarn through the full stitch, working through both loops.
Rnds 8–10: 12 sc for 3 rounds. (12)
Fasten off the first leg. Make the second leg in exactly the same way and fasten off.
Stuff both feet firmly with fiberfill. The feet need enough filling to hold their shape once the legs are joined to the body, but keep the upper leg area flexible enough for the body rounds to sit evenly.

Join the Legs and Crochet the Body
Place both feet side-by-side facing toward you. Before crocheting, check that the two feet point in the same direction; this simple alignment check will make the finished doll stand and face naturally.
Join Red yarn to the inner corner stitch of one leg.
Joining: Ch 3, sl st into the inner corner stitch of the opposite leg.
The chain bridge becomes the small section between the legs. The next round travels around both legs and across both sides of this bridge, creating one continuous body base.
Rnd 1: 12 sc around the first leg, 3 sc across one side of the ch-3, 12 sc around the second leg, 3 sc across the opposite side of the ch-3. (30)
Rnd 2: (4 sc, 1 inc) x 6. (36)
Rnd 3: (5 sc, 1 inc) x 6. (42)
Rnds 4–8: 42 sc for 5 rounds. (42)
Fasten off the Red yarn. Attach Gray or Black yarn at the side corner for the belt.
Rnd 9: In BLO, (5 sc, 1 dec) x 6. (36)
Rnd 10: In both loops, 36 sc. (36)
Fasten off the Gray or Black yarn and attach Red yarn.
Rnds 11–12: 36 sc for 2 rounds. (36)
Rnd 13: (4 sc, 1 dec) x 6. (30)
Rnd 14: (3 sc, 1 dec) x 6. (24)
Rnd 15: 24 sc. (24)
Rnd 16: (2 sc, 1 dec) x 6. (18)
Rnds 17–18: 18 sc for 2 rounds. (18)
Rnd 19: (1 sc, 1 dec) x 6. (12)
Stuff the legs well by this point so the lower body stays filled as the opening becomes smaller. Sl st to fasten off, then stuff the entire body up to the top.

Attach the Arms Before the Head
Pause here while the neck opening is still accessible. Sew the arms flat against the sides of the body, positioning them 1 round below the neck opening.
Check both arms from the front before securing them completely. Their cuffs should sit at a similar height and the arms should angle naturally down the sides.

Crochet the Head
Attach Skin Color yarn at the back of the neck. The head begins directly from the body opening and expands before gradually decreasing toward the crown.
Rnd 1: 12 inc. (24)
Rnd 2: (3 sc, 1 inc) x 6. (30)
Rnd 3: (2 sc, 1 inc, 2 sc) x 6. (36)
Rnd 4: (5 sc, 1 inc) x 6. (42)
Rnds 5–10: 42 sc for 6 rounds. (42)
Before continuing with the decreases, place the 16 mm safety eyes. Insert them between Rnds 7 and 8, counting 3 rounds down from your current hook point. Place the eyes 5 stitches apart and align them with the shoulders.
This is the best time to check the face from the front. If the eyes are level and centered in relation to the shoulders, the later nose, smile, and eyeliner details will naturally fall into place.
Rnd 11: (5 sc, 1 dec) x 6. (36)
Rnd 12: (4 sc, 1 dec) x 6. (30)
Rnd 13: (3 sc, 1 dec) x 6. (24)
Rnd 14: (2 sc, 1 dec) x 6. (18)
Rnd 15: (1 sc, 1 dec) x 6. (12)
Stuff the head and cheeks firmly with fiberfill. Pay attention to the cheek area so the face remains rounded rather than hollow.
Rnd 16: 6 dec. (6)
Fasten off. Weave the yarn tail through the front loops of the remaining stitches and pull tight to close the opening.

Give Mrs. Claus Her Full Skirt
Turn the doll completely upside down. Join Red yarn to the FLO of Rnd 8 of the body, just below the Gray or Black belt.
Working into these exposed front loops creates the skirt directly beneath the belt without disturbing the finished body above it.
Rnd 1: 36 sc in FLO around. (36)
Rnd 2: 36 inc. (72)
Rnds 3–5: 72 sc for 3 rounds. (72)
The second round doubles the stitch count, so the skirt should visibly flare outward from the waist. If it is lying flat at this stage, check that all 72 increases have been made.
Fasten off the Red yarn and join White yarn for the trim.
Rnd 6: 72 sc in White. Fasten off and weave in the ends.

Crochet the White Hair Cap and Raised Bun
Begin with White yarn. This section has an unusual sequence: the bun is formed first, then the stitch count expands outward to create the hair cap.
Rnd 1: Ch 2, 6 sc in 2nd ch from hook. (6)
Rnd 2: 6 inc. (12)
Rnd 3: (1 sc, 1 inc) x 6. (18)
Rnd 4: (2 sc, 1 inc) x 6. (24)
Rnds 5–6: 24 sc for 2 rounds. (24)
Rnd 7: (1 sc, 1 dec) x 8. (16)
Rnd 8: 8 dec. (8)
Rnd 8 completes the raised bun. From here, the pattern changes direction and starts spreading outward to form the cap that will cover the head.
Rnd 9: 8 inc. (16)
Rnd 10: (1 sc, 1 inc) x 8. (24)
Rnd 11: (3 sc, 1 inc) x 6. (30)
Rnd 12: (2 sc, 1 inc, 2 sc) x 6. (36)
Rnd 13: (5 sc, 1 inc) x 6. (42)
Rnd 14: (3 sc, 1 inc, 3 sc) x 6. (48)
Rnd 15: (7 sc, 1 inc) x 6. (54)
Sl st to fasten off, leaving a very long tail for sewing.
Keep the long tail intact because the entire outer edge of the 54-stitch cap will be sewn to the head.
Make the Curled Fringe
Make 2 curls with White yarn. The heavy stitch sequence naturally causes the strip to twist, so there is no need to manually curl it tightly.
Fringe: Ch 10; in the 3rd ch from the hook, work 3 dc, with the starting ch 2 counting as the first dc to give 4 dc in that stitch; work 4 dc in every remaining chain stitch to the end; fasten off, leaving a long sewing tail.
Make the second curl in the same way.
Crochet the Holly Cherries and Leaves
Cherries – Make 2
Use Red yarn.
Cherry Rnd 1: Ch 2, 5 sc in 2nd ch from hook. (5)
Cherry Rnd 2: 5 inc. (10)
Cherry Rnd 3: 10 sc. (10)
Cherry Rnd 4: 5 dec. (5)
Stuff each cherry very lightly with leftover yarn tails. Sl st to close and fasten off.
The light stuffing is intentional here: overfilling these tiny pieces can make them look more like balls than berries.
Leaf – Make 1 or 2
Use Green yarn.
Leaf: Ch 6; working down the chain, 1 sc, 1 hdc, 1 dc, 1 hdc, 1 sc; fasten off, leaving the tails available for tying to the hair.
Assemble and Add the Face
Attach the Hair Cap and Bun
Stuff the bun slightly before positioning it. Place the hair cap so the bun sits somewhat low on the back of the head.
Sew the outer edge of all 54 stitches firmly to the head. Work around the edge rather than pulling one area too tightly, so the cap sits smoothly over the head.
Position the Curls
Pin the two curls at the front of the face. Let the ends remain wavy while sewing the base chain flat across the forehead. This gives the fringe a styled look while keeping the curls securely framed around the face.
Embroider the Nose
Using Skin Color yarn, place the nose one round below the eyes, centered between them. Pass the yarn horizontally over 2–3 stitches several times until the nose reaches the desired size, then gently pinch it so it protrudes slightly.
Add the Eyeliner
Using thin Black DK yarn, embroider a small winged line extending from the upper outer corner of each safety eye. Keep both sides similar in length so the expression remains balanced.
Embroider the Smile
Use thin Red or Pink yarn. Place the smile directly below the nose and anchor it one round lower in the middle to create the gentle curve.
Before tying off, look at the face from a short distance. Small differences in the mouth curve or eyeliner length can noticeably change her expression, so adjust them now if needed.
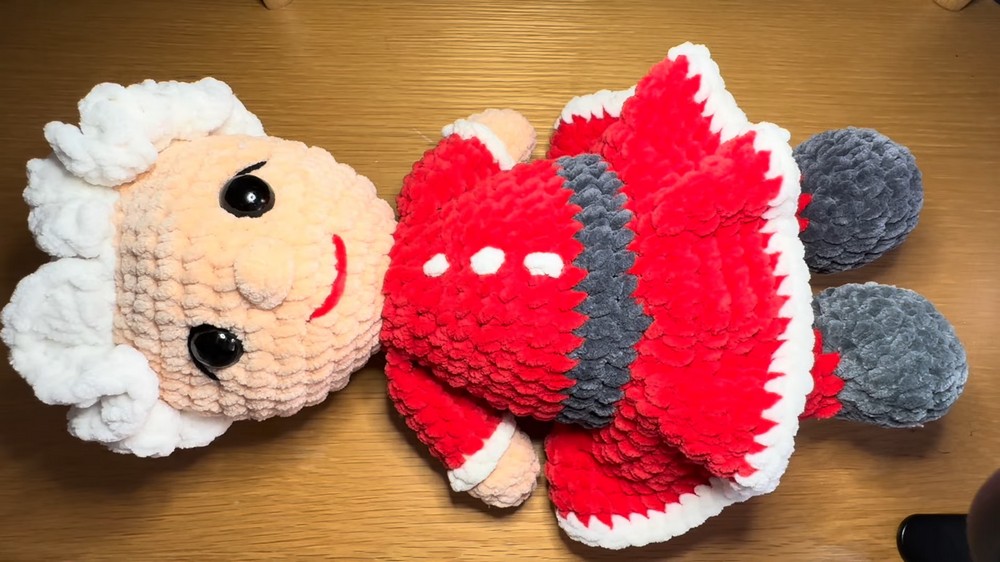
Add the Three Buttons
Using White yarn, embroider 3 small knots or vertical dashes down the red body. Keep the buttons separated by about 1 round.
For an alternate look, replace these embroidered buttons with a white apron as suggested in the customization options.
Finish With the Holly
Take the two red cherries and green leaves and use their yarn tails to tie them securely to the top rim of the white bun. Arrange the leaves and berries together so the decoration sits visibly above the hair rather than disappearing behind the bun.
Weave the remaining ends into the head.
Finishing Check
Once the holly is secure, gently squish and massage the head and body to distribute the fiberfill evenly. Check the face from the front, make sure the arms are sitting at matching heights, and confirm that the skirt hangs evenly around the body.
Your plush Mrs. Claus is now ready to sit alongside Santa for a cheerful holiday display.