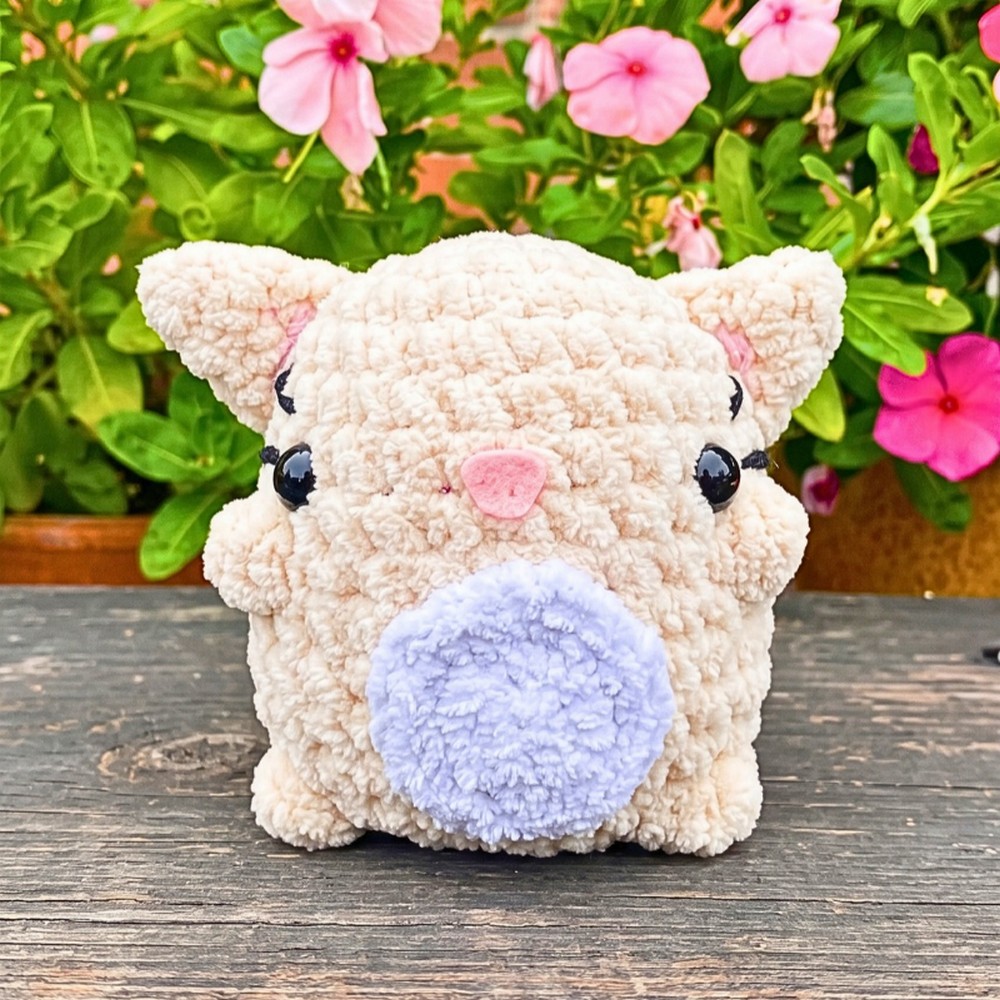
Want a palm-sized crochet kitty that feels extra squishy? Bobble-stitch paws, a fluffy belly, and a sturdy little tail give this cat its cuddly sitting shape.

Round cheeks, chunky paws, and a soft belly make this little crochet kitty especially appealing as a palm-sized desk companion. The paws are part of the body rather than separate pieces, so you get that cute four-paw look without having to sew individual legs into place afterward.
The pattern is worked mainly with simple single crochet and increases and decreases, with bobble stitches creating the paws along the way. You’ll also find the approximate finished size, color ideas, placement guidance for the eyes and ears, and stuffing tips that help the rounded body stay plump without losing its shape.
Credit Simple Crochet
Materials & Tools
- Soft plush yarn: Yarn Bee Velvety Smooth in Ivory for the body
- Fluffy accent yarn: Baby Bee Adore-A-Ball in Angel for the belly
- Crochet hook: 5.75 mm
- Safety eyes: 12 mm
- Pink felt: A small scrap for the nose
- Black worsted-weight yarn: A small amount for the whiskers
- Stuffing: Poly-fil
- Sewing needle
- Scissors
- Hot glue gun
Finished Size & Customization
The finished kitty is designed to be palm-sized and approximately 4–5 inches tall, although your exact size will vary with yarn tension.
For a different seasonal look, replace the ivory body yarn with black plush yarn and add orange accents for a Halloween cat. You can also leave out the felt nose and embroider a tiny pink Y-shaped nose and mouth instead.
Abbreviations
- MR: Magic Ring
- sc: Single Crochet
- inc: Increase – 2 sc in the same stitch
- dec: Decrease – join 2 stitches into 1
- BO: Bobble stitch – 5 double crochets worked into the same stitch
- sl st: Slip Stitch
- FO: Fasten Off
Before You Begin
This kitty is built around one rounded body, with the paws created directly into the body using bobble stitches. You will not make four separate legs.
The body also narrows quickly near the top, so stitch counting becomes especially important from the first round through the final decrease rounds. If you use plush yarn, the stitches can be harder to see than they are with smooth yarn; feel for the top loops with your hook rather than relying only on what you can see.
One count in the supplied tutorial needs special attention: R4 is shown as1 sc, inc (x6) (27), but that sequence does not mathematically produce 27 stitches from 18. The following body rounds are written for 27 stitches, so keep that intended count in mind and check the source tutorial at this point rather than silently changing the supplied pattern.
Crochet the Main Body
The first four rounds expand the starting ring into the rounded base. After that, several even rounds build height before the bobbles and closing decreases shape the kitty.
R1: 6 sc in MR (6)
Why this round matters: The six stitches form the tiny center from which the entire body grows. Keep the magic ring adjustable rather than leaving a large hole.
Visual check: You should have a very small circular starting point, not a flat wide circle yet.
R2: 6 inc (12)
Place 2 sc into each of the 6 stitches from R1. This doubles the stitch count and begins spreading the fabric outward.
After completing the round, pull the starting tail firmly to close the center hole. This is the best time to close it because the stitches are still easy to manipulate.
Visual check: The center should now be closed, with a small circular shape around it.
R3: [1 sc, inc] x6 (18)
Alternate one regular single crochet with one increase all the way around. Each repeat uses two stitches from the previous round and adds one new stitch, taking the count from 12 to 18.
Place your stitch marker in the first stitch so you can easily identify the beginning of the round.
Visual check: The piece should continue widening into a small, flat-to-rounded circle. If it starts curling sharply, check that your increases are going into the intended stitches.
R4: 1 sc, inc (x6) (27)
The tutorial displays this sequence with a final count of 27, although the written repeat and count do not mathematically agree. Because the subsequent body rounds are worked with 27 stitches, confirm the intended R4 count before moving forward.
Before continuing: Make sure your next round begins with the stitch count required by the remaining body pattern. This checkpoint is important because an incorrect count here will carry through every later round.
R5–R8: Sc around for 4 rows (27)
These four even rounds stop the outward expansion and start building the height of the kitty. Work one sc into every stitch without adding or removing stitches.
Visual check: By the end of R8, you should have a short, rounded tube rather than a flat disc. This is also the area where the eyes will eventually sit, so keeping the rounds even helps the face stay centered.

Add the Front Paws
The first pair of bobbles creates the front paws directly on the body. Their position matters because they should appear together across the front.
R9: 8 sc, BO, 9 sc, BO, 8 sc (27)
Work 8 sc, then make the first bobble in the next stitch. Continue with 9 sc, make the second bobble, then finish with 8 sc.
Why the bobbles matter: Each bobble replaces the need for a separately crocheted paw. The five-dc cluster pushes outward from the body and gives the paw its chunky raised appearance.
Placement check: Both bobbles should be on the same side of the body. If they appear too far apart or wrap around the sides, check that you started the round in the intended position.
Visual check: Looking at the body from the front, you should now be able to identify two raised front paws with regular stitches between them.
R10-R13: Sc around for 4 rows (27)
Continue one sc in every stitch. These rounds create the section between the front and back paws and maintain the body’s rounded height.
There are no increases here, so resist the temptation to add stitches if the plush fabric looks slightly snug. The shape is meant to remain compact.
Next orientation: After R13, you will create the second pair of bobbles. Keep the body facing the same way so the new bobbles can line up as the back paws.
Add the Back Paws
R14: 8 sc, BO, 9 sc, BO, 8 sc (27)
Work the second pair of bobbles using the same placement as R9. These become the back paws.
Why matching the placement matters: The front and back bobbles work together with the tail to create the balanced sitting shape. Keeping them aligned prevents the paws from looking randomly distributed around the body.
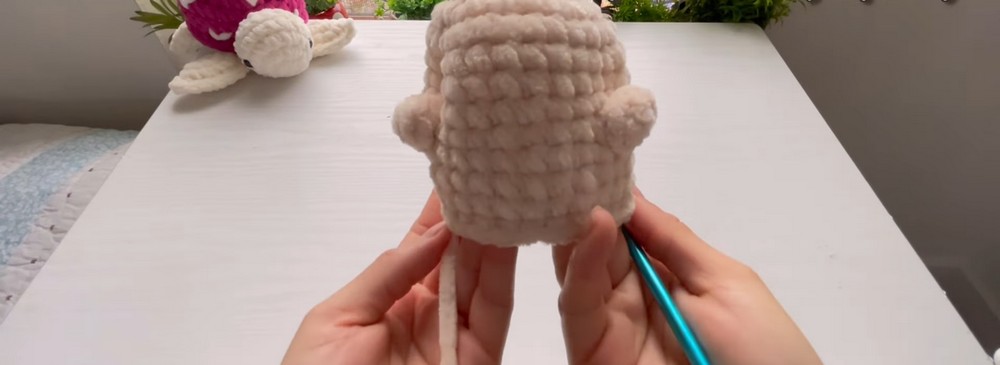
Visual check: You should now see two pairs of raised bobbles around the body. The body should still be mostly rounded and open at the top for the closing decreases.
Add the Eyes and Stuff the Body
R15: 13 dec, 1 sc (14)
This round reduces the body substantially, preparing the opening for the final closure.
Pause here before continuing. Insert the 12 mm safety eyes between R7 and R8, with approximately 7 stitches between them.
This placement is easier to judge while the body is still open and flexible. Look at the body from the front and make sure both eyes sit at the same height before securing them.
Once the eyes are positioned, begin adding Poly-fil.
Stuffing check: Start with smaller amounts and work the fiber into the bottom and sides before filling the center. The goal is a firm, rounded body, not a hard one. Overstuffing can stretch the plush stitches and make the face or paws look distorted.
Visual check: When you look at the body from the front, it should look full and rounded while the stitches remain comfortably closed.
R16: 7 dec (7)
The final decrease round reduces the opening to just 7 stitches.
Before closing, give the body one last squeeze. If one side feels noticeably softer or flatter, redistribute the existing stuffing now rather than trying to correct the shape after the opening is closed.
Finish: Fasten off, weave the yarn tail through the front loops of the remaining 7 stitches, and pull tightly to close the opening. Hide the tail inside the stuffed body.

Make the Fluffy Belly
The belly is a separate small circle that adds a soft contrast to the body and visually fills the space between the paws.
R1: 5 sc in MR (5)
R2: 5 inc (10)
R3: 1 sc, inc (x5) (15)
Finish with a sl st and fasten off.
Leave a long tail if you plan to sew the patch on. If using hot glue, you can fasten off completely.
Before attaching: Hold the patch against the body rather than sewing immediately. Its lower edge should sit between the front paws, with the patch centered beneath the face.

Make the Ears
Make 2 ears using the main plush yarn.
R1: 4 sc in MR (4)
R2: 4 inc (8)
R3: Sc around (8)
Fold the piece in half and sc 4 across the bottom to close the ear. Fasten off and leave a long tail for sewing.
Repeat for the second ear.
Shape check: The ears should be small and compact. Before sewing them onto the head, compare the two pieces side by side so their folded edges and overall shapes match.

Make the Tail
The tail is short and chunky, and its final position has a practical purpose as well as a decorative one.
R1: 4 sc in MR (4)
R2-R5: Sc around for 4 rows (4)
Fold the piece in half and sc 2 across the bottom to close it. Fasten off and leave a long tail for sewing.
Do not worry if the tail looks very short before attachment. Its placement on the lower back allows it to act as a small support behind the seated body.

Assemble the Kitty
Position the Face Details
Cut a tiny triangle from the pink felt.
Hold it between the eyes first and check the position from straight on. Once centered, secure it with the hot glue gun.
If you are embroidering the face instead, stitch the small pink Y-shaped nose and mouth in the same central area.
Add the Whiskers
Thread the sewing needle with black worsted-weight yarn.
Stitch two small, slanted lines along the outer edge of each eye. Keep the whiskers on both sides at similar heights so the face remains balanced.
Tie the yarn ends together and hide them inside the body.
Face check: Before moving on, look at the kitty from a short distance. Small asymmetries are much easier to notice now than after all the other pieces are attached.
Attach the Belly
Place the fluffy belly patch in the lower center of the body, directly between the front paws.
Check that it is centered beneath the face and that the paws remain visible on both sides.
Sew the patch in place using its long yarn tail, or attach it securely with hot glue.
Attach the Ears
Position the ears on the upper sides of the head, spanning approximately R4 through R7.
Do not sew them immediately. First hold both ears in position and compare their height and angle from the front.
Once they look even, sew them securely with their long tails.
After attachment, gently pinch each tip. You can leave them rounded for a softer kitty expression or pinch them more firmly to create sharper ears.

Attach the Tail
Place the tail at the lower center of the back and sew it securely.
Set the kitty on a flat surface before hiding the yarn tail. The tail should touch the surface enough to help support the body without forcing the kitty forward.
If the cat tips backward, adjust the tail’s angle slightly before finishing the sewing.
Final Shape Check
Give the kitty a final check from the front and side.
- The body should remain rounded and firmly stuffed.
- The two front bobbles should read as front paws.
- The two back bobbles should remain balanced with them.
- The eyes should sit at an even height.
- The belly should be centered between the front paws.
- The ears should have similar height and angle.
- The tail should help the kitty sit flat without tipping backward.
- All yarn tails should be securely hidden.
Once these points look right, your chunky crochet kitty is ready to sit on a desk, shelf, or anywhere that could use a tiny squishy companion. The bobble paws are worked directly into the body, so the finished cat keeps its rounded look while avoiding the extra sewing that separate legs would require.