
Here’s a cuddly crochet Christmas gnome with a tall red hat, fluffy beard, white trim, and tiny pom-pom—plus a simple trick for giving his hat a floppy shape.
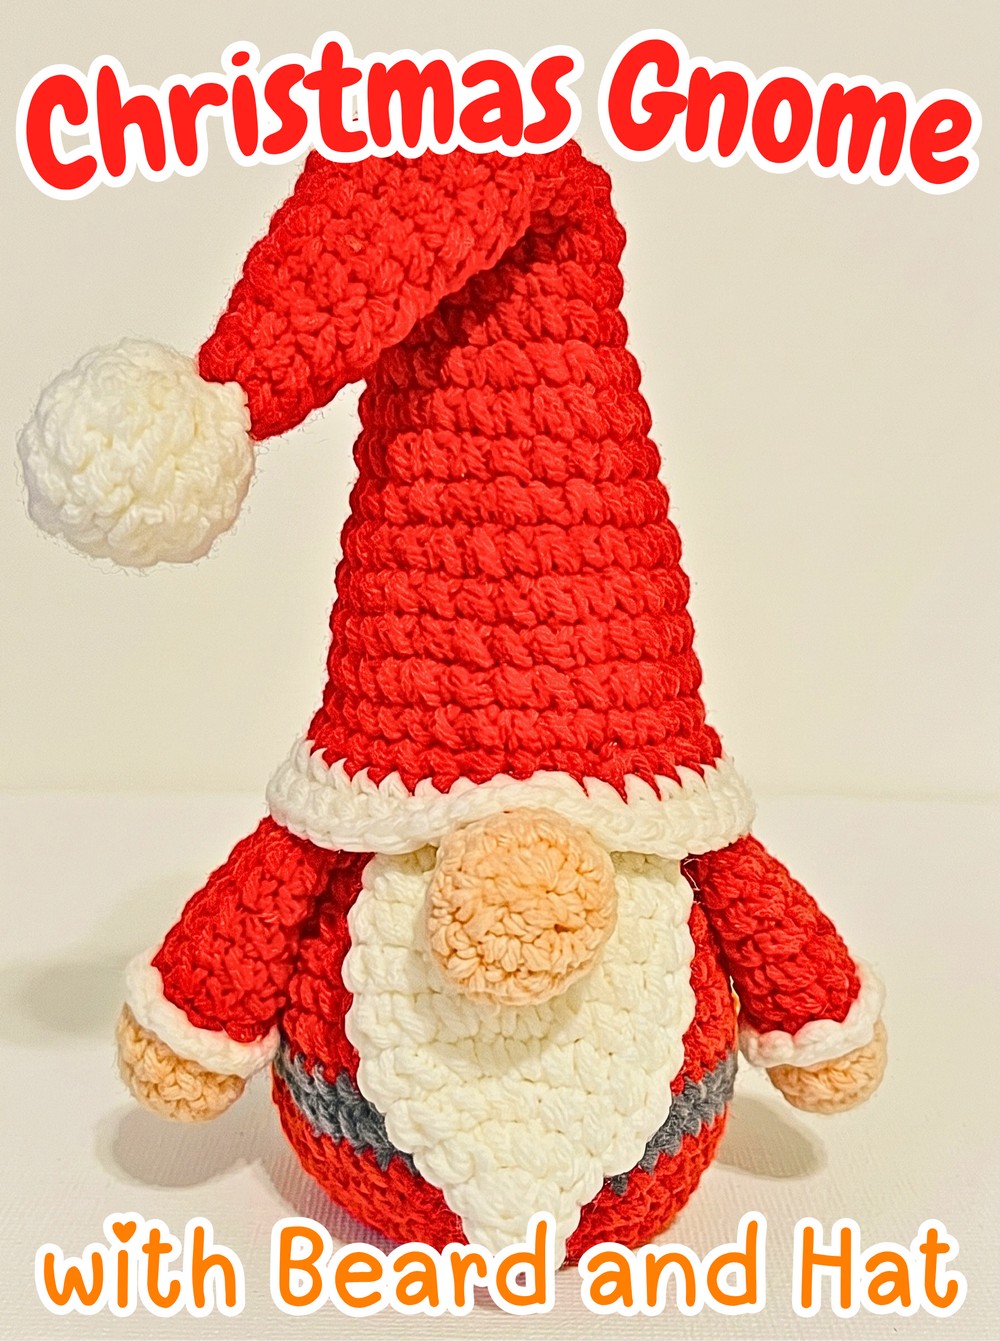
Plush yarn gives this little crochet gnome a wonderfully soft appearance, while the red-and-white color combination brings out his classic Christmas character. His rounded body, oversized hat, beard, and small nose make him especially fun to display on a shelf, mantel, or holiday table.
You’ll crochet the arms, beard, nose, body, hat brim, and bobble separately before sewing the pieces together. The body and hat are worked as one top-down piece, and the stuffing is deliberately handled in two ways: fill the body firmly while leaving the pointed crochet hat section empty so it can bend naturally.
Credit Keep Calm and Crochet
Materials & Tools Needed
- Plush Yarn: Red, white, gray, or black for the belt, and skin color
- Crochet Hook: 5.5 mm
- Notions: Stitch marker, darning needle, and scissors
- Stuffing: Fiberfill
Finished Look & Hat Customization
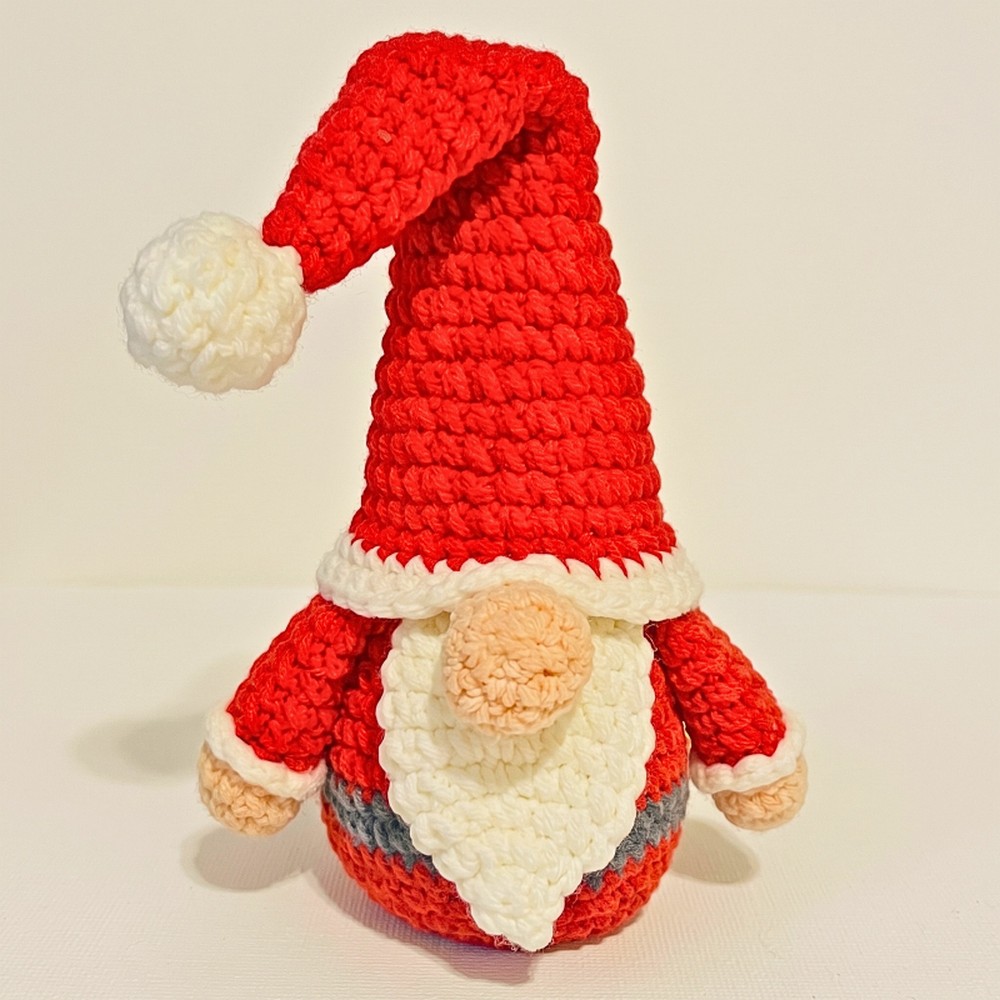
The finished gnome has a tall pointed hat and a rounded, stuffed body. One of the nicest details is that the hat can be made poseable simply by controlling where you put the fiberfill.
When stuffing the body and head, leave the pointed part of the hat empty. The unfilled section can then be gently folded over to create a droopy or bent hat rather than standing completely upright.
Pattern Abbreviations
- ch: Chain
- sc: Single crochet
- inc: Increase – 2 sc in the same stitch
- dec: Decrease – single crochet 2 stitches together
- sl st: Slip stitch
- BLO: Back Loops Only
- FLO: Front Loops Only
- FO: Fasten off
Crochet the Gnome
Make the Arms
Make 2 arms using skin-color yarn for the hand and red yarn for the sleeve. The first four rounds shape the hand before the red sleeve begins.
Round 1: Using skin-color yarn, ch 2. Work 6 sc in the 2nd ch from the hook. (6 sts)
The six stitches create the small foundation for the hand. Keep the center compact so the finished hand does not develop a large hole.
Round 2: 6 inc. (12 sts)
The increases double the stitch count and widen the hand. Make sure all six increases are evenly placed around the round.
Round 3: 12 sc. (12 sts)
Work evenly around the 12 stitches. The hand should now have a short, rounded section rather than continuing to widen.
Round 4: (2 sc, dec) 3 times. (9 sts)
The decreases narrow the hand toward the wrist. Check that you have nine stitches before changing colors.
Sl st in the next stitch to finish the skin-color section.

Change to the Red Sleeve
Attach red yarn in the BLO of the opposite side from where you fastened off.
Round 5: Ch 1, 1 sc in the same stitch. Work 8 more sc in BLO around. (9 sts)
Working into the back loops creates the transition between the skin-colored hand and the red sleeve. Make sure you work all nine stitches so the sleeve begins with the same circumference as the wrist.
Rounds 6–10: Work 9 sc around for 5 rounds. (9 sts)
These plain rounds create the length of the sleeve. Keep the arm narrow and evenly filled rather than overstuffing it, since it needs to remain flexible enough to position beside the body.

Close and Stuff the Arm
Stuff the arm three-quarters full with fiberfill. The stuffing should give it shape without making it completely rigid.
Flatten the top opening, insert your hook through both sides, and work 4 sc across to close it. Fasten off and leave a long tail for sewing.
Add the White Fur Cuff
Turn the arm so the unworked front loops from Round 4 face you. Attach white yarn to the FLO, ch 1, and work 9 sc around.
Sl st to the first sc to join. Fasten off and weave in the ends.
The white cuff should sit around the wrist transition, with the red sleeve extending above it and the skin-colored hand below.
Crochet the Beard
Use white yarn. The beard is worked as a small flattened piece and is not stuffed.
Round 1: Using white yarn, ch 2. Work 6 sc in the 2nd ch from the hook. (6 sts)
Round 2: 6 sc. (6 sts)
Round 3: 6 inc. (12 sts)
The increases expand the beard into a wider shape. Keep the center closed and the stitches even so the piece stays compact.
Round 4: (1 sc, inc) 6 times. (18 sts)
Rounds 5–9: 18 sc around for 5 rounds. (18 sts)
After Round 9, the beard should have enough length and width to form the fluffy face covering. Do not add stuffing.
Flatten the opening and insert your hook through both sides. Work 9 sc across to close it, then fasten off and leave a long tail for sewing.

Make the Nose
Use skin-color yarn.
Round 1: Ch 2. Work 6 sc in the 2nd ch from the hook. (6 sts)
Round 2: 6 inc. (12 sts)
Rounds 3–4: 12 sc around for 2 rounds. (12 sts)
Round 5: (1 sc, dec) 4 times. (8 sts)
The decreases bring the nose toward a smaller opening while keeping its rounded shape.
Sl st in the next stitch. Fasten off, leaving a long tail, and stuff the nose firmly with fiberfill. A firm filling helps the little nose remain raised once it is sewn over the beard.

Crochet the Body and Hat in One Piece
Use red yarn and the 5.5 mm hook. This section is worked from the pointed top downward, so the early narrow rounds form the hat while the later increases create the wider body.
Round 1: Using red yarn, ch 2. Work 6 sc in the 2nd ch from the hook. (6 sts)
Round 2: 6 sc. (6 sts)
Round 3: (1 sc, inc) 3 times. (9 sts)
Rounds 4–7: 9 sc around for 4 rounds. (9 sts)
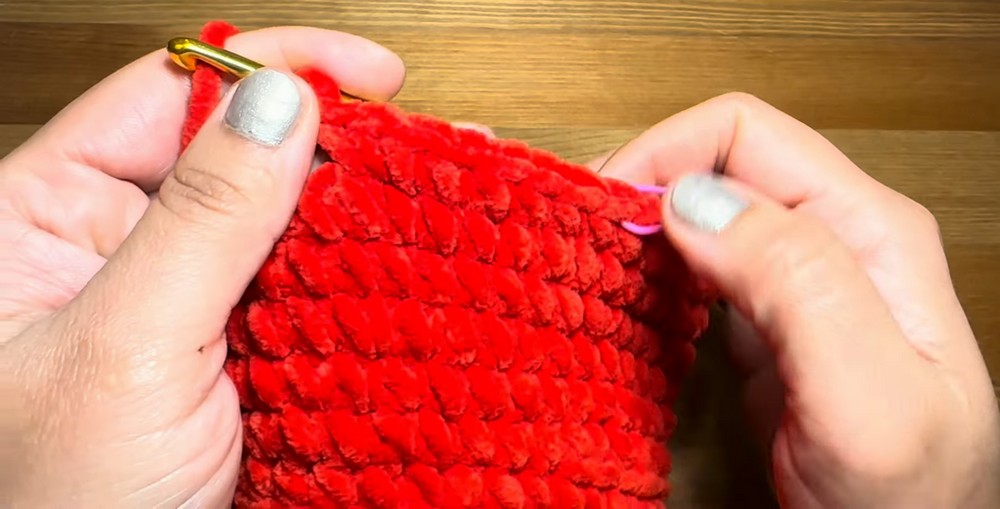
The narrow section should now resemble the beginning of the pointed hat. Keep the stitches firm and even so the tip remains defined.
Round 8: (2 sc, inc) 3 times. (12 sts)
Rounds 9–11: 12 sc around for 3 rounds. (12 sts)
Round 12: (3 sc, inc) 3 times. (15 sts)
Rounds 13–14: 15 sc around for 2 rounds. (15 sts)
Round 15: (4 sc, inc) 3 times. (18 sts)
Round 16: 18 sc. (18 sts)
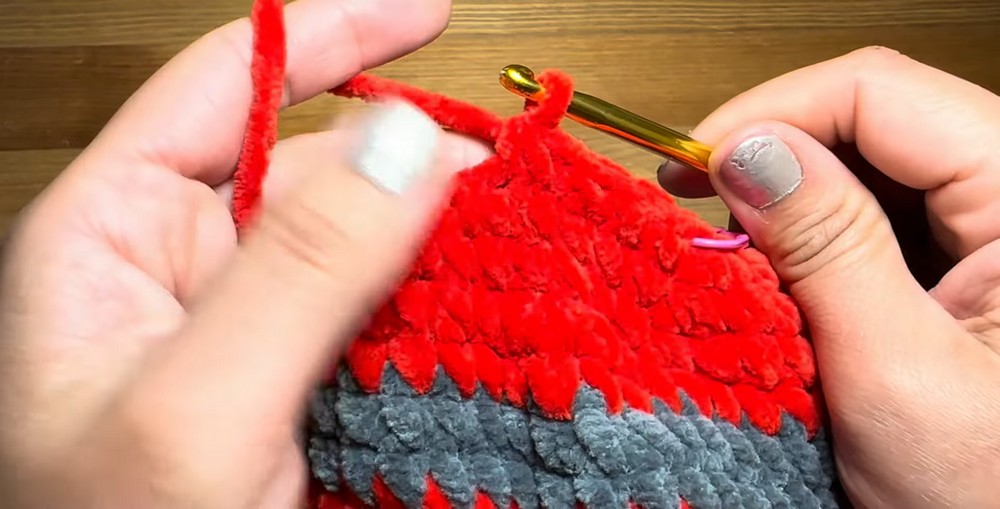
The repeated increase-and-plain-round rhythm gradually widens the hat and transitions toward the larger body. Check your stitch count at each increase round; the shape should expand progressively rather than suddenly flare.
Round 17: (2 sc, inc) 6 times. (24 sts)
Rounds 18–19: 24 sc around for 2 rounds. (24 sts)
Round 20: (3 sc, inc) 6 times. (30 sts)
Rounds 21–23: 30 sc around for 3 rounds. (30 sts)
Round 24: (4 sc, inc) 6 times. (36 sts)
Round 25: 36 sc. (36 sts)
By this point, the piece should be substantially wider and beginning to resemble the main body beneath the tall hat.

Create the Hat Brim Line
Round 26: 36 sc in BLO. (36 sts)
This BLO round creates the line that separates the red hat section from the later brim area. Work into only the back loops and keep all 36 stitches accounted for.
Rounds 27–28: Work 36 sc around in full stitches for 2 rounds. (36 sts)
The body continues below the hat line. The fabric should now be wider and more rounded than the earlier pointed section.
Round 29: (5 sc, inc) 6 times. (42 sts)
Rounds 30–31: 42 sc around for 2 rounds. (42 sts)
Round 32: (6 sc, inc) 6 times. (48 sts)
Round 33: 48 sc. (48 sts)
Sl st to fasten off the red yarn.
Add the Belt
Attach gray yarn.
Rounds 34–35: Work 48 sc around for 2 rounds. (48 sts)
The two gray rounds form the belt section around the gnome’s body. Keep the color-change join as neat as possible because this band will remain visible between the red sections.
Sl st to fasten off the gray yarn.
Round 36: Attach red yarn. Work 48 sc around. (48 sts)
Now begin stuffing the body firmly with fiberfill.
There is one important exception: do not fill the pointed hat section. Keep that upper portion empty so the hat can be bent or folded after the gnome is finished.
Shape and Close the Body
The remaining rounds decrease steadily to close the bottom.
Round 37: (6 sc, dec) 6 times. (42 sts)
Round 38: (5 sc, dec) 6 times. (36 sts)
Round 39: (4 sc, dec) 6 times. (30 sts)
Round 40: (3 sc, dec) 6 times. (24 sts)
Round 41: (2 sc, dec) 6 times. (18 sts)
Round 42: (1 sc, dec) 6 times. (12 sts)
Round 43: 6 dec. (6 sts)
The body should become progressively narrower as you work these rounds. Keep checking the stuffing as the opening shrinks, adding or redistributing fiberfill if needed so the body stays evenly rounded.
Work 1 more dec to make the hole as small as possible. Sl st to fasten off, then use your hook or darning needle to push the tail inside the body.
Crochet the Hat Brim
Turn the body upside down so the pointed part of the hat is facing you. The unworked front loops from Round 26 should now be visible.
Attach red yarn to the FLO from Round 26.
Round 1: Ch 1, work 36 sc around the front loops. (36 sts)
Sl st to fasten off the red yarn.
This round creates the foundation for the fluffy white brim. Make sure you work around all 36 exposed front loops so the brim sits evenly around the hat.
Round 2: Attach white yarn. (8 sc, inc) 4 times around. (40 sts)
The increases gently expand the white brim beyond the 36-stitch red foundation.
Round 3: 40 sc. (40 sts)
Sl st to fasten off and weave the tail into the brim.
The white section should now form a soft, wider band around the base of the hat. Flip it upward temporarily when you need to attach the arms and beard.

Make the White Bobble
Use white yarn.
Round 1: Ch 2. Work 6 sc in the 2nd ch from the hook. (6 sts)
Round 2: 6 inc. (12 sts)
Rounds 3–4: 12 sc around for 2 rounds. (12 sts)
Add a tiny amount of fiberfill. It only needs enough stuffing to give the bobble a rounded appearance.
Round 5: 6 dec. (6 sts)
Sl st to fasten off and leave a long tail. Use a darning needle or additional decreases to pinch the remaining gap completely closed.
Assemble the Gnome
Sew on the Bobble
Use the long tail to sew the white bobble securely to the very tip of the hat.
Take several secure stitches through the bobble and hat tip rather than relying on a single pass. Hide the final tail inside the bobble once it is firmly attached.
Attach the Arms
Flip the white hat brim upward so the red rows beneath it are visible.
Position the arms between Rounds 2 and 3 below the brim, with approximately 10 stitches between them.
Sew each arm to the body by catching one stitch of the body and one stitch of the arm. Go through each stitch twice to keep the attachment secure.
Before finishing the sewing, look at the gnome from the front. Both arms should sit at approximately the same height and angle.
Sew on the Beard
Center the beard directly between the two arms, using the same area of the body between the specified rounds below the brim.
Sew the flat top edge securely onto the body. Keep the beard centered beneath the hat rather than allowing it to drift toward either arm.
Add the Nose
Place the nose directly over the top center of the beard, with the nose’s fasten-off tail pointing downward.
Sew completely around the perimeter of the nose to secure it to the beard and body. Take small stitches around the edge so the nose remains raised and neatly attached.

Shape the Finished Hat
Once all the pieces are sewn on, flip the white brim back down into its finished position.
Give the gnome a gentle squeeze to distribute the stuffing evenly through the body. Since the pointed hat was deliberately left empty, you can now bend the top section over to create a soft, droopy pose.
For a more upright appearance, leave the hat mostly straight. For a playful floppy look, gently fold the empty tip to one side.



One Comment