Here’s a festive crochet holly leaf with bright berries that comes together in simple steps and adds a handmade Christmas touch to any decoration.

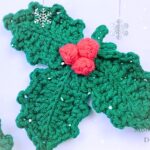
A classic holly leaf can instantly make handmade Christmas decorations feel more special. This crochet design combines three pointed leaves with round red berries to create a timeless holiday accent that looks beautiful on trees, gift wrapping, wreaths, and seasonal displays. The neat shaping and bright colors make every crochet stitch feel worthwhile.
The crochet pattern is worked with simple stitches, making each section easy to follow from start to finish. First, the leaves are shaped with decorative points, then the berries are made separately, lightly stuffed, and joined together to complete the festive arrangement. The final assembly brings every piece together into a polished Christmas decoration you’ll be excited to finish.
Cretid Crochet Anywhere
Techniques & Key Stitches Used
- Working in the round
- Chain (ch)
- Single crochet (sc)
- Half double crochet (hdc)
- Double crochet (dc)
- Treble crochet (tr)
- Slip stitch (sl st)
- Stitch increases (inc)
- Stitch decreases (dec)
- Magic ring (Mr)
Materials Needed
- Yarn: Green (for leaves) and red (for berries)
- Stuffing material: For berries
- Tools: Crochet hook, darning or sewing needle
Tools Required
Crochet hook
Darning/sewing needle
Gauge
Not specified.
Finished Size/Measurements
Not specified.
Abbreviations & Terminologies
ch: chain
sc: single crochet
hdc: half double crochet
dc: double crochet
tr: treble crochet
sl st: slip stitch
inc: increase
dec: decrease
Mr: magic ring
R: round/row
*: repeat instruction specified number of times
Helpful Tips Before You Start:
Ensure you have a needle on hand to close up the berries securely and assemble the leaves together at the end. Keep your stuffing handy for creating firm, round berries.

Pattern Overview & Making Process
The pattern begins by making one leaf from a foundation chain. Stitches gradually increase in height to shape the center before continuing around the opposite side of the chain. A second round adds the signature pointed edges using small chain loops and slip stitches. Repeat these steps to make three matching leaves.
Each berry starts with a magic ring and grows through a round of increases before several even rounds create its rounded shape. After light stuffing, decrease stitches close the opening, and the yarn tail is pulled tight to secure each berry. Make three berries following the same instructions.
To finish, arrange the three leaves in a fan shape and place the berries together at the center. Sew all pieces securely using the yarn tails, then wrap the remaining ends together to form a neat stem. The completed holly leaf decoration is ready to use for Christmas ornaments, gift wrapping, or other festive displays.
Step-by-Step Pattern Instructions
Holly Leaf Pattern
- R1:
- Chain 13.
- Starting in the second chain from the hook, work down the chain:
- 1 sc, 1 hdc, 1 dc, 3 tr, 2 dc, 2 hdc, 1 sc.
- Turn to work along the opposite side of the chain and continue:
- 3 sc in the end space, then repeat the following down the opposite side:
- 1 sc, 2 hdc, 2 dc, 3 tr, 1 dc, 1 hdc, 1 sc.
- 3 sc in the end space, then repeat the following down the opposite side:
- Join to the first stitch with a sl st.

- R2:
- Chain 1. Work pointed holly tips along the edges:
- [3 sc, 2 ch, sl st back into base of chain to form a point] repeat 3 times.
- Then, 4 sc, 3 ch, sl st back into base of chain, 1 sc.
- Continue: [3 sc, 2 ch, sl st back into base of chain] repeat 2 times, 3 sc. Join with sl st to finish leaf shape.
- Chain 1. Work pointed holly tips along the edges:
- Repeat: Make 3 leaves using the above instructions.

Berry Pattern
- R1:
- Start with a magic ring (Mr) and work 6 sc into the ring.
- R2:
- 6 inc (increase in every stitch) – 12 sc total.
- R3–R5:
- Work 12 sc evenly around for three rounds.
- Stuff the berry lightly using stuffing material.
- R6:
- 6 dec (decrease around) – 6 sc total.
- Closure:
- Fasten off, leaving a long tail. Use the tail with a darning needle to weave through the remaining stitches. Pull tight to close completely.
- Repeat: Make 3 berries using this pattern.

Assembly Instructions
- Arrange the three leaves in a fan-like shape so they radiate outward dynamically.
- Position the three berries closely together in the center of the leaf arrangement.
- Use the yarn tails and a darning needle to securely attach the berries and leaves at their central meeting point.
- Wrap any remaining threads together at the base to form a unified stem.

Customization Tips
Feel free to tweak the design:
- Use metallic or sparkly yarn for added shimmer.
- Adjust the number of leaves or berries for different styles (e.g., larger or smaller ornaments).
Troubleshooting & Notes
- Keeping Shapes Consistent: Use firm tension and count stitches carefully to ensure a uniform look.
- Closing Berries: Be sure to weave and pull the yarn tail tightly to fully close the berry tops.
Pattern Variations & Modification Ideas
No pattern variations were provided in this tutorial.
Conclusion
Congratulations! You’ve made a festive Christmas Holly Leaf ornament that’s ideal for holiday decor, gift wrapping, or seasonal crafting fun. Let your handmade project bring joy and warmth to everyone this holiday season!