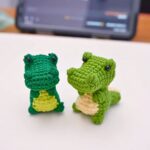
This adorable crochet frog is an easy-to-make, no-sew plushie that’s perfect for anyone looking to create something cute and fun. Whether you want a playful keychain, a thoughtful gift, or a cute decoration for your desk or room, this mini frog brings instant joy with its round eyes, tiny legs, and soft, squishy body.
Crochet Frog Amigurumi Pattern

No sewing required for this crochet frog pattern! You’ll crochet the body, arms, and details all at once, making it perfect for beginners. Using simple materials like yarn, stuffing, safety eyes, and a crochet hook, you’ll create a little frog that you can customize by switching yarn colors or even making larger or smaller versions. Add embroidery for a smiley face and, if you like, turn it into a keychain with a simple jump ring. It’s a great introduction to the basics of crocheting plushies without feeling overwhelming.
Credit stitchingwithsab
Materials & Tools Needed
Here is everything you will need to make the crochet frog:
- Yarn:
- Worsted weight yarn in green (main body) and cream (stomach).
- Optional: Velvet yarn for a different texture.
- Hook:
- 2.75mm crochet hook (recommended is Clover brand).
- Stuffing:
- Polyfill stuffing or any fiber filling (you can use yarn scraps as an alternative).
- Safety Eyes:
- 3mm safety eyes (available on Amazon).
- Glue:
- Fabric glue (Sabrina recommends glue from Daiso).
- Embroidery Thread:
- Black for the frog’s mouth.
- Needles:
- Yarn needle (large) for sewing the ends.
- Embroidery needle (small) for stitching the mouth.
- Scissors:
- For trimming yarn/thread.
- Stitch Marker:
- Optional but helpful for marking rounds. A paperclip works as well.
- Keychain Supplies:
- Jump rings (optional) for turning your frog into a keychain.
- Wooden Dowel or Pencil:
- Useful for poking out the shaped bobble stitches.

Crochet Instructions
The steps below will guide you through each part of the frog:
Step 1: Starting the Body
- Round 1:
Create a magic ring and make 6 single crochets (SC) into the ring. Pull the short tail to close the ring tightly. (Total: 6 stitches) - Round 2:
Place a stitch marker in the first stitch to keep track.- Increase in every stitch around. (2 SC per stitch).
(Total: 12 stitches)
- Increase in every stitch around. (2 SC per stitch).
- Round 3:
- Transition to shaping the eyes and increase size:
- SC in the first stitch, increase in the second stitch.
- Work a bobble stitch (to form the first eye). Follow these steps for the bobble stitch:
- Yarn over, insert hook into stitch, pull through, yarn over, and pull through the first 2 loops. Repeat this process until there are 6 loops on the hook, then yarn over and pull through all loops.
- Adjust the bobble to shape it as an eye.
- SC twice, increase in the next stitch. Repeat the above sequence for the second eye.
(Total: 18 stitches)
- Transition to shaping the eyes and increase size:

Step 2: Increasing the Shape of the Body
- Round 4:
- SC in the first stitch, increase in the second stitch.
- Repeat a sequence of 2 SC, followed by an increase.
(Total: 24 stitches)
- Round 5:
- Increase every few stitches, following this pattern:
- 3 SC followed by increase.
(Total: 30 stitches)
- 3 SC followed by increase.
- Increase every few stitches, following this pattern:
Step 3: Adding Arm Details
- Round 6:
Begin color changes for the stomach design:- SC 6 stitches in green yarn.
- Work a partial bobble stitch to create the first arm (same method as the bobble stitch but stop after reaching 4 loops). Repeat for the other arm.
- Switch to cream yarn for the stomach. SC 5 stitches.
- Switch back to green yarn and complete the round with 12 SC in green.

Step 4: Shaping the Frog’s Body
- Rounds 7–9: Repeat the same pattern as Round 6:
- SC 11 stitches in green yarn.
- Switch to cream yarn and SC 7 stitches.
- Switch back to green yarn to complete the last 12 stitches.
- Round 10:
- SC 12 stitches in green yarn.
- Switch to cream yarn and SC 6 stitches.
- Finish the round with 12 stitches in green yarn.
- Cut and secure the cream yarn tail with a double knot.
Step 5: Adding Legs
- Round 11:
Begin shaping the legs using partial bobble stitches and regular decreases. Follow this pattern:- 3 SC, decrease.
- 2 SC, partial bobble stitch (leg), decrease.
- 3 SC, regular decrease.
- Repeat sequence twice to transition the second leg. (Total: 24 stitches)

Step 6: Closing the Body
- Round 12:
- Decrease all the way around by using invisible decreases (insert hook in front loops of two stitches, yarn over, pull through both loops, yarn over, pull through remaining loops).
(Total: 12 stitches)
- Decrease all the way around by using invisible decreases (insert hook in front loops of two stitches, yarn over, pull through both loops, yarn over, pull through remaining loops).
- Round 13:
- Decrease all the way around again. (Total: 6 stitches)
- Slip stitch the first stitch, pull through, and cut yarn.
- Use remaining yarn tail to close the hole by threading through the front loops of the last round, pulling tight to close. Finish off securely.
Step 7: Adding Facial Features
- Eyes:
- Position 3mm safety eyes carefully into the bobble stitches (frog eyes).
- Secure with glue to ensure they remain in place.
- Mouth:
- Use black embroidery thread to stitch a V-shaped smile.
- Insert the needle at a random spot, thread through to form the curve of the mouth, and secure the thread in place with a knot.
Finishing Touches
- Ensure the frog’s body is fully stuffed. Use extra filling for a plumper appearance.
- Add jump rings to turn your frog into a keychain if desired.

Optional Variations
- Experiment with yarn textures like velvet or thicker yarns to make a plushier or larger frog.
- Try different color combinations (e.g., purple for a whimsical frog).